Search models, users, collections, and posts

Cat eyeglass holder

IP Report

Print Profile(5)

All
A1 mini
P1S
P1P
X1
X1 Carbon
X1E
A1
H2D
H2D Pro
H2S
P2S
H2C
X2D
A2L

cat- lightning infill
Designer
7.1 h
1 plate
4.9(579)

Eyes monochrome assembly No AMS required
3.2 h
2 plates
4.9(252)

4 color, 0.2mm layer, 2 walls, 40% infill
10.3 h
1 plate
4.8(74)

smaller glasses,0.2mm layer, 3 walls, 40% infill, solid base
8.4 h
1 plate
4.9(24)
Click to see more

Open in Bambu Studio
Boost
5600
14828
1078
786
13.8 k
7.2 k
Released 

Description

Membership

Wanna sell this cute cat? now you can =D

Join

Boost Me (for free)

A small click for the user, a big step for the creator


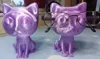
Cute eyeglasses holder, for multicolor prints


Comment & Rating (1078)

(0/1000)

Print Profile
Eyes monochrome assembly No AMS required
Printed nicely. I added some 30mm Glass Cabachon eyes and they fit almost perfectly. Printed with Fuzzy Skin and added a negative part cylinder to create a hole to put my pens in so they don't roll off my desk.
37
Reply
how did you make the cat have all those colors? is there a tutorial for it
Show original
0
Reply
Replying to @user_3735935819 :
I want to know as well, but I suppose it's just some plastic ready to glue eyes.
0
Reply
the color is the multicolored filament
(Edited)
2
Reply
Absolutely fantastic... with a touch of pink
Show original
27
Reply
Did you paint it afterward or print it like that?
Show original
0
Reply
Would love this as an STL if you have it!
1
Reply
Replying to @user_304100071 :
Printed with pink filament as shown in the image
Show original
1
Reply
Print Profile
cat- lightning infill
Printed it in multi-color and added a negative space to hold pencils.
profile
20
Reply
share this print file with me so I can do that too lol
(Edited)
1
Reply
Please share this model. I loved its furry design and pencil holder
Show original
0
Reply
Replying to @Sergio.Jr :
I shared it above. :)
0
Reply
so cute 🩷 made mine detailed
15
Reply
What did you use for the color
Show original
1
Reply
First of all, great model, love it! Small question/suggestion: would it be possible to separate the eyeballs and irises and create a multi-part object? It would make it easier to re-assign colors, or print the eyeballs separately and glue them back in to reduce flushing waste.
(Edited)
The designer has replied
16
Reply
yes its possible, but is very demanding doing this in the modeling process, problably i will do it on the next models ;)
4
Reply
Replying to @Bulbo :
Yes I would also be interested in a cat with separate parts, it would help reduce waste and print time
7
Reply
Replying to @Bulbo :
Hi @Bulbo , U have other contact? here I`m not send pv because my low level. And I need talk with u.
0
Reply
Print Profile
cat- lightning infill
after the head falling off, clogging the poopshoot, and the print head falling off, it was almost done printing. I cleaned it up and reprinted it, looks good and my wife likes it.
The profile uploader has replied
profile
2
Reply
So you screwed it, so you gave it a bad rating. Trolls everywhere.
(Edited)
3
Reply
its there any advice in the profile that can a change to avoid this kind o clogging?
0
Reply
keep an eye on the shute to make sure the parts are falling into your bin when it starts switching colors back and forth.
0
Reply
Print Profile
Eyes monochrome assembly No AMS required
I printed a cute cat for my partner, just with different eyes
Show original
7
Reply
Print Profile
cat- lightning infill
Super, my wife is delighted
Show original
3
Reply
This is a must-have and very functional. Thanks
3
Reply
Print Profile
cat- lightning infill
thank you for this model I love it Would you by any chance be able to help me I have a line appearing on its head What could that be due to
Show original
0
Reply
This comes from the extruder, that's where it always starts printing. For models that are round, you need to set the seam option to "Random" in the quality settings and then re-slice the print plate
(Edited)
Show original
1
Reply
Replying to @RalphS78 :
Thanks, i will try :)
0
Reply

License

If you want to use this model commercially, please join my membership.
Join Now
This user content is licensed under a Standard Digital File License.

You shall not share, sub-license, sell, rent, host, transfer, or distribute in any way the digital or 3D printed versions of this object, nor any other derivative work of this object in its digital or physical format (including - but not limited to - remixes of this object, and hosting on other digital platforms). The objects may not be used without permission in any way whatsoever in which you charge money, or collect fees.