Search models, users, collections, and posts

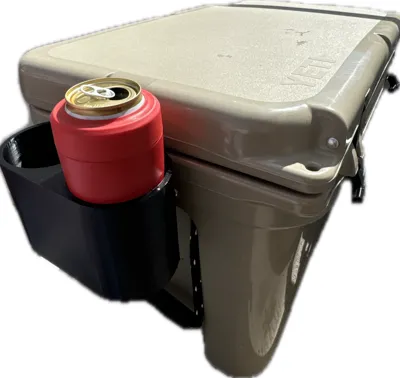
Yeti Cooler Cup Holder

Print Profile(2)

All
X1 Carbon
A1
P1S
P1P
H2D Pro
H2S
P2S
X1
H2C
A1 mini
X1E
H2D
X2D
A2L

0.2mm layer, 2 walls, 25% infill
Designer
7.8 h
2 plates
4.7(6)

No Hardware Update (Dovetail)
Designer
6.9 h
2 plates
5.0(1)

Open in Bambu Studio
Boost
170
498
25
9
247
145
Released 

Bill of Materials

Maker's Supply Kits and Parts
Select all
M4x20 BHCS Machine Screw (5PCS) - AA068
M4 Carbon Steel Hex Nut (10PCS) - AB028

Description

Boost Me (for free)

Want to provide extra support? Boost me if you liked this model. 

A Yeti cooler attachment that allows you to add cup holders to either side of the cooler. The holder slots into the holes designed to secure the cooler in place. This allows for the cooler to be closed and latched with the cup holder installed. The holder is designed to fit the Yeti Colster. 

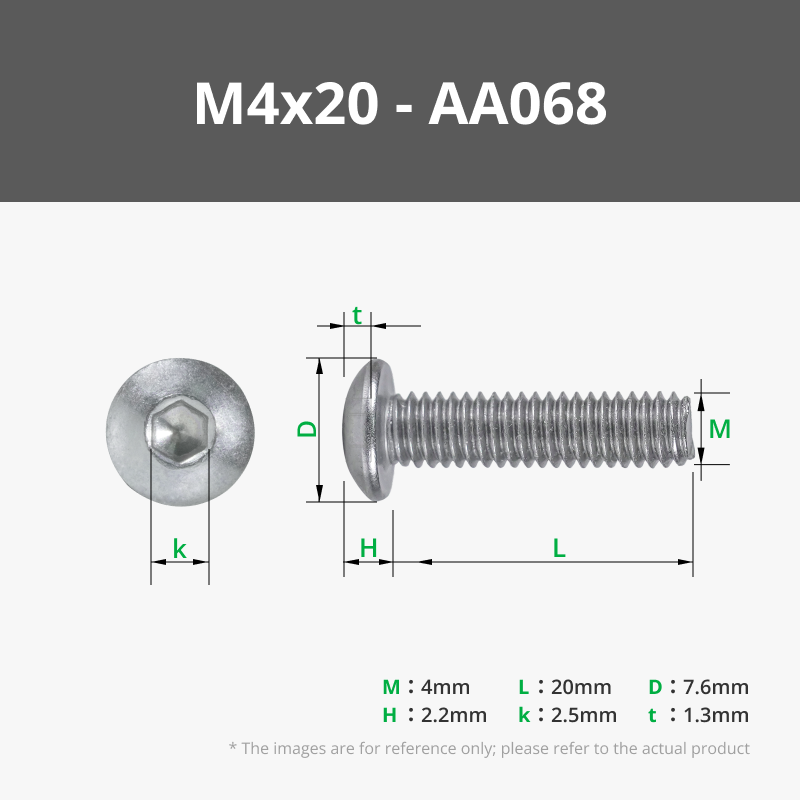
Extra hardware needed if printing the original files:
2x - M4x20 Bolts
2x - M4 Nuts

The updated profile does not require any extra hardware. 

Comment & Rating (25)

(0/1000)

Boosted
Perfect fit using the Dove Tail model, wife loves it!!
The designer has replied
0
Reply
Thanks for sharing! The filament color is really cool.
0
Reply
Boosted
Replying to @jacob.brojek :
Thanks,used TINMORRY PETG Metallic/Midnight Green
0
Reply
Boosted
Print Profile
0.2mm layer, 2 walls, 25% infill
I was able to thin the handle down to 8.5mm to fit my RTIC. works great and looks good.
profile
2
Reply
Print Profile
0.2mm layer, 2 walls, 25% infill
I appreciate The designer uploading this and it fits both sizes of yeti coolers and can holders quite well. It does have a couple issues, one being the hardware one that a lot of people have noticed: M5 hardware doesn’t work but M4 x20 hardware works perfectly you have to set both m4 nuts into the capture slots and crank them up tight before you try to assemble this once you get them cranked up tight pull the bolts back out add the handle and run the handle bolts on through the captured nuts as per picture. also be aware that your yeti cooler lid is not gonna seal quite as good as usual when using this as the hook is strong and rugged but it’s just a bit too thick for both of my yetis to seal properly when this is installed. For us this isn’t issue because we mean to use it around the campfire and not for travel or long-term storage, so it’s still good for the used case because we don’t intend to travel with it installed and risk breaking it anyway anyways. Happy printing!
(Edited)
The profile uploader has replied
0
Reply
Thanks for the constructive criticism. I have modified the design to have a dovetail slot for the cups to slide onto the bracket. I need to get around to finishing it so I can upload it. I think you are the first person to bring the sealing issue up. I haven't noticed that on mine. Ill have to take a closer look at that and see if It will still be strong enough if I make it thinner. Thanks again!
0
Reply
I'm glad I printed just the hook side to test fitment after reading the comments first. Have a brand new Yeti Tundra 45 and the mount hook is tall enough it stops the cooler from naturally sealing.
The designer has replied
0
Reply
did you print the no hardware version or the original one? On the no hardware version I had made it smaller to help with that, but without a new Yeti Tundra I have no way to test it. If you did use the no hardware version would you be able to tell me how much smaller it would need to be to fit properly?
0
Reply
Replying to @jacob.brojek :
I ran the hardware version just since I wanted a permanent affixation because it's going on a small poling skiff that will see a lot of movement/speed/water conditions/etc. That said, I'm not opposed to epoxy bonding the dovetail variation. Printing the dovetail mount now to test fitment. Will post a picture of the two for your records after this one is done.
0
Reply
Replying to @jacob.brojek :
Checking back in. It doesn't even fit down the hole compared to the hardware one. A closer look is the shape of the rectangular side that slides down the gap is a different shape, and arguable a little larger (I don't have a caliper on me) but it appears it might just be the loss of the radiused edges that stops it from fitting. I can get it started going up from the bottom but its so tight it won't slide up to the top with force. The original one slides in fine from the top, it's just too thick.
(Edited)
0
Reply
Print Profile
0.2mm layer, 2 walls, 25% infill
It’s tough to get the hardware in to connect the handle to the cup holder. I drilled to holes opposite the handle holes for access. It works great otherwise! One other thing..Be mindful if you put this on the Tundra Haul handle side of the color. If you lift the big handle to roll it, you will break the cup holder off. Actually you can just reprint the small handle part and try again.
The profile uploader has replied
profile
1
Reply
Thank you for the print and for the criticism. I need to make some changes for the hardware to be easier. I have played around with a concept where the hook has a dove tale and just slides onto the cupholder. I just haven't got around to finishing it and uploading that version. I didn't think about the Tundra Haul when I made this as I just have a regular Tundra. I'm not sure that a two cup version would be able to fit on the handle side but perhaps I could make a single cup version that would clear the handle.
0
Reply
Replying to @jacob.brojek :
A dove tail slide connection would be awesome. Your design is great btw, I wish I had the CAD skills to do stuff like this. Keep it up!
(Edited)
profile
1
Reply
what hardware are using to fit in the inside slot? panhead is too large
The designer has replied
0
Reply
I used M5x20 button head hex. The M5x16 might work too.
0
Reply
Replying to @jacob.brojek :
Awesome! Thanks!
0
Reply
Replying to @jacob.brojek :
@Jacob.brojek can you post a picture of your hardware on this model? I have bought tons of stuff, but the square inside seems to not accept anything. Thanks!
0
Reply
i have purchased every single type of m5 hardware nothing gets flush with the square cutout.
The designer has replied
0
Reply
I have printed two of these myself as gifts for family members. If I remember correctly the bolt goes in from the back side and the nut goes in the square cutouts. The square cutout was a tight fit but the force from screwing in the bolt pulled the nut into place. I have since made revisions to the model that does not require the bolts but they can still be added if needed. I can upload that version too if that would help you but since you already printed it I would just try screwing it in and see if the nut will force itself in. Linked below is the pack of hardware I used for this. Have you tried to use M4 hardware since the M5 isn't working for you?
0
Reply
Replying to @jacob.brojek :
Ill give it a shot! i love the model, it is well designed and built.
0
Reply
Print Profile
No Hardware Update (Dovetail)
0
Reply
Print Profile
0.2mm layer, 2 walls, 25% infill
0
Reply
Boosted
Print Profile
0.2mm layer, 2 walls, 25% infill
0
Reply

License

This user content is licensed under the MakerWorld Exclusive License.

You may create derivative works based on this object, provided that all such derivative works are published exclusively on the MakerWorld platform and include proper attribution to the original creator. You may not share, upload, host, distribute, or publish this object—or any derivative work of this object—on any other digital platform, marketplace, or distribution channel. Commercial use of this object and any derivative works is strictly prohibited. This includes, but is not limited to, selling, renting, sublicensing, or using the object in any context in which you receive monetary compensation or other financial benefits.