3171 Hurricanes HurriLink


Print Profile(2)


Description
Boost Me (for free)
Boosts help me buy filament, which helps me prototype more models and release them. I can go through a kilo of filament designing a complex object, consider boosting to help me make more makes!
Introducing the 3171 Hurricanes HurriLink, an easy, support free print to connect a NEO 1.1 brushless motor and SparkMax brushless controller into a compact, protected package.
In the FIRST robotics competition, there are two major competitors for the brushless motors that power the mechanisms and drivetrains of the most competitive robots: Neo by REV Robotics and Falcon 500 by VEX and CTRE. The Falcon 500, being the more expensive and less available option (or not at all) has the advantage of containing both motor and controller in a single unit that needs only 12v power and CANBUS signal, shielding its 3 phase connection and encoder circuitry inside the metal casing.
The NEO and NEO 550 motors by REV take the opposite design philosophy, separating the motor and controller into discrete components that can be interchanged, repaired, and bought separately. The modularity of this system has many advantages, however it exposes the high voltage wiring, and delicate encoder wiring necessary to for motor to communicate with controller. Careful wire management is needed to prevent damage to the 9 wires that connect motor and controller.
The HurriLink provides the advantages of an integrated controller motor assembly in a package that can be printed easily and support free. It fully contains and shields the motor wiring, and protects the encoder wire and connection with the SparkMax. Neither NEO 1.1 Motor or SparkMax controller need be modified to use this adapter. Instructions are as follows:

The raw print. PETG is recommended as its glass transition temperature is 10C higher than most PLA products and both motor and controller can become somewhat hot during operation. As seen here, the HurriLink prints at a 45 degree angle to increase strength in both functional axes, and to make the print support free (except for 2 bridge tabs built into the model.)

Remove support tabs

Gather components
- NEO 1.1 Motor
- SparkMax Controller
- 3x WAGO 221 Connectors (or disconnect crimps, barrel or spade style)
- 1x 3/8" 10-32 machine screw with washer
- Screwdriver for machine screw head
- Wire stripper for high voltage leads (not pictured)
Pre-strip all high voltage leads (Red, Black and White wires) to 11mm for WAGO 221, or suitable for your crimp connectors.

Carefully insert encoder wires and HV wires into wiretube on the bottom of HurriLink. Feed through to top until you can press motor into tapered recess, keeping the heat shrink bundle of wires at bottom of motor aligned with side recess.


Connect WAGO 221 lever connectors to stripped wire, or crimp male/female wire end.

Insert screw into center hole with washer. Thread into provided 10-32 hole on NEO 1.1 (Only 1.1 version motors have this feature) and tighten. Make sure shaft of motor spins freely afterward (this hole is provided for press fitting to the shaft and the screw can contact the shaft if too long.)

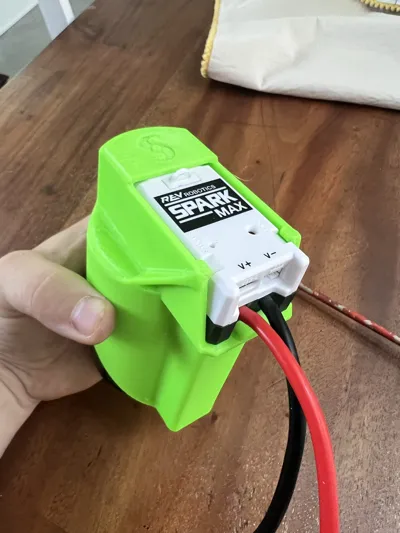
Attach controller to HV wires, matching colors. Plug encoder wire from motor into controller, making sure it is fully inserted.

Coil HV wires, encoder cable and connectors into the wire recess below the controller mount. There should be a little slack when done.

Insert controller from the rear of the HurriLink, pushing forward. you may need to stick a finger in to push the wires deeper in to provide clearance. Push the controller all the way back until the rear tabs line up with the detents on the controller. Do not force, if stuck pull forward and out and coil the wires tighter in the base.

Once controller has reached this point it is fully seated back, you need only push down and it will lock behind the base retention tab located in the center back. The two side tabs will snap inward and secure the controller.


Congrats, you're done! To remove/replace controller, perform the opposite motion. Tilt the rear of the controller up ¼" or so, and pull straight out the back. You can use a spudger underneath the controller to get it started, or grasp the power wires carefully and push the HurriLink downwards with a thumb.
The base HurriLink requires NO wire shortening, so you can maintain full lengths if the motor or controller need to be repurposed outside this assembly. However, if a more compact HurriLink is desired, a version 0.6" shorter is provided, however both motor and controller motor power wires will need to be shortened to fit in the smaller wire recess. The encoder cable can remain full length to avoid recrimping, and be tucked into the center in a coil.

Best of luck in 2023/2024 from the 3171 Hurricanes!
License
You shall not share, sub-license, sell, rent, host, transfer, or distribute in any way the digital or 3D printed versions of this object, nor any other derivative work of this object in its digital or physical format (including - but not limited to - remixes of this object, and hosting on other digital platforms). The objects may not be used without permission in any way whatsoever in which you charge money, or collect fees.
Comment & Rating (2)