
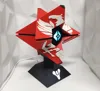
V2 Destiny Crucible Ghost for Magnetic Connector


Print Profile(1)


Description
Thanks for checking out my model! Interested in supporting my work or selling prints?
Support Crew – Show some love and help keep the projects flowing
Galactic Maker Foundry – Sell physical prints of my original designs
Foundry License+ – Sell prints and use my photos for listings
🎉 Supporter-only Discord coming soon – get early access, tips, and sneak peeks!
Membership
Join here to support or get a license
This is a new version of the Crucible Ghost shell that uses a Magnetic Connector with POGO pins instead of the magnets and wires in the first version.
I found that occasionally the connection between the ghost and the base would be unreliable, you might get a colour shift or dimming and would have to jiggle the ghost to get it too light up correctly. I found these connectors on AliExpress and they are much better and simplify the assembly a lot. It's designed for using this connector with 3 POGO pins and ears so it has the required 3 connections when using WS2812B RGB LEDs. If you buy the connectors without pre soldered wires, you with need to solder them on first before you assemble. Once the ghost is assembled, you with not be able to connect the wires.
To complete you will need the following:
1 x D1 Mini ESP8266 or other esp32/8266 compatible with WLED
0.5 Metre of 60LED/M ws2812 RGB LEDs or any WLED Compatible addressable LED
1 x 3 pin male&female magnetic connectors
1 x USB Cable for power
4 x M3x3mm screws
CA/Super Glue
This is how I assemble the ghost.
- Glue the Front eye into the Front Shell, Rear eye into Rear shell, I just add a few dabs of CA/Supper Glue to the Tabs of the eye.
- Glue Mount into base, I try to avoid getting any glue near the wire passage.
- Glue diffusers into Ghost Eye and Base.
- Add the Wing covers and Wing tips to the shell using a few dabs of CA glue if needed.
- Insert 2 magnets per hole into the front and back ghost shells, just keep the magnet polarity in mind before you insert them. The hole is very tight for a friction fit.
- Flash WLED onto the Microcontroller using install.wled.me website. I use version 0.14.0 the others versions have issues with WiFi and displaying the Web GUI
- Solder on approx 150mm length of wire to the Base side connector and about half of that to the Ghost side connector, I use the female connector on the ghost and male on the base but I don't think it really matters. Pay attention to the orientation of the wires and pins, I keep the male and female connectors joined together so the wires are in the correct positions, the connector will only stick together in one specific orientation so you can't just twist the connector around if you mess up the wiring order. I solder the wires that is in the same order as the LED strip, Ground, Signal, 5 Volts which helps make the wiring neater.
- Put the connectors into the base and ghost, I don't glue them yet, if the hole is too tight, I just use a little jewellers file to widen it a little so if goes in smoothly.
- Trim the wires to length and solder the 3 or 4 LEDs in the Base and about 30 in the ghost eye. You don't have to use that many but I just like the eye to be nice and bright. The base connector is soldered to the signal out/DO side of the Base LEDs and then the Signal In/DI goes to the microcontroller I use a D1 Mini esp8266, they are small and cheap. Solder the LED 5v to 5v on the D1 Mini, Ground to GND and then the LED signal wire goes to the GPIO2/D4 pin on the D1 Mini, it's the pin next to the Ground. I then use a little bit of hot glue to glue the LEDs around the hump in the middle and aim the LEDs onto the Base diffuser.
- Solder the wires to the Eye LEDs and attach the LEDs around the inside of the back of the eye.
- Solder in the USB cable 5 volt and ground wires to the D1 Mini.
- Plug in the USB cable and test the Magnetic connection, if everything powers up ok, add some glue to the ear tabs of the connectors and glue them in place.
- To get the Destiny Logo a different colour to the eye you need to add a segments, follow the WLED wiki for more help
License

You shall not share, sub-license, sell, rent, host, transfer, or distribute in any way the digital or 3D printed versions of this object, nor any other derivative work of this object in its digital or physical format (including - but not limited to - remixes of this object, and hosting on other digital platforms). The objects may not be used without permission in any way whatsoever in which you charge money, or collect fees.


Comment & Rating (79)