Modular Hole Distance Marking Tool


Print Profile(1)

Description
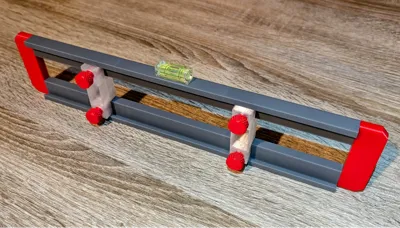
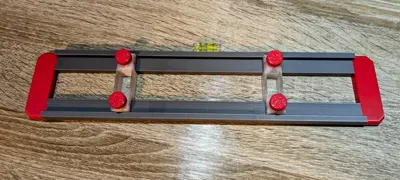
This is a modular distance marking guage that can be used to create a set distance between 2 (or more) points and transfer this to another location. It works by moving the first slider over a point and tighening the bolts (light finger tight is all that is needed) . Then then second slider can be moved over another point and the slider bolts tightened (More than 2 sliders may be used for multiple points). The tool can then be moved to another location, aligned and marks made though a hole in the bottom of the slider. The top of the tool is flat so a spirit level can use used (or a small bubble level glued on as in the attached images)
Example
An example of the usage of this is for mounting an extension cable on a wall. These typically have 2 slots on the back that require you to place 2 round head screws in the wall at exactly the right distence. Using this tool it is simple. Place the tool on the back of the extension and move the first slider to the centre of the first slot and tighten. Move the second slider to the other slot on the extension and tighten.

Then place the tool in the required position against the wall, level with a spirit level and mark where the 2 holes should be drilled with a pencil through a hole in the bottom of each slider.

Why is it modular?
The tool is modular as the side rails are 100mm long. Each side rail can fit into either of the end-caps, or into another rail making it possible to make the tool as long as needed (the attached image is 300mm using 3 sections of each rail type). In addition the bottom of each slider is interchangeable (with 2mm, 4mm, 6mm holes, a cross and a vertical slot designed to make it easy against a ruler).
How is it assembled?
This tool is designed to be glued together, however if required one endcap can be left unglued to allow extra sliders to be added or removed, or extended rail sections to be added.
To glue together, first pick one end-cap and apply glue to the pins and the area around the pins where the rails will touch. Insert the rails and then dry fit the other end-cap and hold until the glue is dry. Doing it this way makes it much more likely the rails will set in the correct place.

When set, remove the dry-fitted end-cap. Then apply glue to the end of each rail, place the next sections of rail and again dry fit the end-cap and hold until set. Repeat this process until all rails are glued.
Next, clip the chosen slider bottom into the slider (it is a simple push fit)

Then screw in 2 bolts a little way and slide the slider into the slot in the rails.

The end-cap can then be either dry fit or glued in place depending on your preference.

License
You shall not share, sub-license, sell, rent, host, transfer, or distribute in any way the digital or 3D printed versions of this object, nor any other derivative work of this object in its digital or physical format (including - but not limited to - remixes of this object, and hosting on other digital platforms). The objects may not be used without permission in any way whatsoever in which you charge money, or collect fees.
Comment & Rating (4)