Soyuz (Rocket)


Print Profile(10)


Description
I'm looking to improve the publication of my models on makerworld, if you like or dislike my models and if you have 5 minutes to lose, can you please fill out this form.
Boost Me (for free)
If you can, please feel free to boost my model so that more models will arrive! 5...4...3...2...1...0...Liftoff! !!
Membership
If you like my 3D models and want to take part in this journey into space, subscribe today! Your support is essential to help me expand our collection!
UPDATES:
- 15/06/2025 -
- Profil BVGD AMS
- Add missing parts Junction_A-BVGD_Grey_x8.
- Replacing BVGD_RD-107A_Orange_x4 parts for a new version.
- Profil BVGD
- Add missing parts Junction_A-BVGD_Grey_x8.
- Moving the white part on plate 1 to the new plate 4.
- Profil BVGD AMS
- 11/02/2025 - Following feedback from a few people informing me of a lack of parts and bad parts, I've made the following changes
- Add missing parts Junction_A-BVGD_Grey_x8.
- Replacing BVGD_RD-107A_Metal_x4 parts for a new version.
- Replacing BVGD_RD-107A_Orange_x4 parts for a new version.
- Addition of a Non AMS profile for BVDG block
- Addition of a Non AMS profile for the Stand.
Description
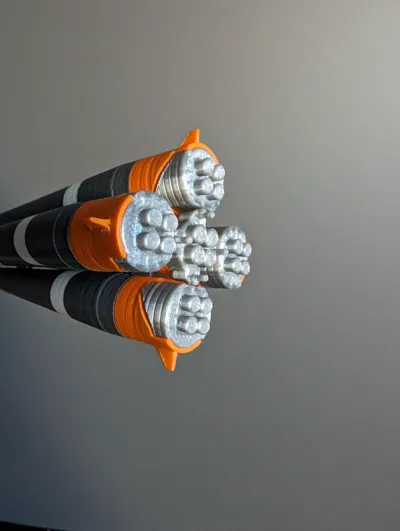
The Soyuz model is a highly detailed 1:200 scale reproduction of the historic Russian rocket that has made over 150 flights. The model consists of several pieces printed separately, which are easy to print and assemble.
The finished model dimensions are approximately 28cm high and 6cm wide.
Printing
- There are 56 parts to print, the total printing time for the entire model is approximately 6 hours.
Assembly and Printing Guide
- You can use the assembly guide published on Instructables to help you assemble the Soyuz.
Tips
Settings
- For infill, 10% is sufficient for a decorative object, and you can also use PrusaSlicer's "Lightning" infill settings.
- For some parts the supports will be necessary, see the assembly guide and impressions.
- For the base, it is recommended to print with 3 perimeters to avoid visible infill.
- If some parts are loose or don't fit, you can change the scale by +/- 1% in the slicer to get a better fit.
Printing
- For a better final result, I recommend printing the Jonction_Block last so that you can adjust their size according to your print and have a better fit during assembly.
- Follow the printing guide published on Instructables.
Post Printing
- You may need to sand the junction areas between the parts for a smoother finish.
- Additionally, I recommend using glue for better strength and durability.
- Follow the assembly guide published on Instructables.
License
You shall not share, sub-license, sell, rent, host, transfer, or distribute in any way the digital or 3D printed versions of this object, nor any other derivative work of this object in its digital or physical format (including - but not limited to - remixes of this object, and hosting on other digital platforms). The objects may not be used without permission in any way whatsoever in which you charge money, or collect fees.
Comment & Rating (210)