Pop up water sprinkler hose connector for lawn


Print Profile(1)

Description
Boost Me (for free)
If you like my design, please support my work with a boost. Thank you!
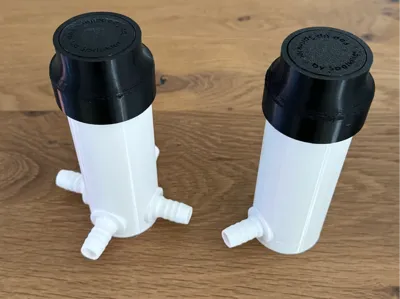
I wanted to do without many Gardena adapters, so I installed a hose connector. The hose can be pushed on directly and fixed in place with a clamp.
(German)
https://www.youtube.com/watch?v=Ca0OeIxfiAo
https://www.youtube.com/watch?v=_RW6EVXKgac
https://www.youtube.com/watch?v=-qt7jZdYm4I
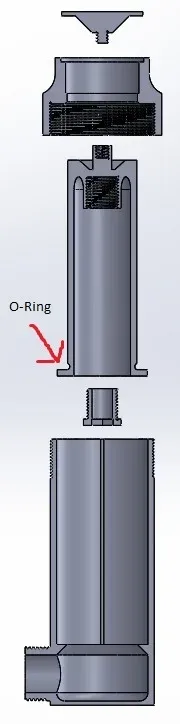
TL;DR: For a lawn sprinkler 360 or 180 degrees you need at least the following parts:
- “Hose-1Connector” or any other (If you use the Hose Connector, I recommend an appropriate hose clamp.)
- Cylinder for 180° watering or Cylinder for 360° watering
- Top & Cover
- 1x O-Ring 30x3mm
____________________________
All parts are printed, no screws, no glue, no seals are required. All you need is a 30x3mm O-ring that goes into the groove at the bottom of the “cylinder”.
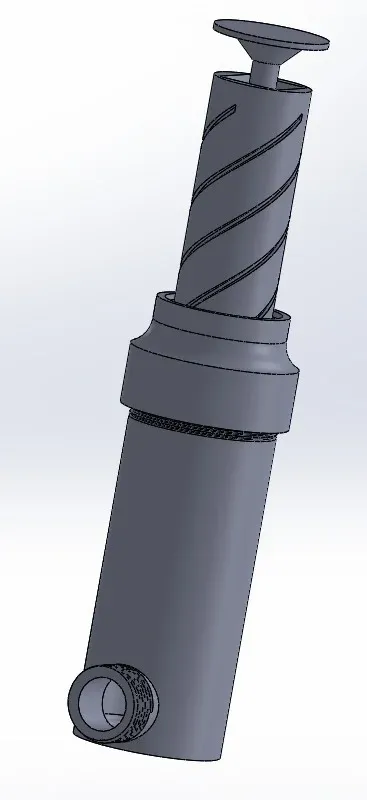
The spray pattern can be changed by varying the diameter of the “throttle”. The sprinkler sprays in a square approx. 5x5m.
If you remove the support material from the “cylinder”, make sure that all 4 holes at the top of the nozzle are clear and clean. In addition, the cylinder must be printed with 100% infill so that there is no air in the part.
Before first use, carefully push the “cylinder” in and out by hand several times so that the guide is clean and sharp edges are broken.
If you blow air into the hole in the “housing” with your mouth, the cylinder should extend under slight pressure,
and then retract completely without hanging.
When using for the first time, turn on the water slowly so that the air escapes and the sprinkler is not damaged.
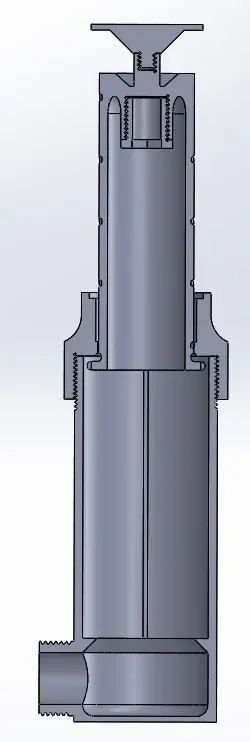
If you turn off the water, the “cylinder” retracts again. The water pushes up past the “cylinder” and fills the upper area of the “housing” with water. If you then turn the water back on the 2nd time, you can the water tap quickly, as the “cylinder” slowly extends at a reduced rate because the water in the upper area between the “cylinder” and the “housing” has to push through the gap at the top.
The “top” prevents the ingress of dirt when closed.
If dirt does get in, this is not a problem, as the “housing” is rinsed each time it is extended and retracted and smaller dirt particles are transported back out again. The spiral, which rinses and cleans the guide, helps with this.
Housing-“ original” water connection: 3/4”
“top": only tighten lightly and do not turn the nozzle, otherwise it may break off.
I have already printed everything several times, and currently use 3 sprinklers in the garden.
WINTER INFORMATION!!
Option 1:
when you do your pipeing, make one pipe deeper then the others and put a water Tap at the end. so you can evacuate your System.
Option 2:
make an Adapter for compressed air on your pipe. and blow carefully thru the pipe to get the water out.
I used Option 2 and today i tested my sprinklers the First Time after Winter and all works still fine. i haven't taken out parts from sprinkler over the Winter.
Second Winter over now, and all still works fine.
This remix is based on

License
You shall not share, sub-license, sell, rent, host, transfer, or distribute in any way the digital or 3D printed versions of this object, nor any other derivative work of this object in its digital or physical format (including - but not limited to - remixes of this object, and hosting on other digital platforms). The objects may not be used without permission in any way whatsoever in which you charge money, or collect fees.
Comment & Rating (31)