Minecraft Brick Set


Print Profile(1)

Description

Build your on Minecraft Brick World from scratch with this brick set!
Compatible with bricks from a certain brand that rhymes with YEGO.
Heavily inspired by the amazing Micro World Series (you can find instructions online and rebuild them yourself: 21102, 21105, 21106, 21107). Great because the normal sets are limited and overpriced.
How it works
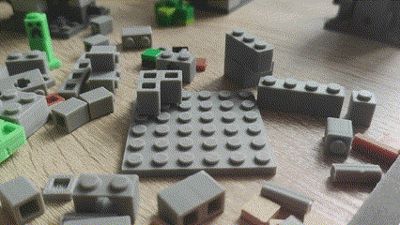
Select and print the parts you want for your world.
Use a 6x6 baseplate for your world and start building vertically.
Your 6x6 worldpieces can be connected with the Connection bricks to form bigger worlds.
Get creative and build your favorite Minecraft World Sandbox Style!
When building
Some parts might fit better than others, so you may need to adjust their positions for a good fit. Ensure the edges align symmetrically. Use a pencil to push the pieces down verically into position. If a piece doesn't fit well, try scaling it.
Be patient, especially with the connection piece.
Remember, this is a DIY project and parts won't always fit perfectly like YEGO pieces.
It's in your hands!

Connecting worlds
It's up to you how many floors your world will have. Vertically, you can use the smooth plates with dots to ensure quick and easy removal of floors.
How to print

All bricks can be found in the Project file and opened in Bambu Studio.
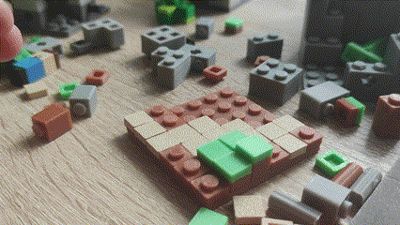
Clone or drag the pieces you need on the print plate and paint them (Green for gras, Brown for Wood and dirt, Grey for Stone etc.).
Special bricks have their own buildplate.
As many of the pieces are rather small, secure a reliable build plate adhesion.
Let the plate cooldown to prevent deformation of prints.
Try printing small amounts of parts first, before switching to large amounts to detect any adhesion problems.

Mostly with the 1x1 tiles
Print Settings
0.4 nozzle
0.2 layer height
No supports.
AMS only needed for Creeper and Steve
0.2 nozzle recommended for Steve!
Use high Quality Filament like Bambu Lab's or Elegoo's to ensure that the parts fit.
Inferior Quality can lead to parts not fitting.
Adjust the print setting according to your needs.
Example crafts
Steve
1x1 smooth Brown + Steve pieces + 1x1 block blue


Creeper
See Creeper plate in Bambu Studio
Enjoy and share your creations!
License
You shall not share, sub-license, sell, rent, host, transfer, or distribute in any way the digital or 3D printed versions of this object, nor any other derivative work of this object in its digital or physical format (including - but not limited to - remixes of this object, and hosting on other digital platforms). The objects may not be used without permission in any way whatsoever in which you charge money, or collect fees.
Comment & Rating (35)