Search models, users, collections, and posts

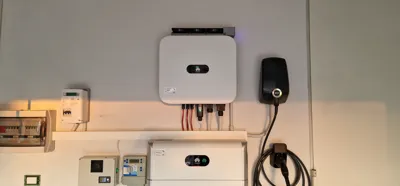
Huawei inverter cooling

Print Profile(5)

All
X1 Carbon
H2S
P1S
H2D
X1E
H2D Pro
P1P
A1
X1
P2S
H2C
X2D
A2L

Lowered manifold
Lowered manifold
Designer
9 h
3 plates
5.0(4)

Side thermostat right
Designer
22.7 h
6 plates
5.0(3)

Front thermostat right
Designer
5.1 h
1 plate
5.0(1)

Side thermostat left
Designer
8.3 h
2 plates
5.0(1)
Click to see more

Open in Bambu Studio
Boost
79
167
120
48
290
96
Released 

Bill of Materials

Bambu Filaments
Select all
ABS Silver (40102) / Refill / 1kg
ABS
x1

Description

Content has been automatically translated.
Show original

Description

I have 3D modeled a mount for three 120x120x38mm fans with an integrated thermostat to cool a Huawei inverter that only features passive cooling. The thermostat allows you to set the fan activation temperature, ensuring they only operate when necessary. The entire assembly is powered by 220V, eliminating the need for external power supplies.

The fans used are metal, ball-bearing models with a capacity of 160 cubic meters/hour and a noise level of 46dB. They are mounted on the support to draw in air. Since I have a Luna battery underneath that generates heat, I opted to extract the warm air instead of pushing it downwards.

I have also created a top deflector to direct the airflow forward instead of towards the ceiling.


Boost Me (for free)

Give me a boost if you like my modification.


Printed Parts

The base and deflector are printed in ABS to prevent warping from the heat generated by the inverter.


Parts to be inserted

Various blind holes are present in the fan support components. These accommodate M3 brass threaded inserts, allowing screws to be tightened without damaging the plastic.


Parts to Purchase

ARCELI W3230 AC 110 V 220 V 20A LED Temperature Controller Thermostat Control Regulator Pz1

EBM-PAPST 4650N
Alternating current (AC) axial fan, IP20, 230V, square, 119 mm, 38 mm, sleeve bearing Pz3

Alternatively, you can use much cheaper 120mm plastic fans with 220V power.

M3x55 screws Pz12 (screws secure the deflector and fans)


Free Project:

This is a completely free project, but if you feel inclined to support me, you can offer any amount you wish. Thank you 


Update

As requested, I have created a base with the thermostat housing on the opposite side. The only parts requiring printing for the left-side box configuration are the side pieces. The central piece works for both configurations. The upper deflector also remains unchanged.

The design is modular, allowing for expansion from a minimum of two fans to an unlimited number simply by printing more central pieces.


Update

I have modified the three base bodies, increasing the spacing between the fan and the vertical section, and added a cable routing channel. I noticed that if you use fans different from the ones I used, there isn't enough space for the cables. With this modification, 20AWG cables fit without issue. 

I noted the issue with these fans: Sunon DP201A A2123 X ST.

As you can see from the photos, there is now sufficient space.


Update

As requested, I have created a base with the thermostat housing on the front. The only part that needs printing for the front thermostat is the "Right Body, Front Thermostat". The rest is compatible with all configurations. The upper deflector also remains the same. The hole for the Ø20 tube-box connector remains in the same position. This allows for part replacement for those who haven't glued the components.

Update

As requested, I've created a base with the thermostat housing on the front, also on the left side. The only parts needing printing for a front left-side thermostat are the "Left Body, Front Thermostat". The rest is compatible with all configurations. The upper deflector remains unchanged. The Ø20 tube-box connector hole stays in the same position, allowing part replacement for those who haven't glued the pieces.

Update

As requested, I have created a lower profile air deflector for users with height constraints. The total height is now 93mm, compared to 133mm for the taller model. For the lower deflector, to allow for the passage of the front screws, I recommend widening the front holes with a Ø3.5 drill bit, slightly angling it for easier screw passage. Only a small amount of widening is needed. The only parts requiring printing are those of the deflector. The rest is compatible with every configuration and fully modular, from a minimum of two fans to however many you choose. Naturally, with many fans, the cable passage hole will need to be enlarged.


Documentation (1)

Other Files (1)
Istruzioni termostato.pdf

Comment & Rating (120)

(0/1000)

Sun2000 L or Sun2000 M version
The designer has replied
Show original
0
Reply
Since no part is attached to the inverter, compatibility is ensured for any model type. It can start from 2 modules and scale up to any number you desire, as the entire system is modular
Show original
0
Reply
Replying to @marcobedendo78 :
Thank you for your response, did you attach everything to the wall using Fischer plugs? Is there already existing provision for corrugated conduit?
Show original
0
Reply
Replying to @user_3498901635 :
I secured it to the wall with two Ø6mm wall plugs on each side, more than sufficient Two holes are visible, a small one for the thermostat temperature probe and a larger one for mounting a Ø20mm pipe-to-box fitting
Show original
0
Reply
Boosted
Beautiful project! I've managed to bring considerably more order to my cooling setup, I've included before and after photos. I would have placed it lower down (as it was before), to keep the fans cool, but I must admit that this way it looks much better! TOP!
The designer has replied
Show original
designer
1
Reply
Thank you very much and great work!!
Show original
0
Reply
Boosted
Cool piece of engineering. Unfortunately, I was unable to insert the display after connecting the cables (with ferrules). I had to break up the 3D-printed housing a little to make it fit. But that's no big deal. It doesn't have to look pretty, it just has to serve its purpose. Because of this i also used this print to empty some filament spools. I am using it just laying on the top of our SUN2000-20KTL-M2
The designer has replied
designer
1
Reply
Thanks so much for the compliments. To use the ferrules, I shorten the plastic part before stapling them, and everything fits without any modifications. Given the size of your inverter, I recommend adding an extra center section to better cover the inverter's rear heatsink, since the parts are completely modular. This is, of course, assuming you haven't already glued everything in place.
0
Reply
Boosted
Replying to @marcobedendo78 :
Thank you, three fans are more than enough for us. The fans (which always run at maximum speed when the temperature is reached) easily cool the inverter to below 35–40 degrees.
designer
1
Reply
Boosted
Print Profile
Lowered manifold
Very good design and very useful
The profile uploader has replied
Show original
profile
1
Reply
Thank you!
0
Reply
Boosted
The print profile is no longer public
funciona
The profile uploader has replied
profile
1
Reply
Ottimo!
(Edited)
1
Reply
awesome print. Will boost as soon as I get more points. a small thing I noticed is that one of the corner has beveled edges on the grills while the rest of the deflectors grills have straight edged. grazie! awesome print so far.
The designer has replied
designer
1
Reply
Thank you for bringing that to my attention I will correct it immediately
Show original
0
Reply
Boosted
Print Profile
Lowered manifold
perfecto
profile
1
Reply
Really nice project but I wonder why not put the display on the front anyway congratulations
The designer has replied
Show original
0
Reply
It could also be done but the side box would become very large Anyway once you've set it up you don't touch it anymore
Show original
0
Reply
Replying to @marcobedendo78 :
No offense, I cut the front and it fits precisely. Could you also design it with an extra 1 cm in box length and a hole on the front? In my opinion, it would look very good aesthetically
(Edited)
Show original
designer
1
Reply
Replying to @SchiaviLab :
Ok per il display ma non capisco perché lo hai montato sottosopra!! Se devi sostituire una ventola diventa un pò complicato il lavoro.
0
Reply
Alternatively, can PETG be a good substitute for ABS
The designer has replied
Show original
0
Reply
If you want it can be fine
Show original
0
Reply
Replying to @marcobedendo78 :
Thank you. I would have difficulty printing in ABS. When you say COULD, what criticality are you referring to?
Show original
0
Reply
Replying to @Panfre :
in case of fan failure the material could overheat this is why my project does not cover or rest on the inverter
Show original
0
Reply
I would like to modify it a bit, like making a 45-degree cut on the air outlet assembly, maybe putting a small frame over the fans and the air assembly, connecting them with magnets, and lightening the part under the fans with small holes, but did you design it first in regular CAD software??
The designer has replied
Show original
0
Reply
It was CAD designed because I designed it entirely myself see the CAD images However someone copied it from me making two modifications one of which blocked the air outlet reducing performance and another was made underneath where the fans are and then just for a change they resell it I can tell you that placing the outlet at a 45° angle doesn't change anything regarding performance it only makes the fans collect dust Reducing the thickness underneath makes you lose the interlocking features and then it deforms faster with heat Making holes is unnecessary because the fans have their precise airflow path and you won't achieve any greater performance in fact you risk deformation I don't see the use for placing magnets on top because it's something you no longer touch once it's assembled Then if you want to modify it remember to mark that it is a remix
Show original
1
Reply
Replying to @marcobedendo78 :
I know how to use CAD for civil projects but in this case I wouldn't even know how to start without CAD files if you give me some tips I'll try meanwhile the printer is working 😁😁😁
Show original
0
Reply
Replying to @user_2258975307 :
To make the modifications, you have to work on the STL (I don't give out the original or step file) and cut the parts you want to modify It's all up to you with your CAD to make the changes I know that working on meshes requires much more work, but if you are capable, it's feasible The only question I ask you is, why do you want to modify something that is fine If it's for space reasons, okay, but otherwise it makes no sense to modify mine, you design one to your liking as you need it and you're good at that point
Show original
0
Reply

License

This user content is licensed under a Standard Digital File License.

You shall not share, sub-license, sell, rent, host, transfer, or distribute in any way the digital or 3D printed versions of this object, nor any other derivative work of this object in its digital or physical format (including - but not limited to - remixes of this object, and hosting on other digital platforms). The objects may not be used without permission in any way whatsoever in which you charge money, or collect fees.