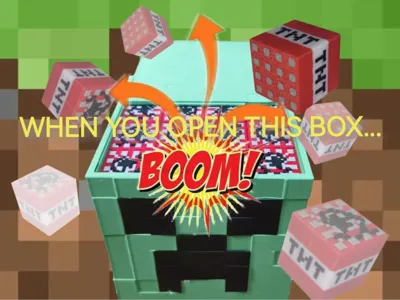
surprising bomb box-minecraft creeper


Print Profile(3)


Description
Web page loading is slow, and the GIF animation experiences noticeable stuttering during the initial load. After the first complete load, subsequent loads will proceed at normal speed.
The web page loading is slow, and the GIF will be obviously stuck when it is loaded for the first time, and the normal speed will be found after the first time it is fully loaded.
Installation process
Installation process
Step 1
Remove the supports for the box and the spring (using PLA for the spring is not recommended. It's best to use a more resilient material such as PETG).
Step 1
Remove the support of the box and the spring (it is not recommended to print the spring with PLA, it is recommended to print with a tougher material such as PETG).
Step 2
Use glue to attach the black creeper's face to the box. Note that only one of the box's four sides has corresponding grooves.
Step 2
Glue the black creeper's face to the box, noting that only one of the four sides of the box has grooves of corresponding shapes.

Step 3
Attach the spring to the bottom of the box. Make sure that the side of the spring marked with an X is the bottom and faces down.
Step 3
Attach the spring to the bottom of the box, noting that the side of the spring with the X is the bottom side, facing down.

If the spring cannot be installed smoothly into the corresponding hole due to the quality of the printed overhang (as shown in the red box below), use scissors to trim this section appropriately until it fits perfectly (as shown in the green box below). Be careful not to over-trim a large area as this can lead to a loose and unstable spring after installation. Trim only the bottom of the spring with the X mark, not the top without any markings!
If you find that the spring cannot be successfully installed into the corresponding hole due to the quality of the printed overhang (as shown in the red box in the figure below), you need to use scissors to trim the part simply and appropriately until it can be installed into the hole (as shown in the green box in the figure below), be careful not to over-trim too large an area, otherwise it may lead to loose and unstable spring after installation. The spring only needs to trim the bottom with the word X, and the top without any words does not need to be trimmed!


The author's own testing shows that springs printed with PETG filament typically require only two springs installed in a diagonal position.
The author's own test shows that springs printed with PETG filaments usually only need to install two springs in one diagonal position.

Installing all four springs may cause excessive tension, potentially damaging the fixing groove of the lid (as shown below, one side of my box has a slight crack from the tension, while the other side is intact). Of course, the optimal number of springs to install depends on your own testing and preferences.
If you fill all four springs, there is a possibility that the elastic force will cause the top of the lid to break the fixing groove (as shown below, one side of my box is cracked a little by the top, and the other side is intact). Of course, the actual number of springs to be installed is still up to your practices.

Step 4
Place the tray with the four spring mounting holes facing down vertically inside the box.
Step 4
Place the tray with the four spring-loaded mounting holes side down vertically inside the box.

Step 5
Insert the lid into the chute a small distance.
Step 5
Insert the lid into the chute a small section.

Step 6
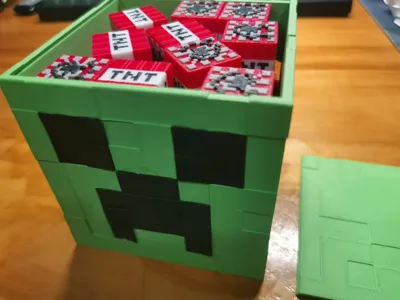
Place as much TNT as desired, but at least two stacks.
Step 6
Place as much TNTs as you like, but you need to place at least two stacks.

Step 7
Use one hand to slowly press down on the placed TNT so that its top is below the level of the chute. With the other hand, quickly slide the lid along the chute.
Step 7
Slowly press down the placed TNTs with one hand so that the top of the TNTs is below the level of the chute and quickly slide the lid along the chute with the other hand.


Once the lid is installed, if you are worried about the lid being blown off if the chute cracks, you can use appropriate tape to secure it until your friend who wants to open the surprise box arrives.
Once the lid is installed, if you're worried about the lid being blown off after the chute cracks, you can use appropriate tape to secure it until your friend who wants to open the surprise box shows up.
Finally, remember that when opening the box (as shown in the GIF in the introduction), you need to hold the body of the box with one hand and slide the lid back very quickly with the other hand. The faster the better, as a slower motion can cause the lid to get stuck or lead to other accidents.
Finally, please remember that when opening this box (as shown in the GIF in the introduction), you need to grasp the body of the box with one hand and slide the lid back very very quickly with the other hand, the faster the better, too slow to get stuck or other accidents.
By the way, to store the box and its accessories safely and neatly, you can interlace the springs in groups of two and place them horizontally at the bottom of the box. Then, place the tray on the horizontal springs and finally load the TNT.
By the way, if you need to store the box and its accessories safely and neatly, you can interlace the springs in groups of two and place them horizontally at the bottom of the box, then place the tray on the horizontal springs, and finally load the TNTs.
License
You shall not share, sub-license, sell, rent, host, transfer, or distribute in any way the digital or 3D printed versions of this object, nor any other derivative work of this object in its digital or physical format (including - but not limited to - remixes of this object, and hosting on other digital platforms). The objects may not be used without permission in any way whatsoever in which you charge money, or collect fees.
Comment & Rating (0)