Bambu AMS Lite Hub M10 fitting adapter

Bambu AMS Lite Hub M10 fitting adapter

Boost
86
156
25

Print Profile(3)

All
P1S
P1P
X1
X1 Carbon
X1E
A1

Regular print, 0.2mm layer, 4 walls, 15% infill
40 min
1 plate
4.8(12)

0.24mm layer, 2 walls, 15% infill
28 min
1 plate

PLA adapter, PETG mount - 2 plates - 0.2mm layer, 4 walls, 15% infill
1.1 h
2 plates

Boost
86
156
25
4
269
115
Released

Description

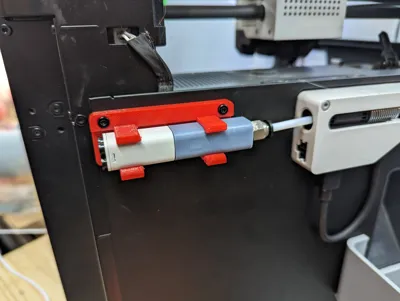
After discovering that I could use a Bambu AMS buffer along with a splitter instead of having to buy the AMS hub, I found I wasn't happy with the quality of 4-1 splitters I was printing myself. A simple solution was to order the the Bambu AMS Lite Hub, which itself is basically a 4-1 splitter. As its output tube is 4.5mm OD, I created an adapter that will attach to it and allow you to use a M10 fitting on it.

You will need:

  • AMS Lite Hub
  • A PC4-M10 Pneumatic Fitting
  • 2 Bambu spool holder screws

You will need to snap off the magnet (as shown in the picture) and use your nips to trim it flush with the rest of the body. Insert the hub into the adapter offset by 45 degrees, then twist it to lock it into place. Tighten the M10 fitting down well so that the back of it mates with the exit tube snugly; be careful not to overtighten and break the adapter.

I made a mount for it so you can attach it to the rear of the printer; a short piece of PTFE will go straight into the buffer, helping to prevent feed/retraction issues. However, the ideal orientation for a direct feed into the buffer has the splitter directly mounted on the back plate. Some thin double sided tape (like several brands of super glue tape) on the mount will work perfect. You will just have to remove the buffer if you want to pull the tubing after you mount it this way.

I'm also uploading a blank mount so you can modify it to attach wherever you want.

Comment & Rating (25)

Please fill in your opinion
(0/5000)

Great file, thank you! I am going to return my original AMS Hub. These A1 Mini adapters worked great. This set up will allow me to use one AMS with each printer and also have the ability to quickly swap some cables and use 2 AMS' with 1 printer for 8 colors! Thanks again!
0
Reply
works 🥰 PERFECT. 100% better than any printed Y.....
0
Reply
Print Profile
Regular print, 0.2mm layer, 4 walls, 15% infill
passt alles
(Edited)
0
Reply
Print Profile
Regular print, 0.2mm layer, 4 walls, 15% infill
0
Reply
What orientation are you supposed to print this in? I'm printing it vertically as-is when you hit open in Bambu Studio but the inside has horrible bridging issues that make it unusable. Using stock settings with Bambu PLA Matte, full cooling fans, door open, etc. Or do I need to use supports inside the adapter and try carve them out later?
The designer has replied
1
Reply
I've created a profile with supports specifically for this reason, it works great. you need tweezers to pull out the support
0
Reply
I believe I printed it vertically, with the threaded opening up top.
0
Reply
can it be used for 1 AMS and, for example, 2 external spools? with the mini hub can we have some kind of advantages for using these external espools? thnks
0
Reply
yes, you'll have to manually feed the other 2 of course
1
Reply
Replying to @Jaymacs2 :
So it can't be used for more then one AMS?
0
Reply
Boosted
This model definitely deserves a boost. Saved me at least 2 lunches worth of money 🙂
The designer has replied
0
Reply
Glad I could help, which is all I wanted to do in the first place. Thanks!
0
Reply
Not really a true remix, just a knockoff. And you removed the center alignment portion of original model by Smittyrn which forces the filament into the PTFE tube. In your video, you can see the filament stop. Yep, it will if it is bent even slightly. And you didn't attribute at all. It appears you are the original creator. I'll say if your base holds up better you have actually done work.
1
Reply
So you didn't change my adapter itself as far as I can tell, but stretched out the bracket and fit the adapter down into the hole to help align it. Brilliant move.
1
Reply
Nicely done! I printed all parts during one print, using ASA. Everything printed perfectly and the dimensions were spot on. Excellent job!!
1
Reply