Search models, users, collections, and posts

Lithophane Cube Lamp

IP Report

Print Profile(1)

All
A1
H2S
H2C
H2D Pro
X1 Carbon
X1E
P1S
X1
H2D
A1 mini
P2S
P1P
X2D
A2L

0.2mm layer, 4 walls, 15% infill
Designer
4.5 h
2 plates
4.9(34)

Open in Bambu Studio
Boost
829
1983
63
45
2.6 k
584
Released 

Bill of Materials

Maker's Supply Kits and Parts
Select all
6500K White LED Light Strip (1pcs) - KA004 / White (41100)
Bambu Filaments
Select all
Jade White (10100) / Refill / 1kg
Beige (10201) / Refill / 1kg

Description

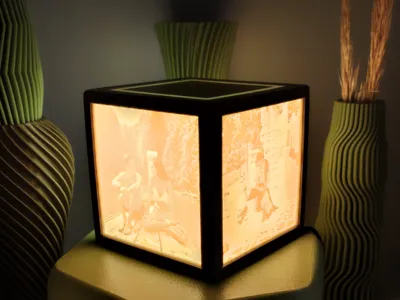
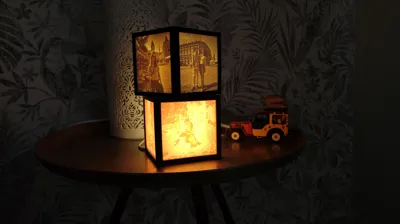
3D Printed Lithophane Cube Lamp – For Less Than $5

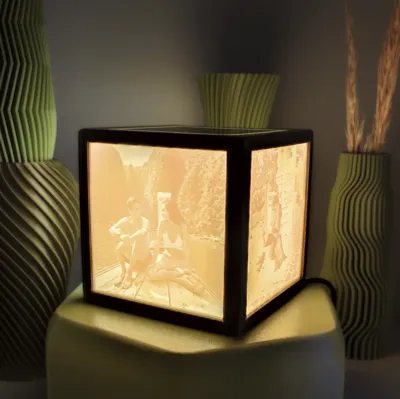
Turn your favorite photos into a unique, personalized lamp. This minimalist and modern cube doesn’t just light up — it transforms any space with the delicate relief of your lithophanes and the soft glow of a top light band for an elegant finish.


Boost Me (for free)

Estoy trabajando para ofrecer diseños cada vez más cuidados y un soporte mejor en cada modelo.
Aún estoy empezando, así que cualquier Boost lo aprecio muchísimo: me ayuda a seguir motivado y a conseguir puntos para invertir en una máquina mejor, lo que se traduce en más fiabilidad en mis impresiones y mas tiempo para crear mejores diseños para todos. ¡Gracias por apoyar! 🙏

✨ Key Features

  • Minimal & modern design: perfect for bedside tables, desks, or cozy corners.
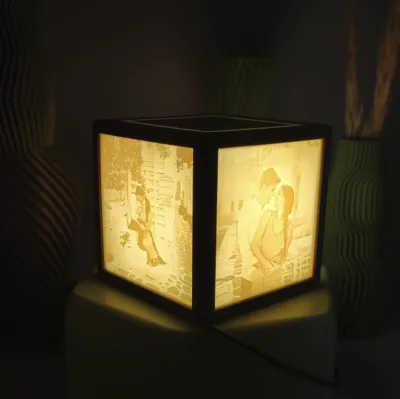
  • Fully customizable: generate square lithophanes from your images using free tools like 3dp.rocks/lithophane.
  • Recommended lithophane size: 84.9 mm × 84.9 mm, thickness 2.44 mm (see documentation).
  • Low-cost & easy build: total cost under $5 with widely available materials.

🛠️ What You’ll Need

  • 1x USB 5V LED strip (pre-assembled, easy to find on AliExpress or similar).
  • 2x M2.5 countersunk screws (4–6 mm).
  • 4x custom lithophanes (84.9 × 84.9 mm, 2.44 mm).

⚡ Quick Assembly Guide

  1. Insert LED strip in the BASE and wrap it around the center cylinder in a spiral.
  2. Fix the strip at the top with a small clip/zip tie (recommended to prevent heat loosening).
  3. Route the cable through the bottom channel to the corner exit.
  4. Slide 4 lithophanes into the UPPER side rails.
  5. Join BASE + UPPER with the snap-fit.
  6. Secure with glue, 2x M2.5 countersunk screws (4–6 mm), or both.

🖨️ Printing Recommendations

  • Orientation: Print each 3D model in the original orientation provided for best results.
  • Seam placement: Fix the seam line to the inner side of each rail so that the exterior surfaces remain clean and uniform.
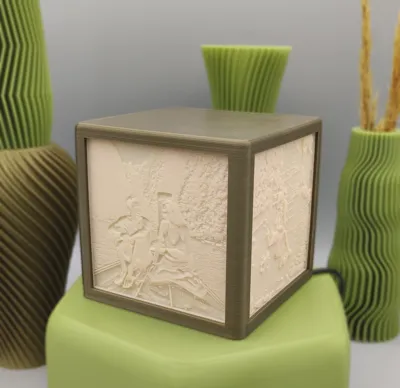
  • Lithophane material: Use skin-tone, off-white, ivory, or bone-colored filament/resin for a more elegant look when the lamp is off. (The BASE and UPPER can be printed in any color of your choice.)
  • LED color balance: Choose the LED strip tone opposite to the lithophane material color (e.g., use a cooler LED if the lithophane material is warm, and a warmer LED if it is cold) for the best visual effect.
  • Lithophane thickness: Adjust the minimum thickness according to LED brightness and the desired contrast — both for resin and filament.
    • Resin: allows higher detail and smoother transitions.
    • Filament: ensure at least two perimeters everywhere to avoid light leakage.

💡 Why You’ll Love It

✔ A truly personalized lighting piece.
✔ Affordable and simple to assemble.
✔ A thoughtful, one-of-a-kind gift.
✔ Designed for easy 3D printing (no unnecessary supports).


Documentation (1)

Assembly Guide (1)
Lithophane_Cube_Assembly_Instructions_v2.pdf

Comment & Rating (63)

(0/1000)

Print Profile
0.2mm layer, 4 walls, 15% infill
I only used the frame, designed my own screens, and scaled the original design to something larger. Excellent frame design, the base, everything fits perfectly
The profile uploader has replied
Show original
0
Reply
It turned out phenomenal, thanks for the review :)
Show original
0
Reply
Looks amaizing. great model. made this for a friend who lost his brother. Blue is his brothers favorite colour
0
Reply
The print profile is no longer public
working late into the night, afterwards I will upload the finished project
Show original
0
Reply
Print Profile
0.2mm layer, 4 walls, 15% infill
1
Reply
In MakerLab, which mode do you choose to create lithopane images that best represent the most realistic light and dark tones?
0
Reply
Hi - I can't adjust the llithophane dimensions to use decimal points, it will only accept whole numbers: https://3dp.rocks/lithophane
The designer has replied
0
Reply
After a website update it's more difficult, but not impossible. Try moving the slider to show numbers with decimals, then rewrite the decimals by adding the number next to it and deleting the original.
0
Reply
small tip, enter the number beforehand in an editor or somewhere else, e.g. 2.44 then just copy and paste it into the form. At least that's how it worked with the decimal places
Show original
0
Reply
Replying to @Haschkeks :
👍
0
Reply
This is an awesome print, I will be doing the Street Lamp print tomorrow. I do however recommend itslittho.com for the Litophane prints. I found it a lot more user friendly.
1
Reply
Are you setting your PEI printer to portrait or landscape mode?
0
Reply
What screws are needed to close it from below, what are their dimensions
Show original
0
Reply
I have the same question
Show original
0
Reply
Replying to @mati.lopez :
I purchased three 13mm countersunk screws, and two 2.5mm ones would also suffice
Show original
0
Reply
I wish there was better instructions on how to create the lithopane though. I am not advanced enough to figure it out on my own :/ Is there a website or something I can use to create the STL's?
0
Reply
Go here: itslitho.com and upload your photo; they will create the lithograph for you
Show original
0
Reply
Replying to @andywalky :
Hello, how can I make the images square on itslitho.com? It only scales them up proportionally. The image should be 2.44 mm, but I can only specify minimum and maximum thickness. What should I do
Show original
0
Reply
Is it permissible to commercially market customized lithophanes using this model of yours
Show original
0
Reply
Hi, you can't sell them directly. The MakerWorld license is for private use. To sell them, we would need to sign a usage agreement. They are affordably priced. If you're interested, you can contact us at a3dei3d@gmail.com
0
Reply
Excellent project. Easy to make and very eye-catching. I have used the ITS LITHO application to create the images and in a few hours I have the complete project assembled
Show original
0
Reply

License

This user content is licensed under a Standard Digital File License.

You shall not share, sub-license, sell, rent, host, transfer, or distribute in any way the digital or 3D printed versions of this object, nor any other derivative work of this object in its digital or physical format (including - but not limited to - remixes of this object, and hosting on other digital platforms). The objects may not be used without permission in any way whatsoever in which you charge money, or collect fees.

Remixes (2)
(Created before license restrict)