NES Console, Cartridges, and Controllers v2.0


Print Profile(4)


Description
The Nintendo Entertainment System is what defined video games in the 80s. Its what introduced us to Mario, Zelda, Metroid, Final Fantasy, Dragon Warrior, Kirby, and many more of the iconic franchises that are still popular today. It gave us the first controller to feature the D-Pad, while also providing a variety of other controllers, some good such as the Zapper, and NES Advantage, and some not-so-good such as the Power Glove and U-Force. And while the system may be approaching its 40th anniversary here in the States (the Famicom is already 41 years old in Japan), most of its games still hold up well today, and Super Mario Bros 3 is still one of the greatest games ever made.
This is an updated version of my original model that now includes an NES console, a pair of controllers, and 4 cartridges, Super Mario Bros/Duck Hunt, Super Mario Bros 3, Metroid, and The Legend of Zelda. Everything is highly detailed, right down to the label on the back of the cartridges and all the screw holes. The Zelda cartridge label was designed partially with HueForge (just the shield), everything else was completely designed by me.
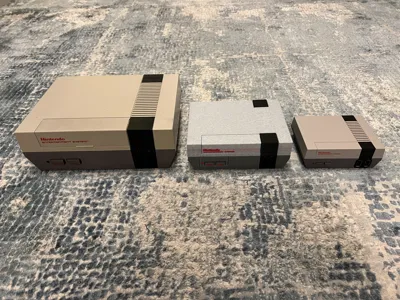
So here you go, a to-scale replica of the NES console that also doubles as a storage container. I built these at a scale of 1 inch to 1 centimeter, then scaled up everything to 175%, to maximize the space available on the A1 Mini and to make the text as readable as possible with a 0.4mm nozzle. Of course if you have a larger printer you can scale up all the objects to 254% and it should be exactly the same size and proportions as an original NES console or controller. The controller also features two different plugs. The second plate has shorter plugs that are designed to match the outlet on the printed console. The third plate has longer plugs which are to scale with an actual controller.
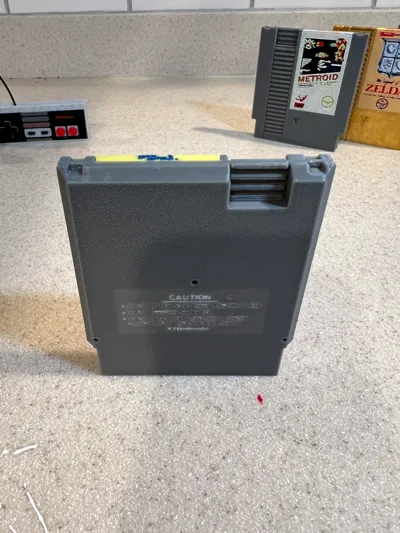
The cartridges can't really be scaled up too easily due to the labels, although if you know what you are doing you can certainly scale them, they would probably look amazing. The front labels height should not be changed, so you will need to bulk up the bottom of the top labels. So instead I included a regular sized cartridge as a separate plate that you can apply a sticker to for the label.
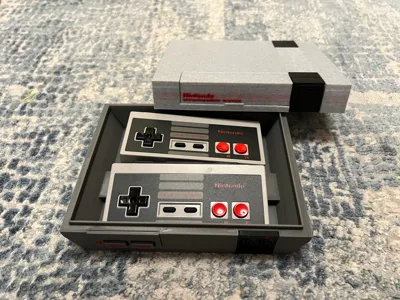
You can remove the top to make it a storage box which is capable of fitting actual NES cartridges (see my copy of Zelda in there, although I'd recommend adding some padding to keep your game safe), NSO controllers, or whatever else you want to throw in. Alternatively, if you want to use it as a toy, on the cartridge file is a big ugly cartridge holder print, this will align with the cut outs on the bottom of the console and will fit loosely but securely in your console, allowing you to insert cartridges into it and easily remove them. Unfortunately, it isn't spring loaded, but if someone with an engineering background would like to create a spring loaded version of it, it would be much appreciated.
The cartridge cover also opens just in case you want to blow in it, just make sure you read the assembly instructions so that this functions correctly. The cartridges also have pins that you can blow on!
Please note, due to the number of parts, and the fact that the cartridge labels need thinner layers, these models have been broken out across four different 3mf files, these will appear as different print profiles which I will label appropriately, so please download them all.
Filament swaps are only required when printing cartridge labels, which can use up to 8 different colors. As these are all approximately one hour long prints, I did not build in pauses. I assume that you can just watch the print and swap out each color when it is time, but I highly recommend writing down which filament is being swapped with which filament so you don't make a mistake, unless of course you want to turn Mario green to make him Luigi! All the other prints only use up to 4 different colors so your AMS can handle it.
Console assembly is pretty straight forward. It prints on 3 plates, the first plate prints the top and is primarily light gray but also uses red, white, and yellow. The second plate is primarily black with a bit of red, and prints the black section that go around the NES. The third plate is the bottom and is primarily dark gray with a bit of red and black. I did my best to minimize the number of color changes so that you create less poop, and only the first plate has 4 colors, plates 2 and 3 have only 2 colors, so you can easily print with an AMS without having to make any swaps. By separating the three major colors onto different plates, you could just remove painting if you don't have an AMS and all you would be missing would be the text which you could probably make a stencil for and paint on, painting the input colors would simple as only the top is colored.
I placed a brim around the top piece so that the corners don't get warped, but that means you need to remove it from between the stripes which is a huge pain. If you feel confident that it won't warp you may want to remove that brim. I also learned that my Light Gray that I used needs a lot of purging to get out the red (thus the pinkish stripes on my print) so I upped the flushing volume for that particular color change to more than double so that you won't have the same problem, but please feel free to adjust flushing volumes as you see fit.
The only assembly you really need to do is to glue on a few pieces and here is how:
- The flat black piece with the controller inputs gets glued to the cutout on the bottom with the red numbers near the top.
- On top it is important that you first place the cartridge cover in before gluing down the L-shaped black pieces.
- The two L-shaped black pieces look identical, but they are not, one of them has a tiny circular cut out in one corner. That cutout goes over the cartridge cover and holds it in place. The other L-shaped piece goes in the same orientation on the back with 1 stripe on the top and 2 stripes on the side.
- Then there are the small cylindrical inputs. The red and yellow RCA inputs go on the side with red on the left and yellow on the right. The white co-ax input goes on the back. There are circular indentations for all three of them so you place them correctly.
- Optionally, if you don't want to use it as a box, you could glue in the cartridge holder and then glue the top onto the bottom.
Cartridge assembly is also easy. The label comes in two pieces, a front label and a top label. The front label is the main artwork on the front of the cartridge, whereas the top label is the bit that folds over onto the top of the cartridge with the name of the game. You will glue the front label on top of the top label, so that the top label is on the bottom. It is called the top label because the small side with the title goes at the top of the front label. I glue these together using a cartridge so that they can get aligned properly. Once these are glued together you can then glue the entire label assembly onto the cartridge.
Controller assembly is the quickest and glue is optional. Take the controller and the controller plugs. Cut a piece of black filament, and stick it into the holes on both pieces. I glued the filament into the plugs and left it loose in the controllers as I don't want them permanently installed in them. Just put a bit of glue on the end of the filament and stick it in the holes, hold it for 10-15 seconds and you should be good. The filament is the only thing that is not to scale, true scale would be approximately 4-3/8mm, but filament is just so much more convenient to use. Please note, this will only work at the 175% scale that I've included in the 3mf, these holes will need to be adjusted if you want to print it at a different scale. Also, the plugs are printed upside down to avoid needing supports, but I do include a brim as they are standing on pretty thin legs.
I used the following filaments for my prints (which was really just what I already had at home and is the cheapest stuff I could find):
- Dark Gray: ANYCUBIC Gray PLA (pretty much a perfect match to the NES)
- Light Gray: ELEGOO Marble PLA (please note, this PLA requires a lot of pooping so the purge values for it have been set really high)
- Black: ANYCUBIC Black PLA
- White: ANYCUBIC White PLA
- Red: Inland Red PLA
- Yellow: ANYCUBIC Yellow PLA
- Blue: Inland Blue PLA
- Orange: ANYCUBIC Orange PLA
- Green: ANYCUBIC Green PLA
I do not have gold filament, so I printed the Zelda cartridge in white and painted it with bright gold paint I bought at Michaels. The label uses yellow, but certainly both could be printed in gold.
I have no plans on designing a RF modulator or AC adapter, however, I probably will add more games to the cartridge collection over time. I'd like to at the very least add Dragon Warrior IV, Final Fantasy, Bubble Bobble, Mike Tyson's Punch-Out, and Wizards and Warriors to the collection, but it will probably be a few weeks.
I hope that you enjoy this print, I had a lot of fun designing it. This is fan art and is not licensed by Nintendo, so please do not sell copies of it.
Now You're 3D Printing With Power!
Boost Me (for free)
License
You shall not share, sub-license, sell, rent, host, transfer, or distribute in any way the digital or 3D printed versions of this object, nor any other derivative work of this object in its digital or physical format (including - but not limited to - remixes of this object, and hosting on other digital platforms). The objects may not be used without permission in any way whatsoever in which you charge money, or collect fees.
Comment & Rating (40)