Search models, users, collections, and posts

Poop Shoot Conveyor Belt System VERSION 2

Print Profile(1)

All
P1S
X1E
X1 Carbon
A1
P2S
P1P
X1
H2D Pro
H2C
H2D
H2S
X2D
A2L

0.16mm layer, 3 walls, 15% infill
Designer
31.5 h
11 plates
4.8(19)

Open in Bambu Studio
Boost
505
869
69
75
1.1 k
178
Released 

Bill of Materials

Maker's Supply Kits and Parts
Select all
M3x10 BHCS Machine Screw (20PCS) - AA172
M3 Carbon Steel Hex Nut (20PCS) - AB005
List other parts
  • **VIEW BILL OF MATERIALS IN DOCUMENTS*** x 1:

Description

Poop Shoot Conveyor Belt System - Version 2.0 (BALL BEARINGS BABY!)

I’m excited to announce the release of Version 2 of the conveyor belt system! This update introduces ball bearings to significantly reduce friction between gears and improve overall performance. After a few hundred hours of testing, I noticed that plastic-on-plastic contact was less than ideal for durability. The addition of ball bearings (½ x 1-1/8 x 5/16 inches) has enhanced longevity and smoothness dramatically.

What’s New?

  • Enhanced Durability with Ball Bearings: Version 2 includes ball bearings (½ x 1-1/8 x 5/16 inches) at the end of each bracket, reducing friction and delivering smoother, more durable operation.
  • Improved Gear Design: The gear has been redesigned to ensure a better fit and a stronger grip on the track, resulting in a more reliable performance.

Upgrade from Version 1
If you’ve already printed Version 1, here’s what you’ll need to update your system:

  • Components to Replace: motor and end brackets, couplings, and gears.
  • Additional Parts: four ball bearings (½ x 1-1/8 x 5/16 inches) and 16 M3x10 screws and nuts to assemble the new parts.

**Make sure to read notes from Version 1
 

If you encounter any issues with assembly or have further questions or feedback, please reach out—I’d love to hear from you. Thank you again, and I hope this updated design brings even more value to your 3D printing projects!

Happy printing!
– 3DPrintAdventures

************************************************************************************************

Poop Shoot Conveyor Belt System - Version 1.0


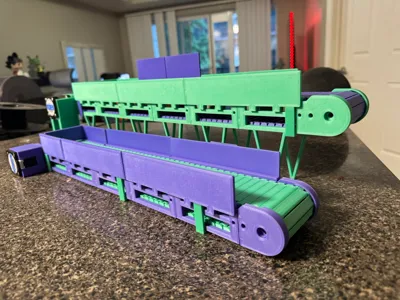
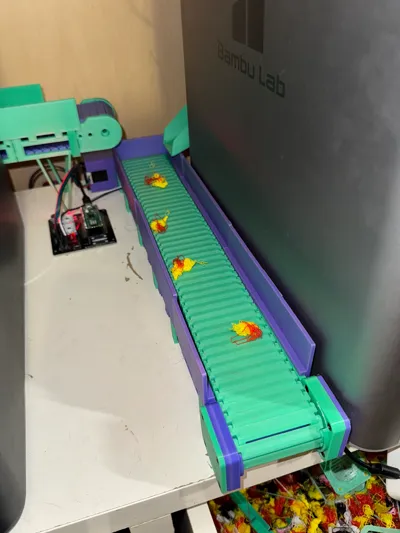
Introducing Version 1.0 of the Poop Shoot Conveyor Belt System! After months of dedicated work, I'm excited to share this reliable and innovative solution with you all. Designed to automate waste disposal and save space, this system eliminates the need for bulky boxes behind your printers.


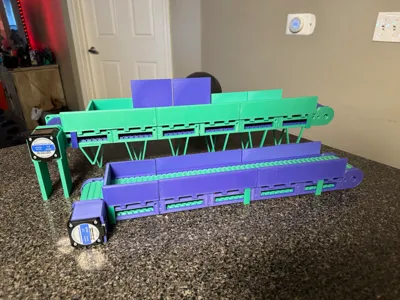
With these automated 3D printable conveyor belts, waste is efficiently transported to a waste bin at the front or side of the printer. Each conveyor belt is powered by Nema 17 42x42x38mm stepper motors, driven by TMC2208 stepper drivers, and controlled by a Raspberry Pi Pico (though an Arduino can also be used – I plan to release compatible code soon). The code is written in C and is provided in the documentation. This code is for a dual-conveyor system but will still work with just one.


To simplify setup, I’ve designed a custom PCB that connects two stepper motors, two drivers, inputs for two switches, two indicator LEDs, and an override button. This PCB will be available for purchase on my Etsy store. Additionally, I’ve created custom switch mounts for the X1 and P1 models to activate the corresponding conveyor.


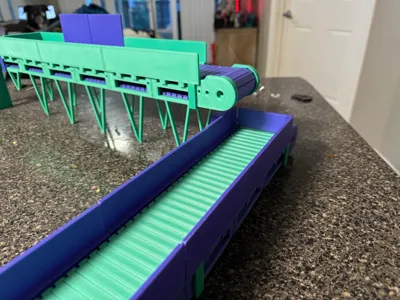
The conveyor belts are available in different heights (flat, 20mm high, and 80mm high) and are modular, allowing you to customize the length to your needs. I have organized the print profile by size. While I find six sections to be the ideal length for the stepper motors we’re using, you can adjust it as you see fit. The conveyor belt itself is print-in-place and easily snaps together for quick assembly.


I'm also working on Version 2.0, which will feature ball bearings to reduce friction and ensure smoother operation. As this is my first project of this complexity, I welcome your feedback to help improve the design. Stay tuned for detailed documentation and a how-to video to guide you through the assembly process.


Thank you for supporting my journey, and I look forward to hearing your thoughts!


Documentation (2)

Other Files (2)
PoopShootConveyorCode.txt
Bill Of Material Poop Shoot Conveyor.pdf

Comment & Rating (69)

(0/1000)

this is how I assembled it. I used M3*16mm on the side racks support and added a washer between the support and the side plate to act as a spacer, so the belt is no too tight sideways. I do think that an spacer should also be used on the rolls, but let's see how it goes when I finish. I am also planning to use a cheaper motor . I'll keep you updated.
(Edited)
The designer has replied
designer
2
Reply
I'll try to use one of these super cheap step motor. But I have also ordered a regular DC motor to try later.
1
Reply
Replying to @Eddie7 :
well, it didn't work. the motor is not powerful enough to move it
0
Reply
Replying to @Eddie7 :
hey dude! there’s an awesome creator who reached out to me that created a version that uses DC motors, hopefully can get something posted soon. in the meantime, my PCB board is available for sale if you’d like to make things a little easier! love all the updates. feel free to message me on Etsy and I’d be happy to answer any questions you have
1
Reply
Print Profile
0.16mm layer, 3 walls, 15% infill
Side brackets were a little tight for me personally. Had to trim the belt pieces witb a wire cutter but not really an inconvenience. Pcb fairly easy to set up just plug the stepper to the board and the pico to usb and you're all set. It did come with a lot of extras which is nice. I used ai to make code in thonny for the conveyor to activate on its own every few minutes and now it's perfect for big prints when i need to be away. Used different creator's slide model. All around amazing project!
profile
2
Reply
How do I take apart a chain linked together?
Show original
0
Reply
Replying to @user_1129275069 :
just pull the parts apart. quite well designed to be open at any part of the belt
(Edited)
profile
1
Reply
Print Profile
0.16mm layer, 3 walls, 15% infill
This is just what I was looking for! I added washers to the body bracers to allow easier belt function. I needed an extra long run of conveyor to make it to my bin so one extra print of body parts and 2 extra belt plates did the charm. I believe I needed to print 1 belt connector for good fitting. only thing keeping this from 5stars is there's no medium height body parts as mentioned in the description, just the tall and table level, I had to cut and modify the talls to suit my printer.
profile
1
Reply
What are the final dimensions? Does it exceed one meter in length?
(Edited)
Show original
1
Reply
Replying to @user_2994766058 :
sorry just seeing this, not longer than 1M. probably about 0.75/0.8M or about 30”
0
Reply
Since you are no longer making the boards can we have a wiring diagram at least?
The designer has replied
3
Reply
I still make boards! I just updated the Etsy store :) boards will be ready to ship in 7-10 business days. I can release the wiring diagram as well though!
0
Reply
Replying to @3DPrintAdventur :
Ok I saw them become available earlier today and ordered 2, sorry was just stalled trying to figure it all out. Thank you
0
Reply
Replying to @Messiealex :
If you have any questions please message me on Etsy!!
0
Reply
can you make me a operating one....i will gladly pay u
3
Reply
Where are you from, mate? I may, gladly, make one for you, if you are around the UK. Would charge nothing, just material ;-)
1
Reply
Replying to @Eddie7 :
I’m in the uk where did you get limit switch’s and how does it go together I purchased everything busy printing thing of just waiting for parts to arrive only thing I’m not sure about it the limit switch and how it all goes together I own x1c and p1s
0
Reply
Replying to @kelly_whiteley :
I do not see where to use the limit switches... I did not follow the automation instructions. I used what I had around: A DC motor JGB37-520, with a high torque reduction and speed control. Then I connected everything to a TP-Link smart plug and made a rule to let it run for enough time to dispense the poop. I don;t know how to provide a project remix with my parts design... At the moment, it runs when I click the shortcut on my phone, but I am planning to attach a light or magnetic sensor to detect poop on the ramp and relay to automate the process. Also, I had to sand and trim the corners of the belt. I would suggest to remove the brim.
0
Reply
Print Profile
0.16mm layer, 3 walls, 15% infill
awesome model and works great! got the electronics off the Etsy to keep it simple. works exactly as I needed. awesome help from creator with questions.
0
Reply
Boosted
would you be so kind as to make the source step file available for editing?
0
Reply
Boosted
Never mind, I drew what I needed myself and made my take on it. I like the way the conveyor belt snaps together, and the coupling to the drive gear. Those I kept. But based it on 20x60mm aluminium profile - which I then actually just 3D print for now. Gives flexibility and a sturdy design :) I will put it up including source step files when I'm done with it.
0
Reply
Boosted
Replying to @nic6911 :
Here's a couple of pictures of the real deal.
0
Reply
Boosted
And video - 50 RPM and 300 RPM
GIF
GIF
0
Reply
Boosted
AMAZING!
The designer has replied
designer
1
Reply
thank you for the boost!
0
Reply
Boosted
Replying to @3DPrintAdventur :
No problem, this is amazing
0
Reply
Is there an assembly instruction for the conveyor belt or conveyor belts?
The designer has replied
Show original
2
Reply
I will be making one soon!
0
Reply
where do you put the limit switch on the x1c?
0
Reply
there's a model in his profile that goes where the wiper is in The Poop Shoot. the end stop switch goes behind the little bar that make sure the poop is moving freely. so when the print head goes over the Poop Shoot it activates. his code is good and has advanced logic so doesn't run unnecessarily when it's purging, only when it first touches it for a delayed time. I'm thoroughly impressed with this model design, electronic sold on Etsy to support it and the designer. I had to ask a plethora of questions as I made a lot of mistakes and they were more than helpful.
(Edited)
0
Reply
ok thanks
0
Reply
Replying to @Michaelwtong :
One more question, can you just show me a picture of how to mount it?
0
Reply

License

This user content is licensed under a Standard Digital File License.

You shall not share, sub-license, sell, rent, host, transfer, or distribute in any way the digital or 3D printed versions of this object, nor any other derivative work of this object in its digital or physical format (including - but not limited to - remixes of this object, and hosting on other digital platforms). The objects may not be used without permission in any way whatsoever in which you charge money, or collect fees.