Search models, users, collections, and posts

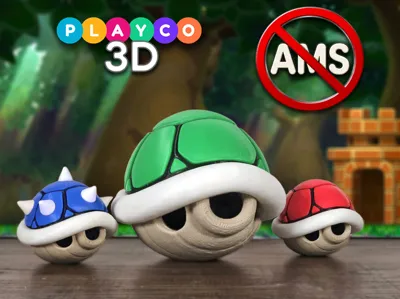
Mario Koopa Shell and Spiny Shell Multi Part

Print Profile(13)

All
A1
P1S
P1P
X1 Carbon
X1E
X1
A1 mini
H2D
H2D Pro
H2S
P2S
H2C
X2D
A2L

(Koopa Shell 100%) 0.2mm layer, 2 walls, 10% infill
Designer
4.5 h
4 plates
5.0(275)

(Spiny Shell 150%) 0.2mm layer, 2 walls, 10% infill
Designer
9.2 h
4 plates
5.0(257)

(Koopa Shell 150%) 0.2mm layer, 2 walls, 10% infill
Designer
8.6 h
4 plates
5.0(117)

(Spiny Shell 100%) 0.2mm layer, 2 walls, 10% infill
Designer
4.9 h
4 plates
4.9(254)
Click to see more

Open in Bambu Studio
Boost
4178
8523
1345
1.3 k
6.8 k
3.5 k
Released 

Description


There's something about a simple Koopa Shell that holds a special place in my heart. Maybe it's from countless hours spent playing the original Mario Kart in the 90s, battling family and friends all night with with different shells. Getting a red shell was the best as it gave you the ultimate power!


This 3D printed model is the first multi-part model I designed. When I began experimenting with multi-color 3D printing, I started collecting various Mario models online from other designers with a goal of displaying a large collection on my shelf. However, I couldn't find a Koopa shell that fully satisfied me, so I decided to create my own multi-part design, which marked the beginning of my journey of many hours of learning and experimenting with Blender. You might wonder why the colored shell pieces are each shaped slightly differently. It's because I aimed to preserve their authentic appearance and original shapes.

At 100% scale, the model stands 2.5” (63.5mm) tall and 3” (76mm) long. At 150% scale, it measures 3.75” (95mm) tall and 4.5” (114mm) long. If scaling down to 80% size as seen in the pictures, adjusting the size of the small triangle pieces by approximately 1% may be necessary for a better fit, but readability of the markings will be too small to see, so pay attention to each piece. I would assume scaling up past 150% poses no issues, though snapping in the bottom part may become a little hard as the material wont bend as much. Scaling down the tan and black insert a tad will help.


Colors Used:

-Common shell colors:

- Elegoo: Matte white, black

- Sunlu: Burlywood

- Green shell: PLA Pro green

- Red shell: Creality Hyper Red

- Blue shell: Elegoo BlueGrey


Printing Technique:

I consistently use a glue stick to secure prints to the bed plate, which significantly improves adhesion. For the tan lower shell, I use default tree supports at a 25-degree angle, along with rafts set with an 8mm expansion. The white ring is set for strong tree supports at 25-degree angle with rafts and a 3mm expansion. Default tree supports for the top black shell. When printing color shell pieces, rafts are recommended for the small triangle pieces, and default supports for the bigger pieces. If bed adhesion concerns arise with larger pieces, consider using rafts, although I haven't encountered issues myself.


Assembly Tips:

- Light sanding will be necessary on the bottom of the white ring due to support material residue.

- Each part is labeled for ease of assembly:

- White ring: Oval cut on the inside edge, marking the front

- Black insert: Arrow indicates front

- Black top: Arrow on bottom and small bump point forward

- Starting from the back looking forward, L (Left side), R (Right side)

- Colored pieces: Labeled for front (F), back (B), rights (R), lefts (L); top is unlabeled

- Small triangle pieces: Marked sequentially from front to back (1, 2, 3) with side indicators (R or L)


Building the Model:

1. Snap the black insert into the tan lower shell, ensuring it faces the front.

2. Snap in the lower shell to the white ring, inserting the back first and then snapping in the front. If you are pressing too hard, you are doing it wrong, don’t force it as you could damage it.

3. Snap in the black top in the correct orientation; gluing may be necessary if it’s too loose.

4. Take your time gluing the colored pieces, allowing time for drying to prevent sliding around.

5. Insert the small triangle pieces in their designated slots with the flat printed edge facing downward.

6. (For Blue Spiny Shell) Glue on the spikes to complete the assembly.


Now you have a Koopa Shell straight out of the game! Thank you for visiting and building this model. For more Mario prints, explore the rest of my collection.


Follow me on instagram for the latest updates!

https://www.instagram.com/playco3d/

Comment & Rating (1345)

(0/1000)

I remixed the wings from another model to fit into one of the spike holes. I put it up over here if anybody wants it. It is currently scaled to fit the 150% sized shell, scaling by 66.67% will fit the 100% shell. https://www.thingiverse.com/thing:6693994
The designer has replied
designer
28
Reply
Awesome, nice work! Thanks for sharing just the wings on Thingiverse and not a full remix. I'm in the process of designing wings, and will release a profile here for the shells soon.
4
Reply
Replying to @Playco3D :
Absolutely, fantastic work btw!
0
Reply
Thank u for perfect fitting remix! The pic doesn't show how actually awesome it looks like. scaled it up to the 200% version and I'm happy I chose the blue Koopa.
1
Reply
Boosted
Love printing models with glow in the dark pla 😀
The designer has replied
designer
15
Reply
ohhhh now that's cool. I haven't tried glow in the dark PLA. I'm gonna have to use this on my Cappy model! Thanks for sharing
2
Reply
what type of glow pla is it?
1
Reply
Boosted
Replying to @seededubs :
Sunlu PLA Glow in the Dark 😀
0
Reply
Printed the green and red shells at 150% and went 250% on the blue shell with a silk blue. assembly had me a bit confused on the first one because I was looking at left and right from the front which was backwards from that end. awesome model had to boost it. Thanks! Any chance you plan on adding a blue winged spike shell version?
The designer has replied
designer
8
Reply
Amazing! I haven't scaled up that big yet but will eventually. Any issues snapping in the tan bottom into the white ring, or with the black top into the ring at that size? I will update the description to identify the L and R better, thanks for letting me know. I did consider adding wings and may provide an update in the future 😀
0
Reply
Replying to @Playco3D :
Oh yeah, wings would be good. I already have one, but yours is much easier to print.
0
Reply
Replying to @tob.hab :
Where'd u get the wings from they look great
0
Reply
printed the OP’s red shell profile and scaled it to 150%. FYI the two right pieces of the shell didn’t fit well (they were too deep and the rear right didn’t even quite fit the shape), so I duplicated the left side pieces and mirrored the X & Y axes and it worked perfectly.
The designer has replied
designer
3
Reply
Awesome looking shell! That's interesting that the pieces didn't fit, ive never encountered this issue or from another user. Did you use the 150% profile? Did you accidentally place the right pieces in the left side?
0
Reply
Replying to @Playco3D :
I had used the 100% file and just scaled all the pieces up to 150%. at the time, the 150 profile was actually the spiky shell, which I didn’t want. Not sure what happened, but the R ones were definitely deeper. Probably a non-issue if no one’s mentioned it before!
1
Reply
Boosted
alright so I’m not the only one! I’ve tried printing this twice because I thought maybe the pieces had warped a little bit. the right side simply doesn’t fit. it is not properly shaped to fit into the black insert.
2
Reply
Boosted
Print Profile
(Koopa Shell 100%) 0.2mm layer, 2 walls, 10% infill
awesome model thank you!!!
The profile uploader has replied
profile
2
Reply
You're welcome, thanks for sharing!
(Edited)
1
Reply
Boosted
Replying to @Playco3D :
been printing different versions for my kids 😁
(Edited)
profile
1
Reply
Replying to @Mugen89K :
Very cool! Now they just need some go karts and throw shells at each other, haha
(Edited)
2
Reply
Printed at 400%! Looks awesome!
The designer has replied
designer
2
Reply
Holy cow, that's awesome! thanks for sharing
1
Reply
did the top black part fit easy for you? mine isn't going in
0
Reply
Replying to @billyw2003 :
no haha it was quite the squeeze lol
0
Reply
Boosted
Print Profile
(Spiny Shell 100%) 0.2mm layer, 2 walls, 10% infill
perfect model as always
The profile uploader has replied
profile
3
Reply
Great job! Thanks for sharing
0
Reply
Boosted
Print Profile
(Spiny Shell 150%) 0.2mm layer, 2 walls, 10% infill
Print profile is really good. I’ve been having fun printing variations of these with different filaments. I used the wing profile another user shared on here. Everything prints without issue. I’ve printed PLA+, Glow PLA, and PETG without issue. I’ve used both the 100% and 150% profiles. all I’ve charged is to slow things down and move down to .16mm layer height.
The profile uploader has replied
profile
1
Reply
wow those look amazing, great job!
(Edited)
1
Reply
may i ask what filament you used for the glowing wings? looks amazing!
(Edited)
1
Reply
Boosted
Replying to @user_35267530 :
Sorry for the late reply. I never check my mentions on here. This is what I used. It doesn’t stay charged up long, but under black light, it’s awesome.
0
Reply
Print Profile
(Koopa Shell 100%) 0.2mm layer, 2 walls, 10% infill
Printed both spike version and no spikes. Spikes pop in clean, secured them with super glue as they're for 2 young boys who are less than careful. They print clean enough and the orientation of the shell pieces means they're left with classic shell ring marks. I want to see if I can get the shell brim orientated slightly differently, there's a bit of layering I'm not keen on but that's personal preference. They print and go together really nicely. At some stage I want to print them 200% bigger.
The profile uploader has replied
profile
1
Reply
You can prolly use a variable layer height at the top, to reduce the layer lines.
0
Reply
Replying to @Playco3D :
It's a great print, you're probably right, I should try variable layers to get it smoother. As is I just lightly sand the supported rim and it's great.
(Edited)
profile
1
Reply
Replying to @pippyswoodforge :
hope it helps and thanks for sharing 😀
0
Reply
Print Profile
(Spiny Shell 150%) 0.2mm layer, 2 walls, 10% infill
Looks perfect. In the next Update i wish some Wings :)
The profile uploader has replied
profile
1
Reply
There is a user on here that added wings...I can't remember who but the user put them on thingiverse
0
Reply
Replying to @Playco3D :
Thanks man, found it in the comment section. Read First, then Ask. Sorry :) This Boost goes on me :)
(Edited)
profile
1
Reply
Replying to @ressistantx :
Appreciate it, thanks! 😀
0
Reply

License

This user content is licensed under a Standard Digital File License.

You shall not share, sub-license, sell, rent, host, transfer, or distribute in any way the digital or 3D printed versions of this object, nor any other derivative work of this object in its digital or physical format (including - but not limited to - remixes of this object, and hosting on other digital platforms). The objects may not be used without permission in any way whatsoever in which you charge money, or collect fees.