Legend of Zelda Overworld Map 200% remix new frame


Print Profile(1)

Description
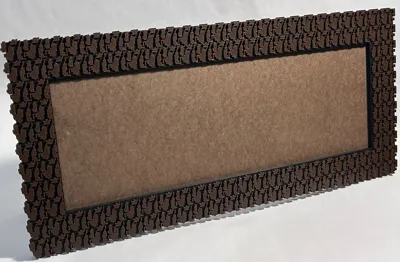
This is a remix of AeonJoey's Zelda Overworld Map that has been scaled up 200% and I created a new frame for it that mimics the wall pattern of the cave shops in the game. The frame is designed specifically for the 200% enlargement of this map and may not scale back down to 100% without some modifications. I haven't tried it but please let me know if you do it and it works.
THIS IS ONLY FOR P1/X1. Will not fit on the smaller A1.
OVERALL SIZE: 24" x 11"
DO NOT AUTO ARRANGE. It will mess up all the map pieces. They are separated by colors on the different plates.
NOTES: Please visit the original map model to get AeonJoey's detailed description on how to print the map pieces before you print the frame. All the map pieces should be printed without support. I used their recommendation of the Hilbert pattern and .28mm layer height and everything turned out perfectly. After you complete all the map pieces, change the following settings to print the frame parts:
layer height to .20mm
Top surface pattern to monotonic
Supports to on - normal (auto) - threshold angle 5% (your frame will not turn out well without - don't forget to turn this on for the main frame parts! you can turn off support for the final plate of accessory parts)
Brim off (I printed the map pieces without too)
I chose a darker brown to print the frame so it contrasted with the map pieces. I followed AeonJoey's recommendation for all of the other colors.
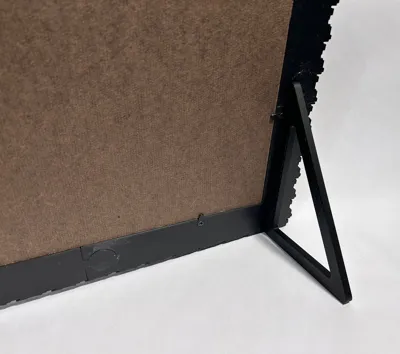
As you can see in the photos, I used a 1/8" hardboard to attach the map pieces to which I picked up from my local hardware super store in the plywood isle. You can glue it to the recessed rabbet in the frame, or use the clips that are on the last build plate along with some 3x8mm flathead self-tapping screws. Also included are 3 keyhole parts that glue into the holes in the back of the frame if you want to hang your model. Be sure to glue these in place with the correct direction facing up. Or, use the two legs for a table-top display (delete these off the last build plate if you have no intention of a table-top display).
You will need to dig out the support on all the frame pieces and put a little effort into getting out any residual support material. Any left behind may interfere with the interlocking parts.
Glue the frame parts together using the glue of your choice. I used a 2-part epoxy for a little open working time. BE SURE YOU ARE ALIGNING THE PATTERN OF EACH FRAME PART TOGETHER PROPERLY! The frame parts key together very tightly. Resist the urge to dry fit them completely until you are glued up and ready to assemble. You might find them very difficult to separate once put together. When it's all glued up, place it on a flat surface and I would suggest weighting it down flat while the glue cures. A few taps of a rubber mallet will convince the keyed parts to flush up if they are being stubborn.
GLUING THE MAP PIECES IN PLACE (IMPORTANT): Lay out all the pieces outside of the frame in the order they will be according to the map. This will allow you to more quickly glue them in place before your glue sets. Use a glue with ample working time to allow you enough time to set all the pieces within the frame. The pieces must be able to shift a little as you assemble, especially as you put the last column of pieces in because it is a tight fit. If the glue on the first run of pieces sets up before you finish the last column, it will be frustrating to have to sand the edges of these final pieces to get them to fit. I used Gorilla Glue wood glue for my samples. 1-2 hour 2-part epoxy may work too but likely more difficult to spread. I applied the wood glue to the hardboard in a continuous zig-zag bead of glue, and then spread it around with an old business card that I cut little “v” notches as if I were applying mortar for ceramic tiles. I used enough glue to cover the entire hardboard surface with a thin layer, but not so much that the glue would squeeze out between the pieces. Also- avoid sliding the pieces into place like you are playing Tetris. This may cause the glue to get pushed up at the joint between pieces. Try to lay the pieces straight down into position with minimal shifting. I started at the top left corner and finished at the bottom right corner.
Would love to see a finished print if you complete this model!
UPDATE- Zelda plaque that is sized for this frame can be found here:
Legend of Zelda Plaque for a 200% Map Frame Remixed by cmcraig2 - MakerWorld
If you have the HSW Honeycomb Storage Wall system, download my HSW picture frame hanging plug to easily hang it onto the HSW:
Picture Hanger HSW Plug Honeycomb Storage Wall by cmcraig2 MakerWorld: Download Free 3D Models
Boost Me (for free)
If you like this frame, please send me a boost! It's free to do so and helps me with filament costs associated with designing models I upload to Makerworld.
Comment & Rating (53)