Search models, users, collections, and posts

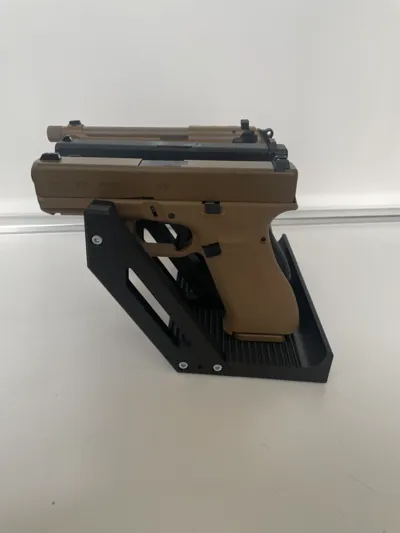
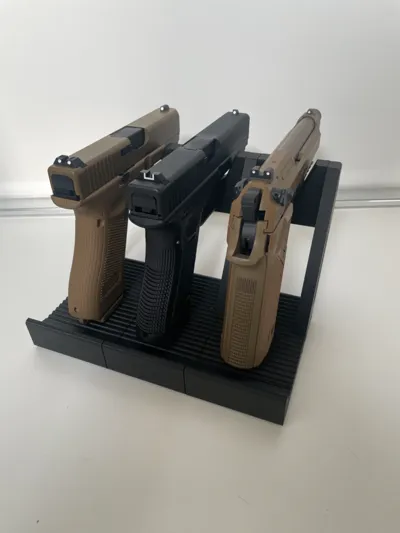
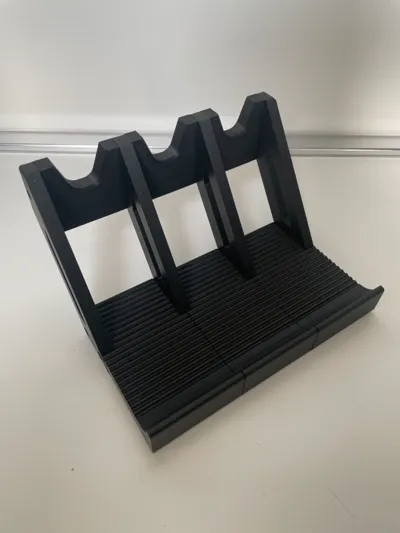
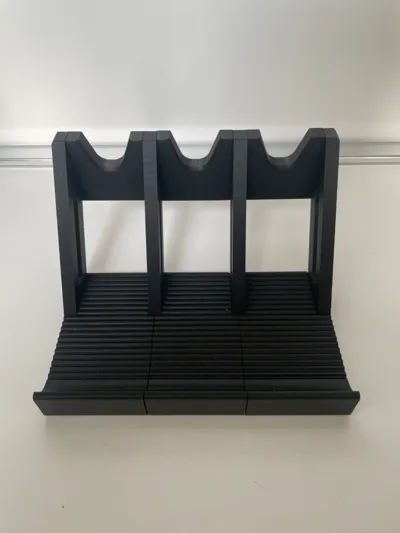
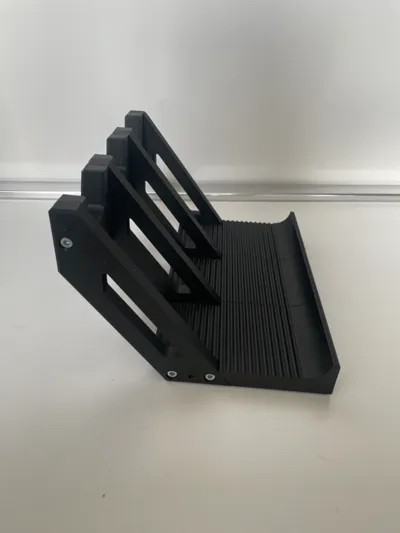
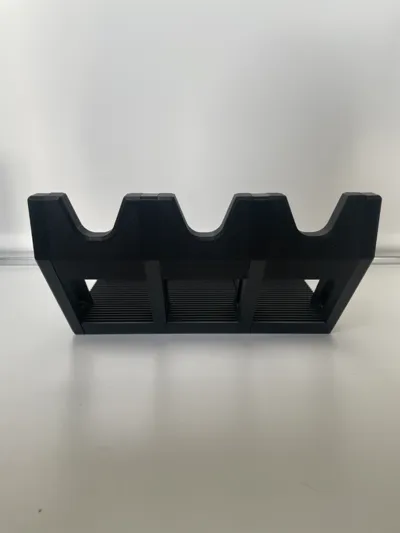
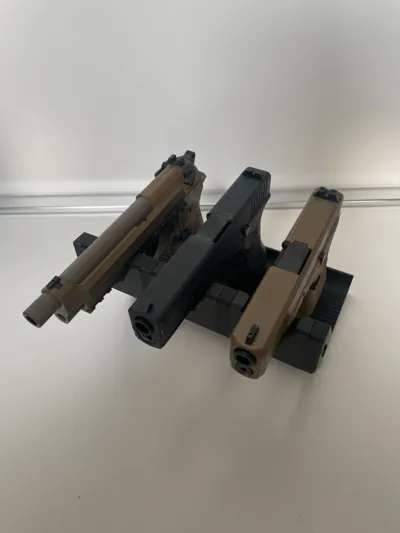
Modular pistol/gun rack "lite" (Glock, Sig, Ruger)

Print Profile(5)

All
X1 Carbon
P1S
P1P
X1
X1E
A1
H2D
H2D Pro
H2S
P2S
H2C
X2D
A2L

3 guns rack 1 plate only - 0.2mm layer, 2 walls, 15% infill
Designer
8.5 h
1 plate
4.7(13)

2 guns rack - 0.2mm layer, 2 walls, 15% infill
Designer
6 h
3 plates
4.9(7)

4 guns rack - 0.2mm layer, 2 walls, 15% infill
Designer
11.6 h
3 plates
5.0(4)

3 guns rack - 0.2mm layer, 3 walls, 10% infill
Designer
8.8 h
3 plates
5.0(2)
Click to see more

Open in Bambu Studio
Boost
385
987
37
28
780
275
Released 

Description

This is my new modular pistol/gun rack “lite”. (minimum 2 guns)

It is universal for Glock, S&W, Sig, Ruger, and many others.


Low filament consumption!


You can start from 2 guns rack and add as many as you want.

Just add one “Base middle” (check below for the letter instruction),Appoggio” and "Barra middle" every gun you want to add to your new modular rack.


Hardware: You only need a bit of screws M4, 10mm lenght!


When mounting you need to start to the end

For 4 module rack: Base end and Appoggio screwed to the Barra end. Barra middle screwed to the pieces already mounted. Then screw Base middle B and Appoggio to the already mounted part. Then add another Barra middle. After that screw Base middle A and Appoggio to the mounted part. Add another Barra middle. Screw Base start and Appoggio the the almost finished rack. Complete the build screwing Barra start.

For 3 module rack: Base end and Appoggio screwed to the Barra end. Barra middle screwed to the pieces already mounted. Then screw Base middle A and Appoggio to the already mounted part. Add another Barra middle. Screw Base start and Appoggio the the almost finished rack. Complete the build screwing Barra start.

For 2 module rack: Base end and Appoggio screwed to the Barra end. Barra middle screwed to the pieces already mounted. Then screw Base start and Appoggio the the almost finished rack. Complete the build screwing Barra start.

For adding 1 or 2 modules: If you have your rack already mounted unscrew Barra start and Base start. Check the letter of the Base module you see (check pic below). Add new Base middle, and all other parts you need. You have to alternate A and B every time. Complete with Base start and Barra start.


Please feel free to write your comment!

Hope you will like it


You may also like:


Comment & Rating (37)

(0/1000)

Awesome print. I added empty spaces in the base elements for magnets (and pause in print process to insert them) to help stabilize the rack in my safe (it also helps with stabilizing the pistol itself) but it's an amazing model even as is.
The designer has replied
0
Reply
Amazing!! thank you
0
Reply
Print Profile
3 guns rack 1 plate only - 0.2mm layer, 2 walls, 15% infill
It would be better if there was a protrusion for the mag well to stabilize the grip.
1
Reply
Boosted
is there any way you can make a version, that’s all in one print for the X1 Carbon. Thank you !
The designer has replied
1
Reply
Hi, how many guns you need? If I can, I will create a print profile for you :) thank you for your boost!!
1
Reply
Boosted
Replying to @T.giovanzana :
3 guns thank you !
0
Reply
Replying to @VERSE187 :
Hi, check the profile "3 guns rack 1 plate only - 0.2mm layer, 2 walls, 15% infill"
0
Reply
Print Profile
3 guns rack 1 plate only - 0.2mm layer, 2 walls, 15% infill
0
Reply
Boosted
Print Profile
4 guns rack - 0.2mm layer, 2 walls, 15% infill
Great print. Wish there was a different way to put them together. Maybe just plugs instead of the screw setup.
1
Reply
Boosted
Great print and easy to assemble. Only gripe I would have is that it gets very front heavy, and I have to move it to where the muzzles hit the back of my safe so it doesn't fall over. It would be nice if there was a slot for a weight on the back end where the grip goes. However, that is a very small gripe as it does work well when positioned right in my safe.
1
Reply
Boosted
Thank you!
1
Reply
it's like 18 screws for the 3 holder. You're building from right to left. I recommend machine head screws. M4 x 12 also work if your stores hate the metric system and carry hardly any stock. Great print. The screw hole supports are hard to get out, but if you can push them through a centimeter, your good to go.
0
Reply
Print Profile
3 guns rack 1 plate only - 0.2mm layer, 2 walls, 15% infill
Great design. The only thing I wish was different is the back where the butt of the pistol hits is rounded. My pistols slide up there a bit.
0
Reply
Print Profile
3 guns rack 1 plate only - 0.2mm layer, 2 walls, 15% infill
Printed well. Would recommend through holes instead of having to thread through both pieces during assembly, as this would decrease the likelyhood of stripping the part.
0
Reply

License

This user content is licensed under a Standard Digital File License.

You shall not share, sub-license, sell, rent, host, transfer, or distribute in any way the digital or 3D printed versions of this object, nor any other derivative work of this object in its digital or physical format (including - but not limited to - remixes of this object, and hosting on other digital platforms). The objects may not be used without permission in any way whatsoever in which you charge money, or collect fees.