Bambu Build Plate Holder 2-8 tapered slots etc.


Print Profile(2)

Description
UPDATE November 27, 2025: I have confirmed that scaling the model to 129% on X works for H2C build plates. Scale it before rotating it to fit. You can also just use the same 133% as for the H2D. Note that the build plates will need to be inserted with a side down. Unlike the H2D version, they cannot sit on their rear (or front) side, because there is such a big difference between their width and depth, so they're too narrow and won't catch in both slots and will fall. Conversely, if you only want to stand them up on their front/back ends, you can scale the model to 125%, but then their sides won't fit.
Update June 27, 2025: I have confirmed that scaling the model to 133% on X works for H2D build plates. Scale it before rotating it to fit.
See ratings and discussion at https://www.printables.com/model/304326-bambu-build-plate-holder-with-2-8-tapered-slots-op
Yet another version of the Bambu Lab X1 (Carbon) bed holder, this time with 2-8 slots (your choice), and with tapering on the slots to make it easier to insert the beds. Also, the middle section is a separate part that can be sliced as open infill so that the honeycomb prints more efficiently, or you can choose a different pattern. The edges of the middle section are chamfered a bit to capture the infill. The optional “tongue” is a stabilizer that slides under the printer if you're placing it next to the printer.
Thanks to all the designers that came before me in the evolution of this design.
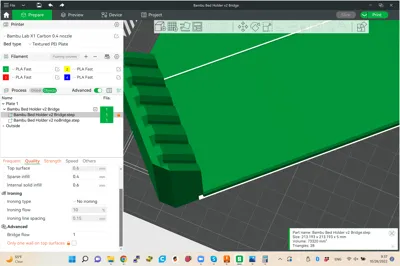
I've included a Bambu Studio 3MF for the 6-slot version with the Tongue, but if you want to slice it yourself in Bambu Studio:
How to slice
- Decide on how many slots you want, from 2 to 8
- Decide whether you want a “tongue” to slide under the printer or not
- Download two files:
- the “body” file matching the number of slots and with or without tongue
- the “center” file matching the number of slots
- Drag both files into the (Prusa/Bambu/Orca) slicer at the same time
- When slicer asks “Load these files as a single object with multiple parts?” click “Yes”
- Rotate the model 135 degrees on the Z axis (it should to go from the front right to the back left, with the tongue pointing forward)
- Set Global Settings
- On the “Quality” tab, set:
- Only one wall on top surfaces: Not apply OR Topmost surfaces only
- On the “Quality” tab, set:
- Set center settings
- Switch to Objects view
- Click the object filename with “center” in it
- On the “Quality” tab, set:
- Line Width - Sparse Infill: 0.8 (up to double the nozzle width, for more open pattern)
- On the “Strength” tab, set:
- Wall loops: 6-10
- Top shell layers: 0
- Top shell thickness: 0
- Bottom shell layers: 0
- Bottom shell thickness: 0
- Sparse infill density: 20% (or less for more open pattern)
- Sparse infill pattern: Honeycomb (or other pattern as preferred)
- Click “Slice Plate”
- Click “Print Plate”, and un-check “Flow Dynamics Calibration”
On the Bambu Lab X1 (Carbon) the larger (more slots) versions barely fit, so you'll need to rotate 135 degrees on the Z axis, and disable Flow Calibration when you send the print, otherwise the flow lines will be stuck to the bottom of the model.
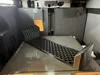
The purple print in the pictures is a previous version with 6 slots and a 2-inch tongue instead of 1-inch, and the infill goes a bit under the towers instead of ending short of them.
I've included the Fusion 360 file for remixing or changing the number of slots. You should be able to edit the rectangular pattern in the main sketch, and a couple other tweaks. Make sure to export just the Bridge body, and the Towers and Rails body with or without the Tongue body. If you want the Tongue, it must be exported in the same file as the Towers and Rails so it's one part and will print as one part for strength. I'm a Fusion beginner so don't judge too harshly.

Comment & Rating (13)