Search models, users, collections, and posts

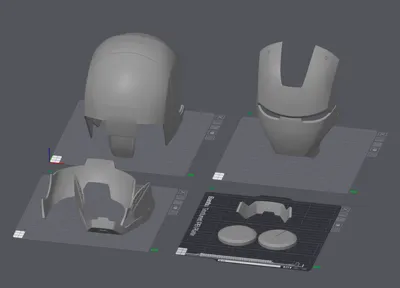
Iron Man Helmet + testfit file

Remixed by

Print Profile(2)

All
X1 Carbon
P1S
P1P
X1
X1E
A1
H2D
H2D Pro
H2S
P2S
H2C
X2D
A2L

0.28mm layer, 2 walls, 15% infill
Designer
1.8 h
2 plates
4.7(75)

0.2mm layer, 3 walls, 15% infill , tree support
Designer
20.5 h
4 plates
4.4(427)

Open in Bambu Studio
Boost
2783
5058
610
453
8.7 k
4.9 k
Released 

Description

official 3d made a greate job modeling this so i had to print it and share it here on makerworld.


14.10.23: i have added a print plate with a testfit model in 100 and 120%

try some different sizes to fit it perfectly

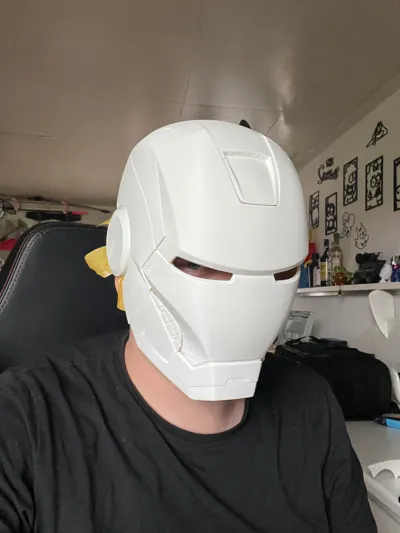
13.10.23 sadly it does not fit my big head

i will have to print it bigger to fit and then i will update a profile.

Membership

Join

Boost Me (for free)


Comment & Rating (610)

(0/1000)

Print Profile
0.2mm layer, 3 walls, 15% infill , tree support
Nice print! Unfortunately the parts don’t fit together perfectly and leave gaps, but other then that I like it
15
Reply
how do the ear pieces fit?
0
Reply
not at all, they just fall through 😅I fused them from the inside with a soldering iron, but have some gaps now, maybe scaling them up helps. but still looks great
(Edited)
2
Reply
Boosted
Replying to @nicoscholl :
I'm also melting with the soldering iron from inside and I must say that it works very well and seems to me to be the only valid alternative
0
Reply
I had the main supports collapse twice on the main piece, a bit off filling and it will be good as new. got some magnets coming, padding and the light up eyes lol. looks so cool.
6
Reply
this is the best finished one I’ve seen so far! what did you use to hold it all together?
1
Reply
Replying to @user_3219525424 :
its held together with masking tape at the moment until the magnets I ordered arrive then the back plate and face plate will be pop off with magnets, the rest will be glued and plastic plate welded. the inside will be foam to cover any gaps.
1
Reply
Replying to @user_57881129 :
How are you putting the magnets on the back plate and face plate?
0
Reply
Print Profile
0.2mm layer, 3 walls, 15% infill , tree support
The model is beautiful, it's a shame that the parts don't fit together perfectly and that the only way to hold the parts together is to use glue. You should modify the model allowing the use of magnets
9
Reply
glue is any th only way you can use magnets
0
Reply
Replying to @user_4241164688 :
you're not wrong! LMAO!
0
Reply
Print Profile
0.2mm layer, 3 walls, 15% infill , tree support
Amazing product.
8
Reply
Boosted
Hi friend, to keep it firm you used glue, because mine doesn't hold itself
0
Reply
Replying to @ivandn99 :
?
0
Reply
with steady hands and a glue gun, it came together quite well!
4
Reply
Hello Unfortunately, my last print failed What am I doing wrong? See image
The designer has replied
Show original
0
Reply
Looks like poor print adhesion Are you using glue or 3Dlac
Show original
0
Reply
I only use the print bed without any additional materials, can I add anything? Yes, it's visible that adhesion is insufficient
Show original
0
Reply
mine keeps doing that idk what to do
0
Reply
Print Profile
0.2mm layer, 3 walls, 15% infill , tree support
it it works good just make a easy modal fo a1 mini I had to cut it into pieces and reprint several times buy new filliment but worth it for sure
3
Reply
Almost perfect, the only issue is that the parts don’t fit 100%, and they were a bit hard to put together. I’m not sure if this was my fault, but I also found that the parts were a bit warped and stuff like that. I used a heat gun to warp the faceplate to fit perfect. This is a great print for a first helmet, as it was my first time making one. So if you’re looking at it and it’s a little rough looking and the “soldering” looks off, that’s on me since it’s my first time.
3
Reply
Print Profile
0.2mm layer, 3 walls, 15% infill , tree support
Prints good, I sanded it down, used bondo and acetone, then spraypainted, also added magnets to the faceplate and back piece so they can be removed, only complaint is that the pieces don't fit perfectly, leaving quite a few gaps. Overall, I'm happy with the result for my first ever helmet, and I will definitely be making more in the future.
1
Reply
How and where did you add the magnets
Show original
0
Reply
Helmet and parts printed really well, just how does the part in the picture fit onto the helmet?
(Edited)
The designer has replied
0
Reply
this only to test if it fits over your head
0
Reply
Replying to @Jakob1508 :
cool thanks for that
0
Reply