
Kitchen & Bathroom Sink Drain Strainers, Stoppers, Pads


Print Profile(7)


Description
A collection of kitchen and bathroom drain strainers, stoppers, and drain pads. Useful for kitchen sinks, bathroom sinks, utility sinks, bathtubs, and probably more!
Before printing, please review the list of models and their respective measurements followed by some additional notes.
General Notes:
- The only model that requires support is Part 4 (sink_stopper_4_fin) of the Bathroom Sink Drain Stopper (Experimental).
- No brim is necessary for any of these models.
- Concentric or Archimedean Chords for top and bottom surface patterns works well for many of these models as they're circular.
Kitchen Sink Drain Strainer
- 111.5mm outer diameter
- 66mm basket diameter
- 32.6mm basket depth
Voronoi Kitchen Sink Drain Strainer (Experimental)
- 111.5mm outer diameter
- 68mm basket diameter
- 36.3mm basket depth
Utility Sink Drain Strainer
- 72mm outer diameter
- 42.6mm basket diameter
- 25mm basket depth
Bathroom Sink Drain Strainer
- 33mm top diameter
- 26mm basket diameter
- 51mm height
Bathroom Sink Drain Stopper (Experimental)
- 33mm top diameter
- 28mm shaft diameter
- 130mm height
- The ring (part 5) must be printed in TPU filament (or similar)
Large Drain Stopper Pad
- 150mm diameter
- TPU filament (or similar)
- Engineering plate (or similar smooth built plate)
Medium Drain Stopper Pad
- 100mm diameter
- TPU filament (or similar)
- Engineering plate (or similar smooth built plate)
Small Drain Stopper Pad
- 50mm diameter
- TPU filament (or similar)
- Engineering plate (or similar smooth built plate)
Instructions for the Bathroom Sink Drain Stopper (Experimental)
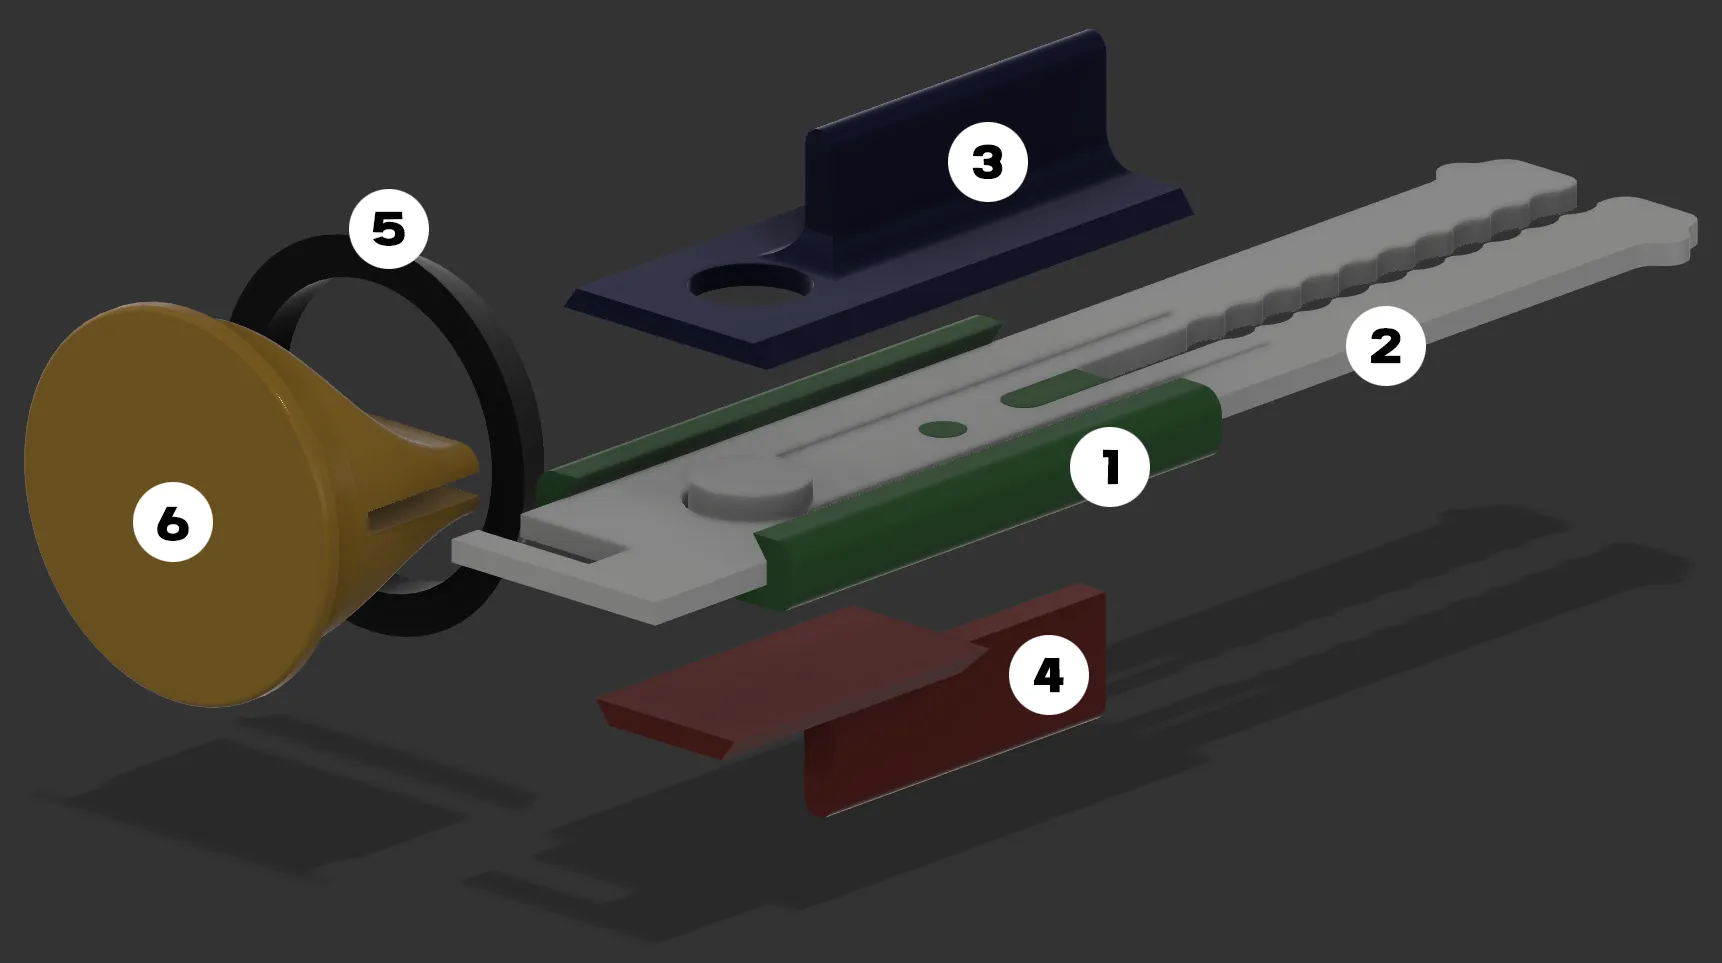
- Insert 2 into 1. Try pushing the teeth of 2 together and then coming in at a top down angle into 1. Then slide the teeth down and when you reach the circle, lift the center of 2 to lock in place.
- Slide 3 into 1 (on top of 2) while pushing down on 2's circle tab which will lock into 3's circle.
- Slide in 4 on the opposite side.
- Pinch 5 to get it around 6. Pull down one side of the ring (5) until it pops into place. This is best done on the wide sides of 6. Then do the same on the opposite side to fully pop in the ring (5).
- Slide 6 sideways into the notch at the top of 2.
My TPU Settings
I know this may help some people so I'm including the slicer settings I use for TPU.

License

You shall not share, sub-license, sell, rent, host, transfer, or distribute in any way the digital or 3D printed versions of this object, nor any other derivative work of this object in its digital or physical format (including - but not limited to - remixes of this object, and hosting on other digital platforms). The objects may not be used without permission in any way whatsoever in which you charge money, or collect fees.


Comment & Rating (307)