Search models, users, collections, and posts

Mechanical Clock

GIF

Print Profile(2)

All
A1 mini
P1S
P1P
X1
X1 Carbon
X1E
A1
H2D
H2D Pro
H2S
P2S
H2C
X2D
A2L

2 plates, 0.2mm layer, 2 walls, 15% infill
Designer
2.9 h
2 plates
4.7(27)

0.2mm layer, 2 walls, 15% infill
Designer
2.8 h
1 plate
5.0(3)

Open in Bambu Studio
Boost
397
761
47
48
845
411
Released 

Description

Edit : Cartisky3D made a review of this model (without weights) on youtube

=> short and video


Hi,


Concept:

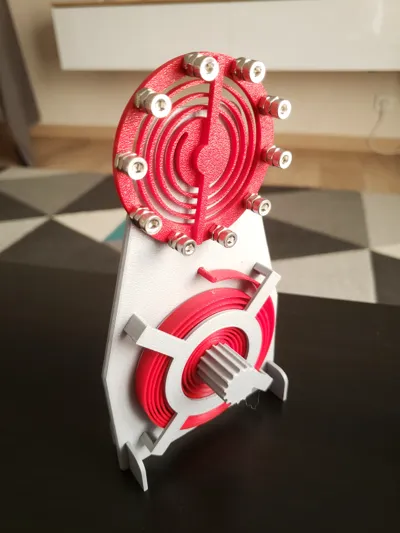
I designed a mechanical clock to better understand clock mechanism.

I could get this clock to run 42 s with a single rewind of the PLA spring.

It might run longer with other kind of filament.

Please let me know if you beat my record ;)


No hardware is needed but you will get a longer runtime if you weight with “InertiaWheel” with some M4 bolts.


I know my design can be improved and I greatly encourage remixes.

You can find my source file on Onshape here.


Printing:

It is an easy print. I recommend using Arachnee to get the right spring thickness. I also recommend using 100% infill for the InertiaSpring to add some weight to it.


Assembly:

There is a quite a lot of parts (which makes the assembly satisfying) but assembly is straightforward based on the 2 exploded views below.

/!\ Make sure you insert the arm in the right orientation. The face of the arm should be parallel to the face of the escape whee:!\ l teeth.
/!\ Make sure you insert the ratchet in the right orientation

Comment & Rating (47)

(0/1000)

Print Profile
2 plates, 0.2mm layer, 2 walls, 15% infill
Well the print setup and quality is top notch. It's a fascinating design. But alas, I could not get it to work more than 5 "ticks" no matter what I tried. I did use the 4mm bolts. Tried multiple combinations of how many were used. It just will not continue. I'm bummed about that too because I was hoping it could be the basis for a cool project idea I have.
The profile uploader has replied
0
Reply
You have to add weight (inertia) to the top wheel to get more run time. Little M3 screws works fine
0
Reply
Replying to @SigmaT4 :
As I said, I did add the bolts. Didn't help. Any other advice? I'd love to get it working.
0
Reply
Replying to @FerrumCampitor :
@FerrumCampitor Oh yes you did, sorry. Two possibilities : you have too much friction (maybe the top wheel is rubbing against the chassis, or the chassis is squeezed too much by the top gear assembly) or the spring is too soft.
(Edited)
1
Reply
I'm having trouble with the clockwork... It doesn't go full automatic... Too much pressure? Is there something that I'm missing?
0
Reply
learn from my experience, don't squeeze the push-ins too tight or they would jam
1
Reply
Replying to @GyanZoe :
Yeah I noticed... I leaved it like an ornament better... it was my first or second print on the bambulab... now its more like a trophy XD
0
Reply
Print Profile
2 plates, 0.2mm layer, 2 walls, 15% infill
Tick tack
0
Reply
Print Profile
2 plates, 0.2mm layer, 2 walls, 15% infill
this design works great! I have tried several escarpment mechanisms and this one was easy to put together and worked first time! printed great and needed no glue or sanding. I am very happy with the results and will add weight to make it go longer. Thank you for the file!
0
Reply
It took me a few tries with different parts, but I was able to get it to work flawlessly!
0
Reply
Print Profile
2 plates, 0.2mm layer, 2 walls, 15% infill
Like it!
0
Reply
Print Profile
2 plates, 0.2mm layer, 2 walls, 15% infill
A superb result considering everything that is possible with 3D printing. The spring opens in 17 seconds. It's probably due to the fact that it was printed on the P1P and automatically upscaled, which makes the spring less dense.
Show original
0
Reply
Super project Thank you very much
Show original
0
Reply
Boosted
Print Profile
2 plates, 0.2mm layer, 2 walls, 15% infill
Awesome job. I have been printing all the clockworks I can find and highly prefer fully 3D printed models so this piqued my interest! Update: Got 17 seconds of movement with no weights, posting video this week
The profile uploader has replied
profile
2
Reply
I have stumbled upon your video by pure chance and recognize my work lol. I have added a link to your video the model description. Please add a link to this page in your shorts :) I think that my linkage hinges are "video worthy" too :) https://makerworld.com/fr/models/1098622-gravity-locked-print-in-place-vertical-hinge#profileId-1093562 https://makerworld.com/fr/models/195411-print-in-place-concealed-hinge-fidget-toy#profileId-215987
0
Reply
Also, you would actually get a better run time by weighting the balance spring :)
0
Reply
I second this, I love fully printed assemblies
0
Reply
Print Profile
2 plates, 0.2mm layer, 2 walls, 15% infill
Even scaled down print came out great!
0
Reply