1952 Gordini Roadster (Pinewood Derby Car Shell)


Print Profile(1)
Description
Summary
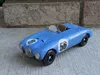
The Gordini 23S was the winner of the 1952 Prix de Monte Carlo and raced in other races, including the 24 Hours of Le Mans.
This model doesn't look exactly like the real thing, but I think it still looks pretty good, and it's different from the other cars I've designed.
What is a "pinewood derby car shell"?
A pinewood derby is an event created by the Boy Scouts many years ago. Each scout is given a pinewood derby kit typically consisting of a block of wood with slots for axles, 4 wheels, and 4 nails to be used as axles. The scout (and his dad, usually) will then carve the block of wood into the shape of a car, paint it and apply stickers, install the wheels on the axles, and then race it at the "derby", which involves a sloped track with a timekeeping apparatus.
An official scout derby will usually require that the parts in the kit be used for cars entered in the derby. Other organizations (including workplaces) often hold derbies, too, and some of them require the use of the parts in the box, including the block of wood.
These "pinewood derby car shells" are intended to be used with an official derby wood block, cut down to size, along with the axles and wheels included in the kit. A printable model of the shaped wood block is provided. You can either use the printed model or use it to accurately cut an official wood block down to size.
Print Settings
Notes:
- Car body: Supports are required.
- Windshield: I printed this using clear PLA in vase mode with a brim, but it can also just be printed flat.
- Exhaust pipe: Printed vertical with a brim.
Post-Printing
Smoothing
This car was smoothed with 3d printing resin and baby powder. You can find videos and guides online that describe the process, but here it is in a nutshell:
- Mix 1 part resin and 2-3 parts baby powder in an opaque container (so that it can be stored without hardening due to UV exposure).
- Using a paintbrush or cotton swab, spread a thin layer of the resin/baby powder mix over the body, wherever you want to smooth print lines and gaps.
- Use a UV flashlight (a cheap one--like the kind used to harden resin finger nail polish, which you can order from Amazon or buy in the pharmacy department of Walmart) to harden the resin.
- Sand the body smooth until there are no thick layers left.
- Repeat over any areas that are still rough.
Weights
You can add tungsten weights to the holes in the rear of the body. If you plan well, and use enough infill, you can maximize the weights and end up right at 5 oz.
Comment & Rating (6)