Search models, users, collections, and posts

Playstation 5 controller wheel (Mustang style)
IP Report


Print Profile(3)

0.16mm layer, 2 walls, 15% infill
Designer
5.4 h
1 plate

0.2mm layer, 2 walls, 15% infill

55 min
1 plate

A1 MINI BEST SETTINGS 0.16mm layer, 2 walls, 15% infill

1.3 h
1 plate
Open in Bambu Studio
Boost
2084
3789
228
74
4.9 k
2.8 k
Released
Description
This is a remix of https://www.printables.com/fr/model/157076-playstation-5-controller-mini-wheel from @pixel2_237985.
Presentation
The original wheel with two circles was not confortable to me, so I designed a real round wheel to be more comfortable and with a better grip.
Inspired by the steering wheel of 1967 Ford Mustang.
Here is a video of the assembly and use of the steering wheel by Maelstrom Engineering:
Updates
- 2024-03-06: With the sudden success of this piece, I decided to give it a little makeover by adding some colors: I uploaded two 3MF files (steering wheel + horn) with multicolor for those who have BambuLab's AMS.
What you need:
- 608 bearing, 22mm diameter, 7mm thick, 8mm center (fidget spinner, skateboard)
- 1.6mm diameter metal rod X2 (butterfly paper clip/14 gauge finishing nail/wire)
- Superglue
Instructions
- Glue the top and bottom edge of the bearing into the frame. Wait for glue to dry. Superglue might leave a white haze on the controller if it's not dry.
- Attach the pivot to the rack:
Cut down a 14 gauge finishing nail to a length of 20 mm. Pass the nail up through the pivot and into the rack. The pivot should spin free on the nail with minimal play. Put a drop of superglue in the slotted part of the rack. This is probably the most ideal setup. A piece of paperclip [wire] works but it's tricky to get a tight bend on the end. - Snap the rack onto the frame:
Attach the assembly to the controller. Start by sliding the pivot on to the left stick. Clip the back of the frame on, then the front. - Glue a 22mm length of metal rod into the "nub". Pass this down through the bearing and frame. There is a step in the nub, have this on the left side.
- Press the wheel into the bearing and glue the horn on the rod.
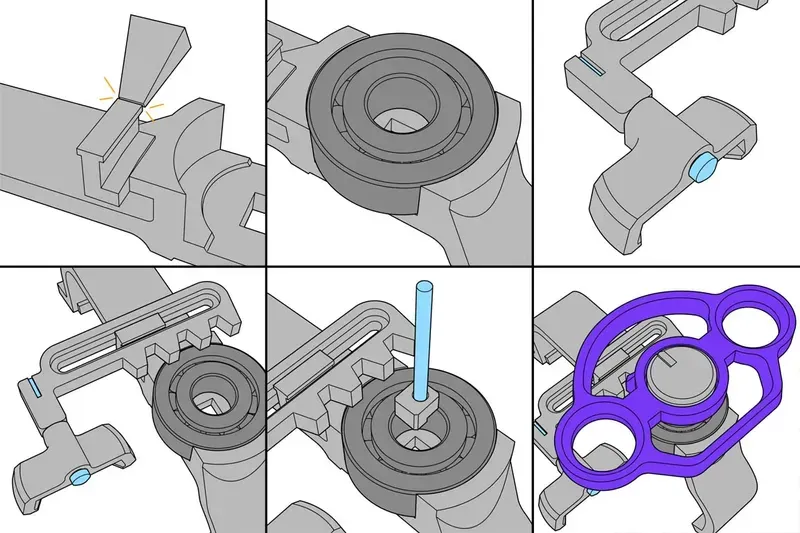
(Instructions and images from the original model)
License

This user content is licensed under a
Creative Commons Attribution-Noncommercial-Share Alike


Comment & Rating (228)