spinning armillary sphere / gyroscope


Print Profile(0)
Bill of Materials
- M3 screws. Some short ones to mount the motor, longer ones to fasted the lid. x 1: https://a.co/d/0h6QfzET
- KBT 12V 1200mAh Rechargeable Li-ion Battery x 1: https://a.co/d/0aRZWNvu
- RioRand PWM DC Motor Speed Controller x 1: https://a.co/d/0dD1tH2k
- DC 12V 100RPM Geared Motor x 1: https://a.co/d/0dXod2RQ
Description
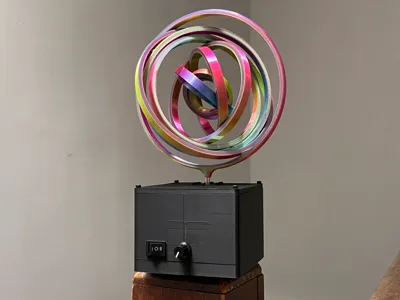
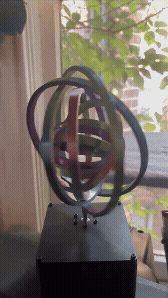
A simple decorative armillary-style gyroscope designed for smooth rotation and satisfying motion. Features multiple concentric rings that rotate independently, creating a lovely kinetic display. A 100RPM motor regulated by a speed controller with a forward/reverse switch allows for a satisfying interaction.
Designed to be easy to assemble. Just a few M3 screws. Designed for those who enjoy mechanical models, astronomy-inspired designs, or kinetic desk toys.
PRINT/ASSEMBLY
Rings: The rings are print in place. I recommend that you auto-generate supports. It should spin freely after supports are removed. It will work without supports, but there may be some warping at the connection points of each ring, which may increase friction or result in a slightly unstable spin.
(No sanding or anything else required. I am open to suggestions though, this model isn't perfect.)
Housing and lid: The housing, along with the lid, are simple prints.
The motor is mounted directly to the underside of the lid via 6 ~8mm M3 screws. The screw wells of the motor go pretty deep, so just make sure the screws are long enough to pass through the lid and a few mm into the screw wells. I recommend using small washers. The outer ring press fits directly onto the motor shaft.
The speed controller I linked comes with a rocker switch which snaps nicely into the front of the base. Mount the speed controller inside such that the dial is sticking out of the front. I reccommend screwing it down.

Here is a beautifully crude drawing of the circuit:

Comment & Rating (0)