Parts Express TB 4-Pack Powered Subwoofer


Print Profile(1)
Description
TB 4-Pack Quad 3" 3D-Printed Powered DIY Subwoofer
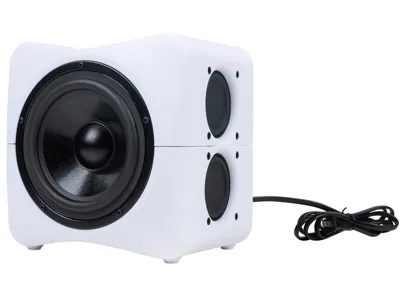
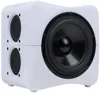
This 3D-printable enclosure is designed specifically for the Parts Express TB 4-Pack Quad 3" Powered DIY Subwoofer Kit, a compact little bass machine that is perfect for desktop audio, gaming setups, small rooms, workbenches, nearfield listening, and any project where you want surprising low-end from a small footprint. With four Tang Band 3" neodymium subwoofers, a Dayton Audio SA25 plate amplifier, and a front-mounted DS175-PR passive radiator, this design turns a handful of small drivers into a fun, self-powered subwoofer that hits harder than its size suggests. It is a great weekend build for anyone who wants to combine 3D printing, DIY audio, and the satisfaction of making a finished speaker that actually gets used.


Designed specifically for the Parts Express TB 4-Pack Powered DIY Subwoofer Kit, the finished build uses four Tang Band W3-2052SC 3" RBM neodymium subwoofers, a Dayton Audio SA25 25-watt subwoofer plate amplifier, and a Dayton Audio DS175-PR 6-1/2" passive radiator. All of these components are crammed into a compact powered subwoofer with a unique multi-driver layout. It is a great project for builders who want a small powered subwoofer that combines real DIY assembly, 3D printing, and a finished design that looks more like a complete product than a simple test box.
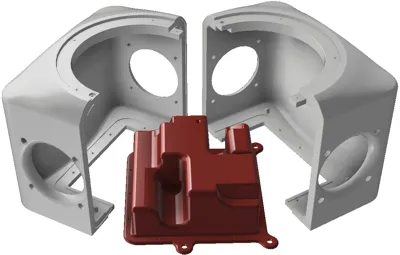
The enclosure was developed to make the TB 4-Pack kit practical to print and assemble on common consumer 3D printers. The design can be printed as a multi-piece enclosure using the included top, bottom, and amplifier cover sections, or as a single-piece enclosure if your printer has enough build volume (the single piece enclosure is not recommended for 3D printers with a moving bed, bed-slingers). The multi-piece version is especially useful for more common printer sizes because it keeps the main parts manageable while still allowing the final enclosure to be rigid, sealed, and properly aligned during assembly.


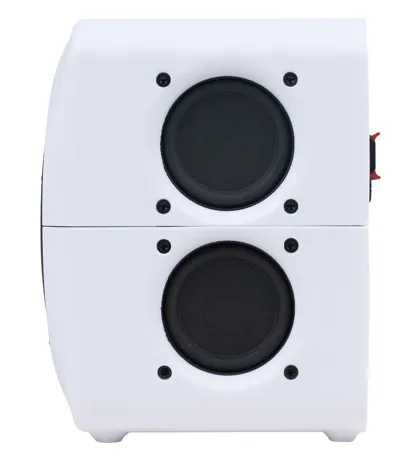
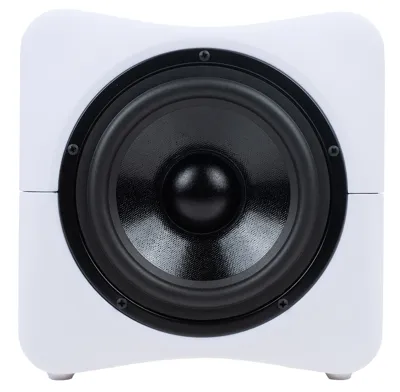
The layout places the four 3" Tang Band subwoofers around the sides of the enclosure while the passive radiator mounts on the front and the SA25 amplifier mounts on the rear. This arrangement keeps the footprint compact while giving the system enough radiating area to move a useful amount of air for a small powered subwoofer. The passive radiator is mass-loaded with the included fender washers, allowing the system to achieve deeper bass output than a simple sealed enclosure of similar size.
This project is suitable for both experienced DIY speaker builders and first-time builders who are comfortable with basic tools. The kit requires common assembly steps such as trimming gasket tape, fastening printed parts together, mounting the drivers and amplifier, soldering or securely joining the internal wiring, and installing the passive radiator. Take your time with the sealing and wiring steps, since a small subwoofer enclosure depends heavily on airtight assembly for clean output and proper tuning.
Important Driver Availability Note: The Tang Band W3-2052SC 3" RBM neodymium subwoofer used in this kit is a buyout driver with limited availability. This enclosure was designed specifically around that driver, so fit, tuning, wiring, and performance are based on the included TB 4-Pack kit components. Once the driver is sold out, direct replacement options may be limited, and other 3" drivers should not be assumed to fit or perform correctly without significant design changes. Please check the TB 4-Pack package availability before beginning this project.
Print Notes:
- Minimum build volume: 230 mm wide × 230 mm deep × 180 mm high
- Recommended materials: PLA, PLA+, PETG, or ABS with adequate ventilation
- Layer height: 0.2 mm maximum (adaptive layers recommended)
- Wall loops/perimeters: 5
- Top and bottom layers: 5
- Infill: 30% minimum
- Infill pattern: Gyroid or cubic
- Supports: Tree supports
- Brim: 5 mm recommended for improved bed adhesion
- Print speed: Moderate speeds recommended for all enclosure parts
- Filament: Use dry filament to help avoid weak layers, micro-gaps, and air leaks
- Bed preparation: Clean and level the bed before printing to keep the large enclosure surfaces flat and properly aligned
- Orientation: Print the enclosure parts with the flat rear surfaces facing down on the build plate
TB 4-Pack Kit Components:
- 4 × Tang Band W3-2052SC 3" RBM neodymium subwoofers, 4Ω
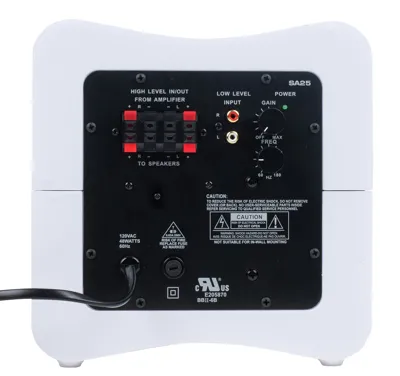
- 1 × Dayton Audio SA25 25-watt subwoofer plate amplifier
- 1 × Dayton Audio DS175-PR 6-1/2" Designer Series passive radiator
- Speaker gasket tape
- #6 × 3/4" pan head deep thread screws
- M5 × 30 mm cap head wood screws
- 1/4" × 1" zinc fender washers

Suggested Tools and Consumables:
- Phillips screwdriver
- 4 mm hex bit or Allen wrench
- Wire cutters/strippers
- Utility knife
- Electrical tape or heat shrink
- Scissors
- Hot glue gun (Optional)
- Soldering iron and Solder (Optional)
- Cyanoacrylate adhesive (Optional)
TB 4-Pack Assembly Details:

Before final assembly, dry-fit all printed parts to confirm that the enclosure pieces fit tightly and the screw holes align correctly. The 3-piece enclosure uses gasket tape between the top and bottom sections and around the amplifier cover mounting area to help create an airtight seal. Do not stretch the gasket tape while applying it, and press it firmly into the grooves so it stays attached around curves and mating surfaces.
The amplifier cover uses locating posts to help align the printed enclosure sections during assembly. Tighten the screws only as needed to compress the gasket and pull the parts flush, being careful not to strip the printed holes. A small amount of CA adhesive can be used on the posts or tabs if needed to reduce the chance of rattles or buzzes, but it is usually not required if the enclosure is printed and assembled correctly.
The SA25 amplifier installs from the rear of the enclosure. The amplifier output wires are routed through the oval opening in the amplifier cover and into the inside of the enclosure. After routing, seal the wire pass-through with hot glue, caulk, epoxy, museum putty, or poster tack to prevent air leaks.
The four Tang Band W3-2052SC drivers are wired in a series-parallel configuration for a final 4Ω load to the amplifier. Soldering the wire connections is recommended, but secure twisted connections can also be used if they are properly insulated with electrical tape or heat shrink. Any excess wire should be secured inside the enclosure to prevent unwanted buzzing or rattling during playback.
The DS175-PR passive radiator mounts on the front of the enclosure using the supplied gasket and screws. The included fender washers are added to the rear of the passive radiator before installation to provide the correct added moving mass for this design. Once the passive radiator is installed and pulled flush against the gasket, the TB 4-Pack powered subwoofer is complete and ready for setup.
License
You shall not share, sub-license, sell, rent, host, transfer, or distribute in any way the digital or 3D printed versions of this object, nor any other derivative work of this object in its digital or physical format (including, but not limited to, publishing derivative works outside the Makerworld platform or hosting on other digital platforms). The objects may not be used without permission in any way whatsoever in which you charge money or collect fees. Subject to the above restrictions, derivative works may be published only within the Makerworld platform, and all such derivative works must be licensed under the same SDFL‑C license, without modification or additional terms. You may download the digital versions of this object, 3D print it, and display images, videos, or usage demonstrations of 3D printed versions of the object on personal social media platforms or Makerworld official channels, provided that no digital versions of the object are shared or distributed.
Comment & Rating (0)