
Bathtub Paddlewheeler
Print Profile(2)
Description

Paddlewheel Riverboat Bath Toy — Rubber-Band Powered & Removable Hull
Bring a little riverboat adventure to the bathtub!
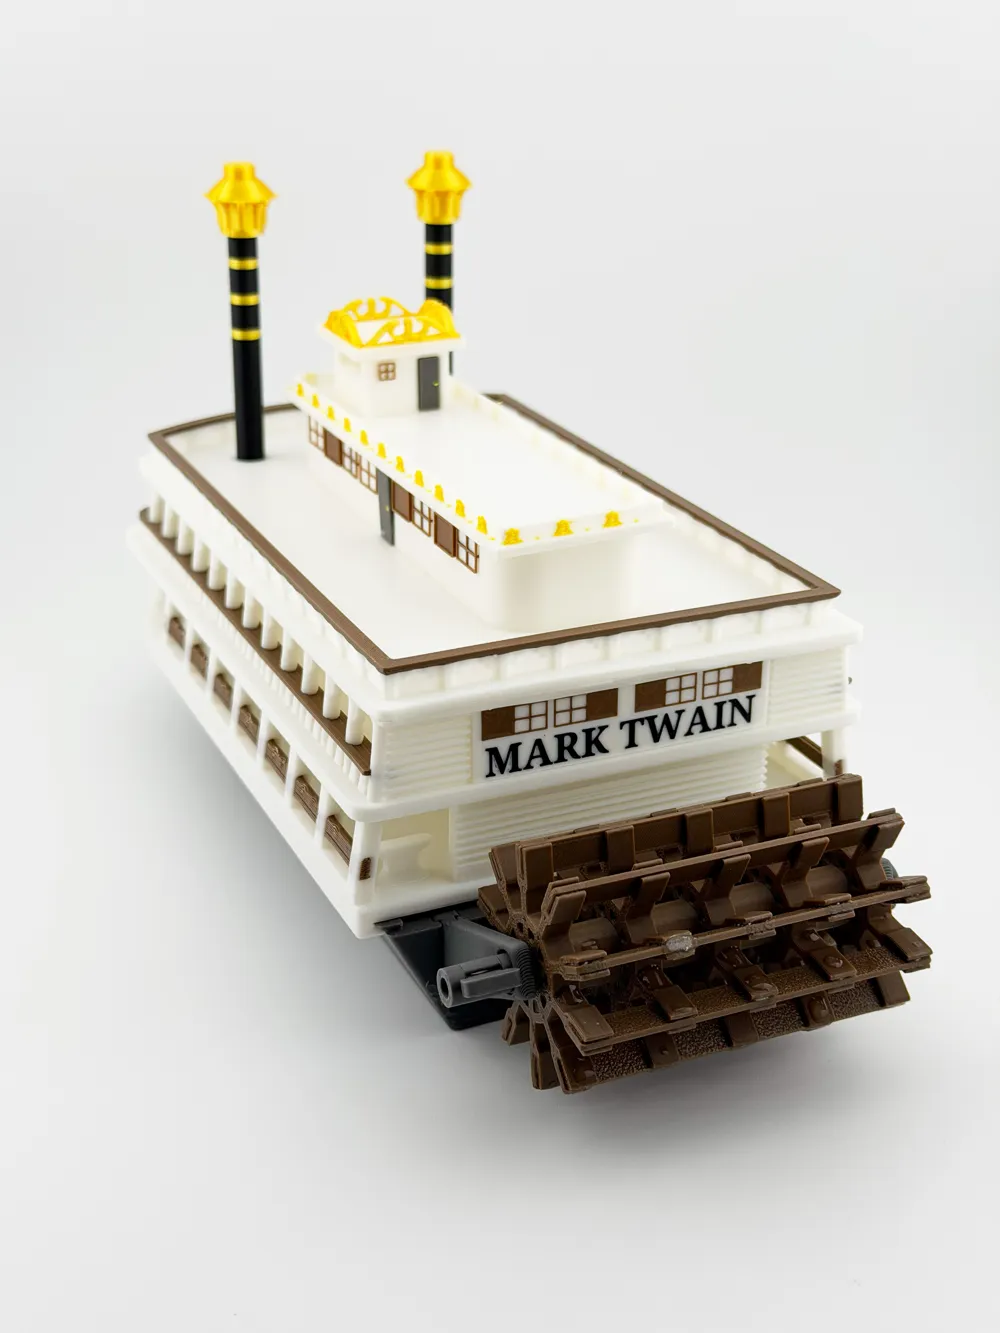
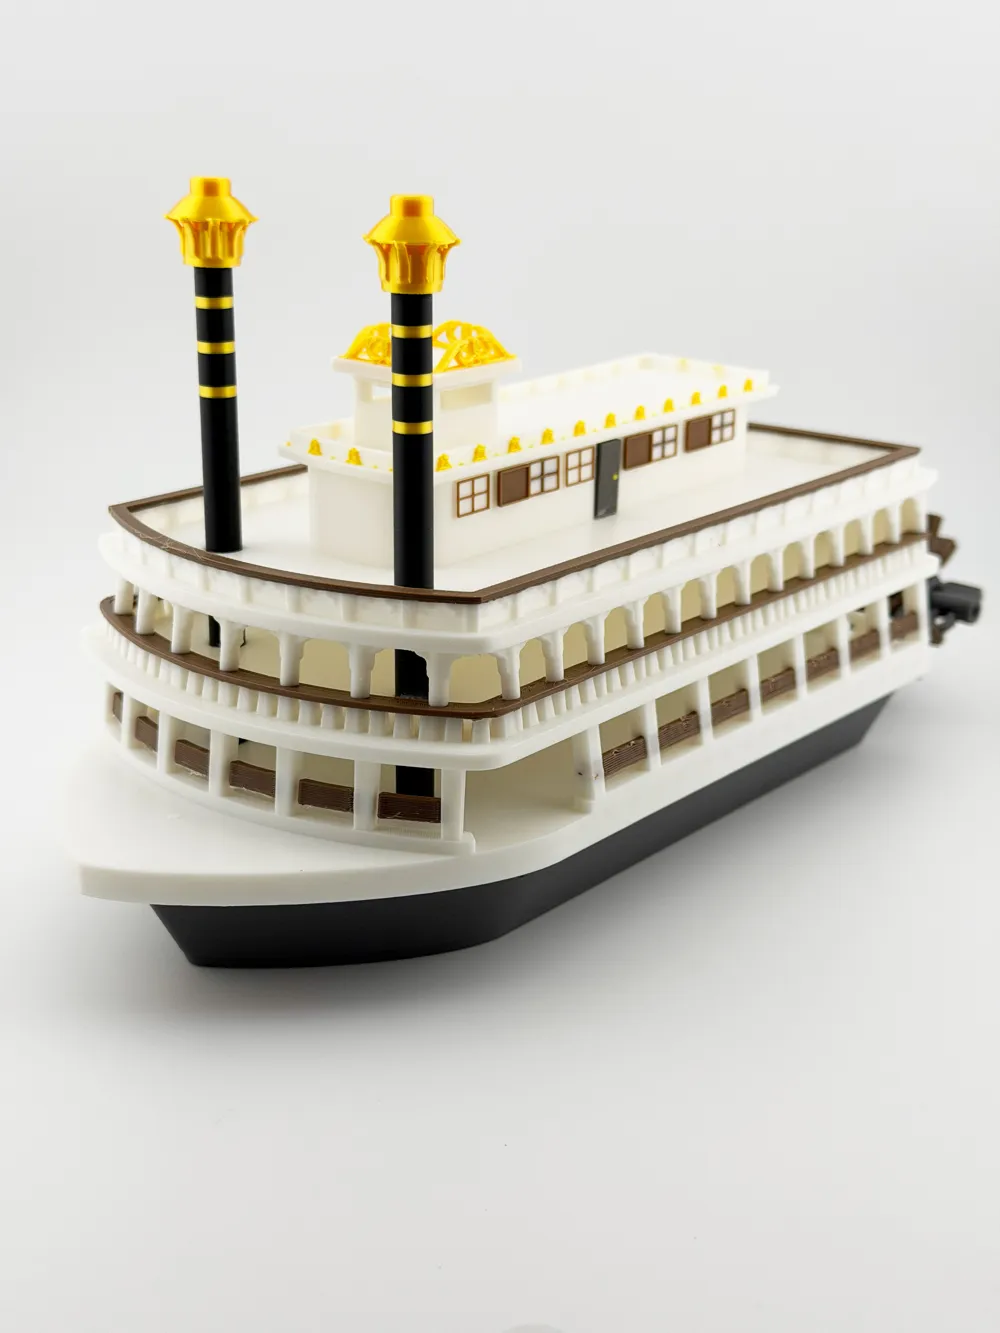
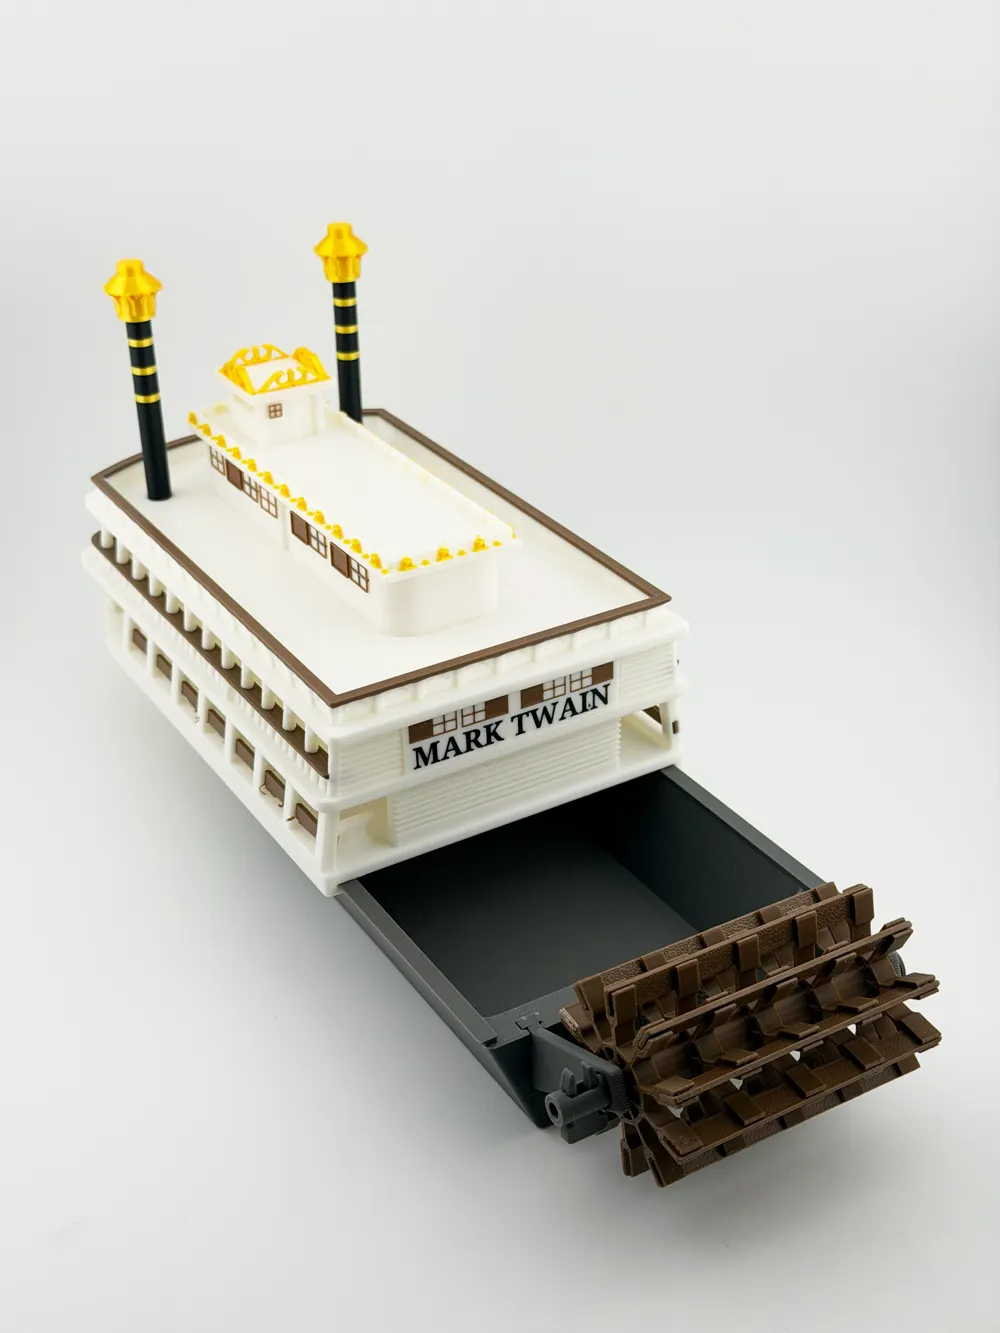
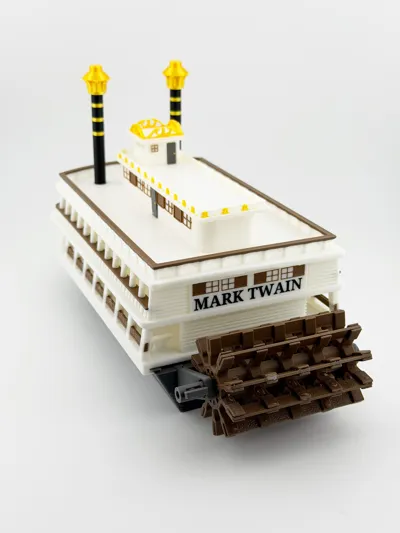
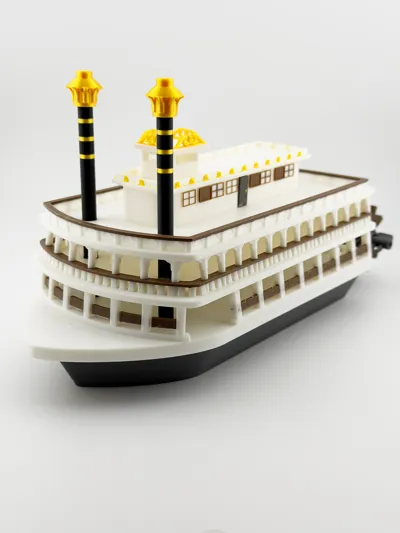
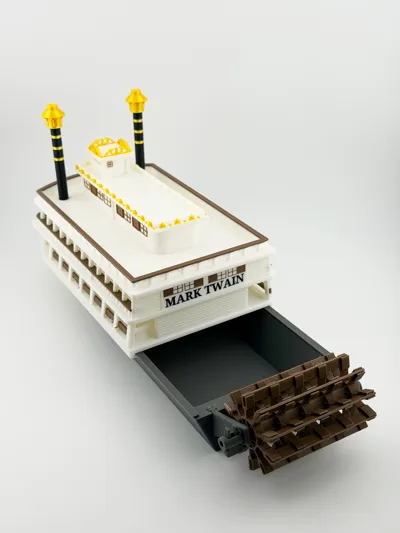
This modular paddlewheel riverboat is a printable bath toy inspired by classic American sternwheelers. It features a working paddlewheel assembly, an optional rubber-band-powered drive system, and a removable hull that slides out for draining, cleaning, and drying after water play.
The boat is designed as a detailed multi-part build, with stacked decks, railings, decorative trim, twin smokestacks, a pilot house, and a MARK TWAIN nameplate. It can be displayed as a model, used for imaginative play, or launched in the bathtub, sink, pool, or water table.
Features
- Functional paddlewheel assembly with a shared axle
- Optional rubber-band-powered paddlewheel action
- Removable hull for easier draining, cleaning, and drying
- Multi-level classic riverboat design
- Keyed axle and paddlewheel components to assist alignment
- Removable axle clip for a simple free-spinning setup
- Optional permanent axle retention by gluing the clip
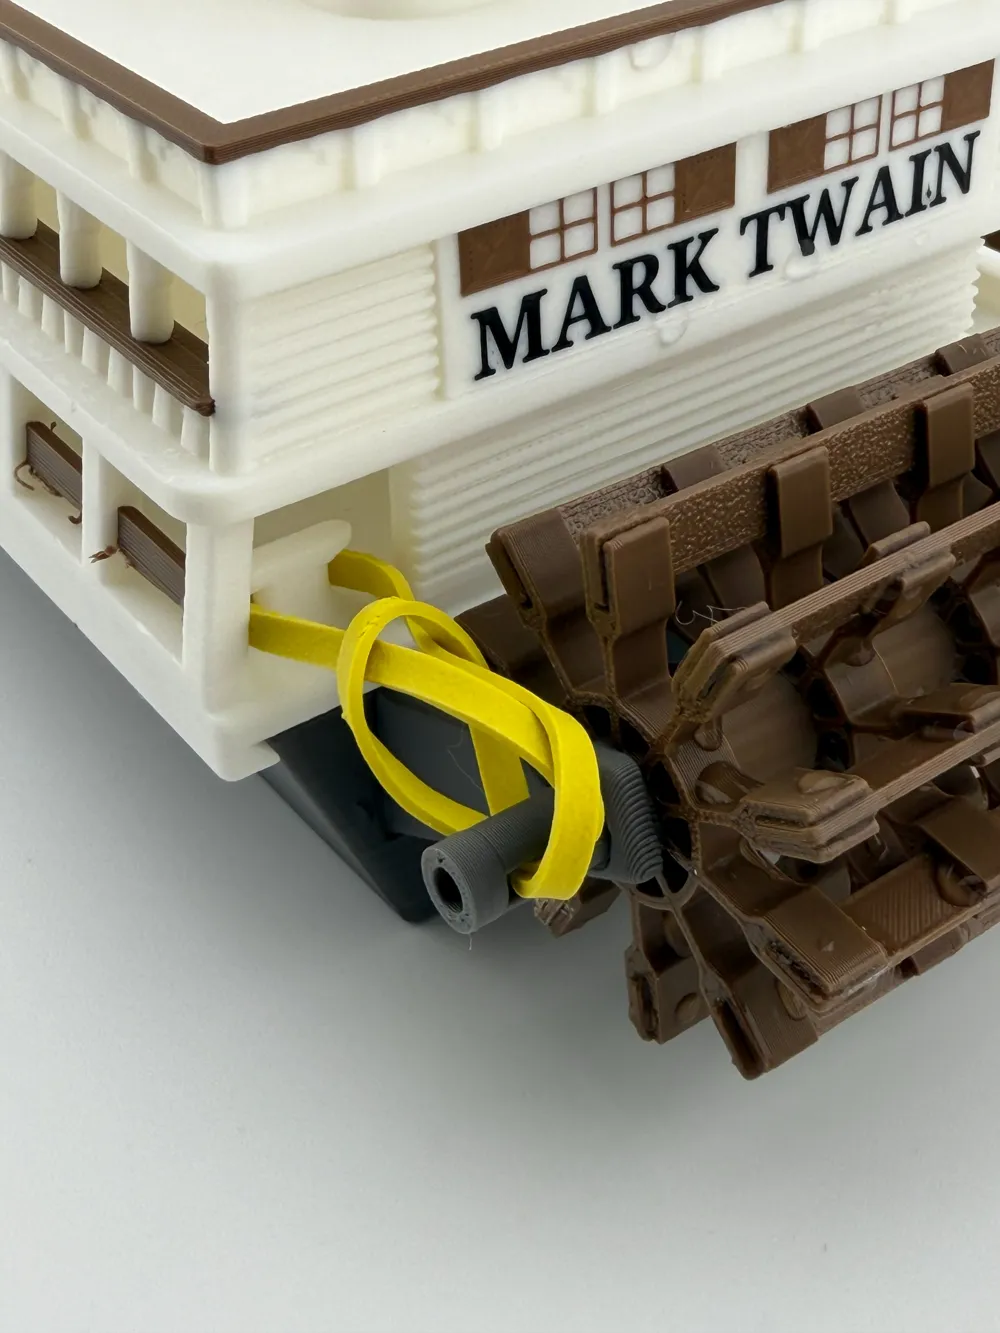
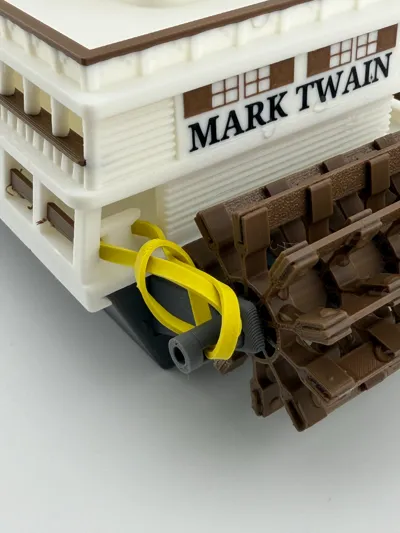
- Rubber-band bollard on the main deck for powered operation
Decorative windows, doors, railings, smokestacks, smokestack toppers, pilot house, roof details, and MARK TWAIN nameplate
Included Printed Parts
The model includes the following major components:
- Hull
- Main deck
- Promenade deck
- Sun / Texas deck
- Pilot house
- Pilot-house roof
- Roof decorations
- Two smokestacks
- Smokestack toppers
- Windows
- Doors
- MARK TWAIN decorations
- Paddle supports
- Paddlewheels
- Paddle boards
- Axle
- Axle clip
- Main-deck rubber-band bollard
What You Will Need
In addition to the printed parts, you will need:
- Cyanoacrylate glue, also known as CA glue or super glue
- A rubber band, if using the powered paddlewheel option
- Optional: flush cutters, tweezers, or a hobby knife for support cleanup
Printing
Print all plates before beginning assembly.
A standard 0.4 mm nozzle/profile is suitable for the primary structural parts and will produce a strong, good-looking model.
An optional 0.2 mm profile is recommended for smaller decorative pieces if you would like finer detail. This can be especially useful for:
- Windows
- Doors
- MARK TWAIN nameplate
- Smokestack toppers
- Pilot-house roof decorations
- Fine rail or trim details
WARNING Support Removal and Cleanup
Take extra care while removing supports.
There are many small supports beneath the deck rails on each level. These small pieces of support plastic are a choking hazard and must be removed.
This model is not suitable for infants.
Remove these slowly so the thin railings and balusters are not bent or damaged. There are also support structures underneath the decks, including supports around the locating cutouts used to align the stacked levels.
Each deck has cutouts and locating features that help position the next level during assembly. Clean these locations thoroughly before gluing so the decks sit squarely and fully in place.
Recommended Decoration Prep
Before stacking and gluing the decks together, I recommend installing the smaller decorative pieces first. This keeps the parts easier to handle and reduces the chance of damaging upper decks or railings while working around the completed boat.
Glue the following decorative pieces in place before final deck assembly, as appropriate:
- Windows
- Doors
- MARK TWAIN decorations
- Pilot-house roof details
- Smokestack toppers
- Other decorative trim pieces
The doors are intended to be glued to the sun / Texas deck and pilot house.
Assembly Instructions
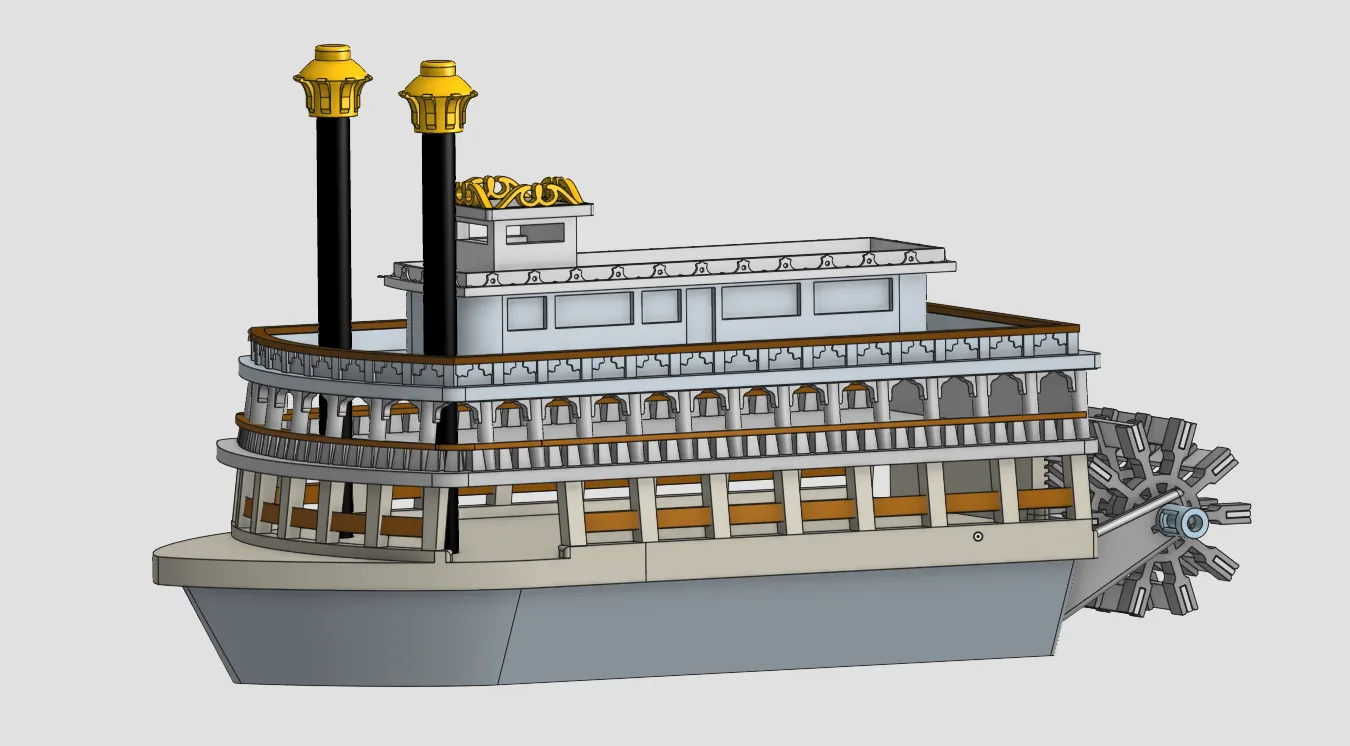
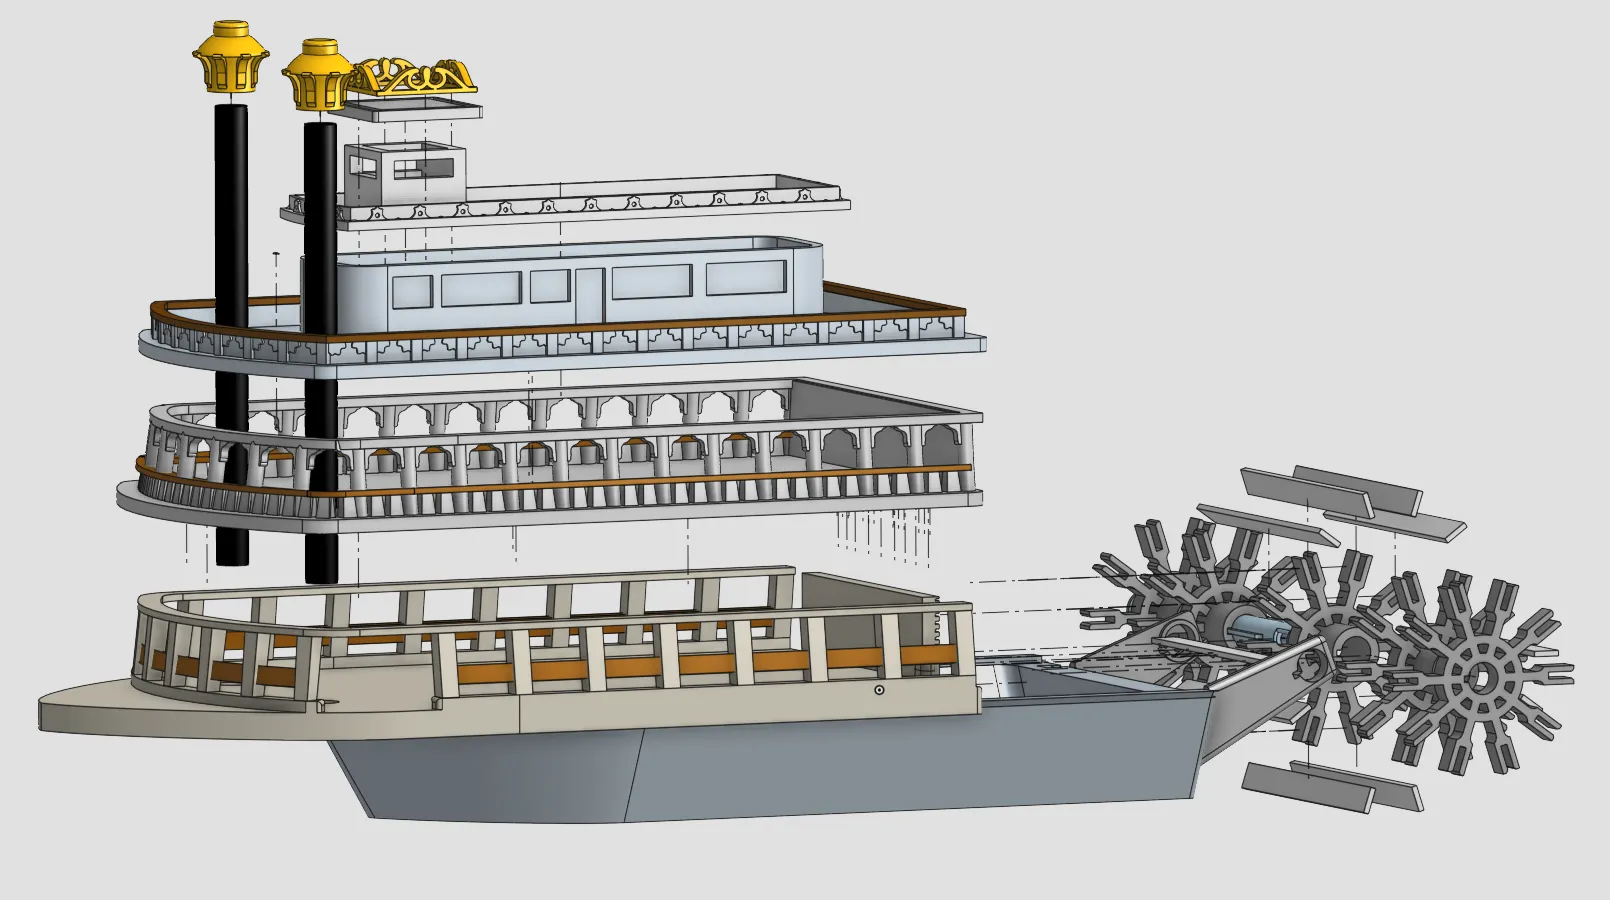
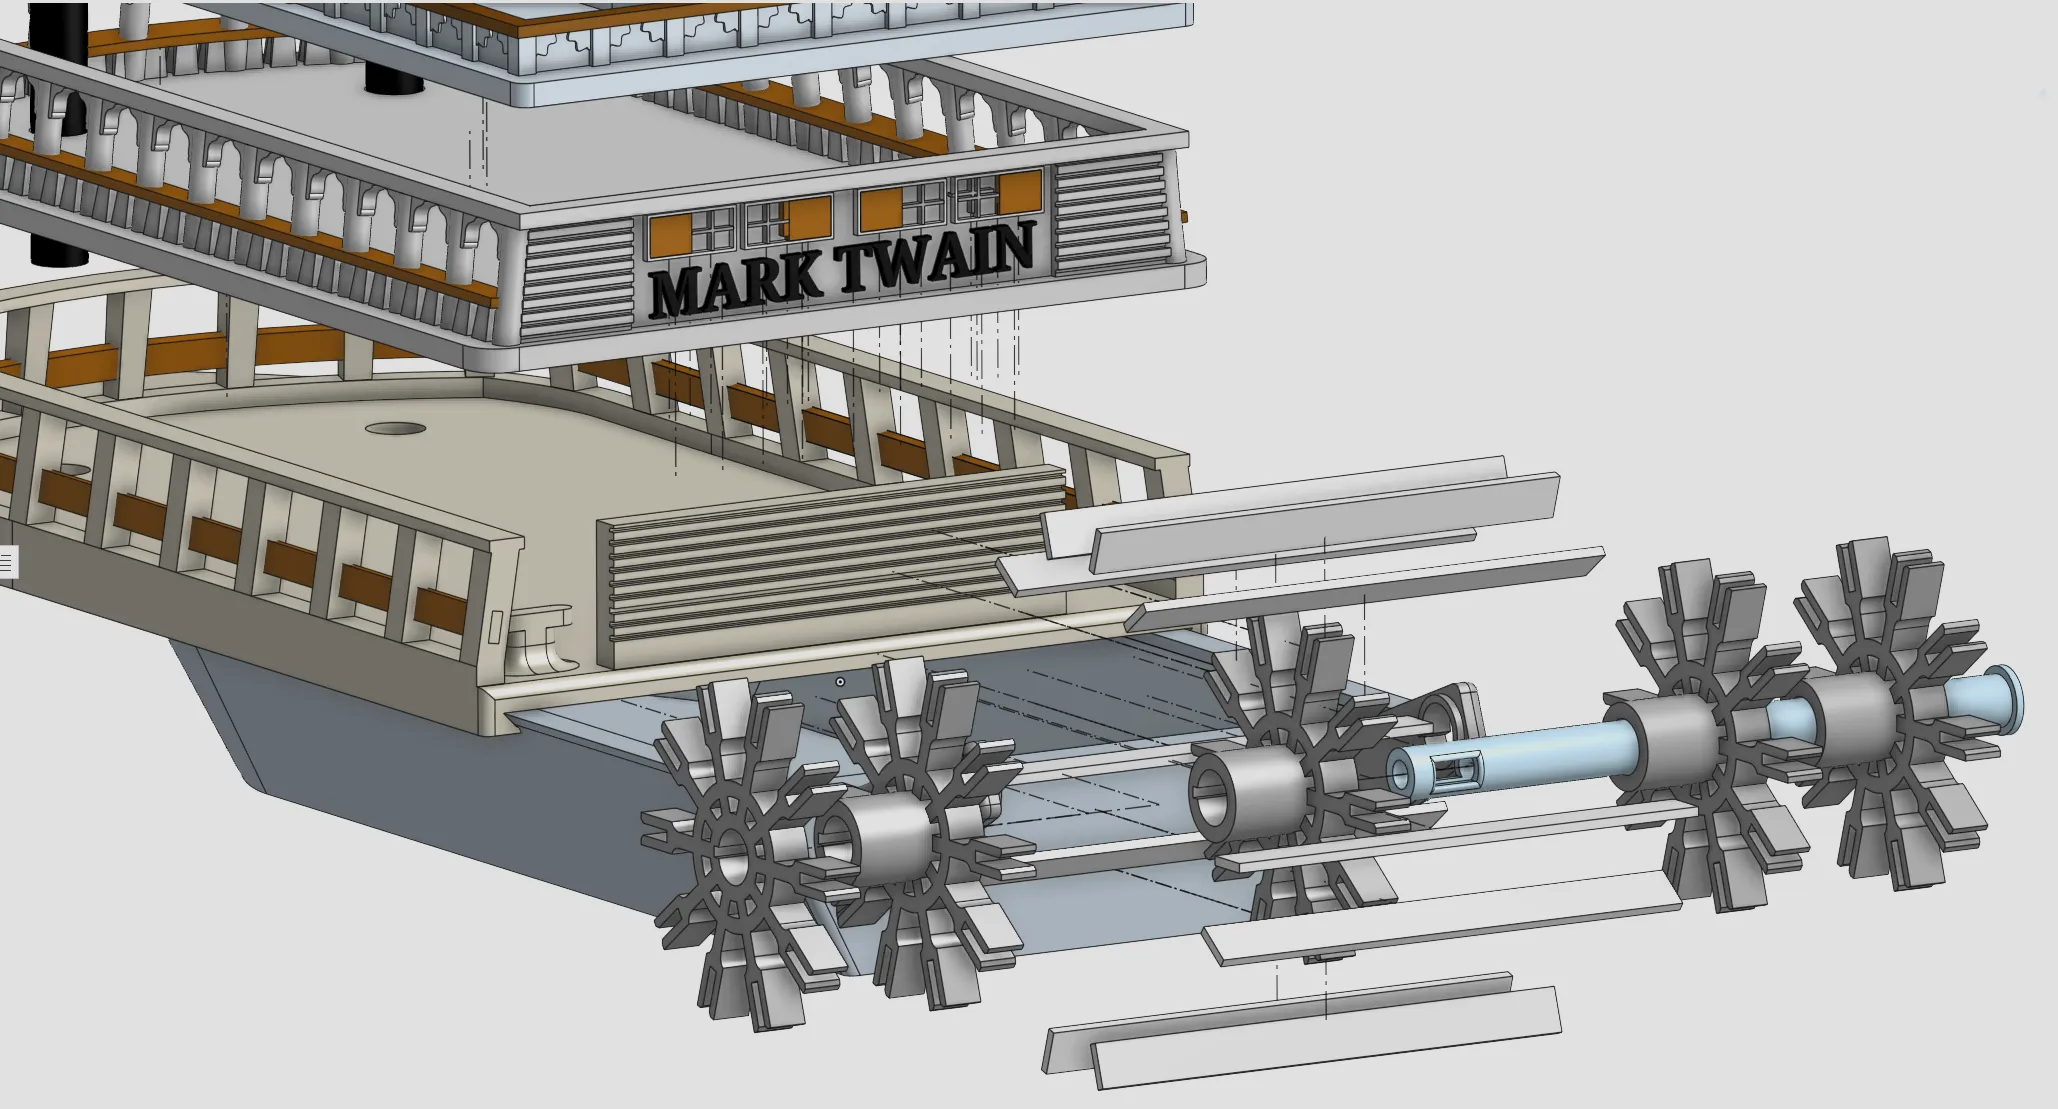
Paddlewheel and Hull Assembly
Install the paddle supports into the hull.
Place the two paddle supports into their mounting locations in the hull. Each support has one flat side with a small ring detail. The flat sides and rings should face inward, toward the centerline of the boat.Test-fit the supports first. They may be glued in place if you would like a permanent paddlewheel assembly.
Insert the axle through the starboard paddle support.
Feed the keyed axle through the paddle support on the starboard side of the boat. Starboard is the boat’s right-hand side when facing forward toward the bow.The axle and paddle-support holes are keyed and should align naturally.
Install the paddlewheels with hubs.
Slide each paddlewheel with a hub onto the axle. The hubs should point toward the port side of the boat.Port is the boat’s left-hand side when facing forward toward the bow. The paddlewheels are keyed to help maintain their correct alignment.
- Install the final paddlewheel.
Slide the final paddlewheel, the version without a hub, onto the axle. Then press the axle through the port-side paddle support. Glue the paddle boards across the paddlewheels.
Install the paddle boards between the paddlewheel rings. Use only a small drop of CA glue at each connection.Be careful not to glue the paddlewheel assembly to the supports or hull. The axle and paddlewheels should remain free to rotate.
When the wheels are assembled in the order above, their keyed openings should naturally remain aligned. If you choose to install paddle boards before placing the wheels on the axle, make sure the keyed wheel openings are aligned correctly before gluing.
Choose the axle retention and drive method.
For a simple free-spinning paddlewheel assembly, install the axle clip. The clip may be left removable or glued in place for a more permanent configuration.For the rubber-band-powered option, do not install the axle clip. Instead, thread a rubber band through the axle’s clip / retention hole and loop it around the bollard on the main deck. The rubber band acts as both the axle retainer and the power source.
Deck and Superstructure Assembly
Install the hull into the main deck.
Slide the completed hull and paddlewheel assembly into the main deck.Do not glue the hull to the main deck. The removable hull is intentional and allows the boat to be slid apart after water play for draining, cleaning, and drying.
- Glue the promenade deck onto the main deck.
Use the alignment cutouts and locating features to position the promenade deck correctly. Test-fit the deck, make sure it is fully seated, and then apply CA glue. - Glue the sun / Texas deck onto the promenade deck.
Align the locating features, verify that the deck sits flat and square, then glue it in place. - Glue the pilot house onto the upper deck.
Position the pilot house using its locating features on the sun / Texas deck. Test-fit it first, then glue it into place. - Glue the pilot-house roof onto the pilot house.
Center the roof carefully and make sure it is fully seated before the glue sets. Install the smokestacks.
If the toppers were not installed during decoration prep, glue them onto the smokestacks first.Insert the completed smokestacks into the holes in the main deck and glue them in place.
Rubber-Band Powered Operation
To use the optional powered paddlewheel system (small bursts of paddling):
- Leave the axle clip off.
- Thread a rubber band through the axle’s retention hole.
- Loop the other end of the rubber band around the bollard on the main deck.
- Turn the axle backward to wind the rubber band.
- Place the boat gently in water.
- Release the axle and allow the rubber band to turn the paddlewheels.
The rubber-band system is intended to provide a little paddlewheel action and added play value. Performance will vary depending on rubber-band size, water conditions, and how tightly the axle is wound.
Care and Use
After water play, slide the hull out of the main deck and allow all parts to drain and dry completely.
Do not leave the boat submerged for extended periods. Drying the interior after use will help preserve the model and reduce water buildup inside the hull.
This model contains small components, moving parts, and a rubber-band mechanism. Adult supervision is recommended for younger children.
License

You shall not share, sub-license, sell, rent, host, transfer, or distribute in any way the digital or 3D printed versions of this object, nor any other derivative work of this object in its digital or physical format (including - but not limited to - remixes of this object, and hosting on other digital platforms). The objects may not be used without permission in any way whatsoever in which you charge money, or collect fees.


Comment & Rating (0)