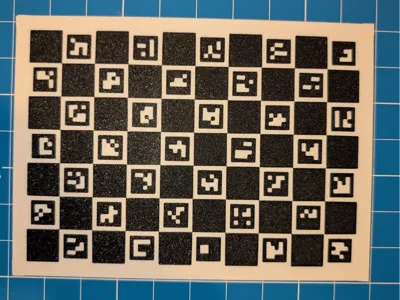
Dual-Color ChArUco Camera Calibration Board

Print Profile(1)
Description
Dual-Color ChArUco Camera Calibration Board
A flat, dimensionally-accurate **ChArUco board** for camera calibration, photogrammetry, and computer-vision / OpenCV pipelines. Printed as a two-color flat plate (no paper, no glue) so the pattern is part of the print itself. The pattern face is printed against the textured plate for a **matte, anti-glare finish** that the detector loves.
Board specs
- **Pattern:** 7 × 10 squares (ChArUco)
- **ArUco dictionary:** `DICT_4X4_50`
- **Checker square:** 18.0 mm
- **Marker:** 13.5 mm (inside each square)
- **Quiet-zone margin:** 8 mm white border all around
- **Board size:** ~142 × 196 mm
- **Footprint incl. mouse ears:** ~154 × 208 mm
- **Minimum bed:** ~210 mm in the long axis (the ears push past 200 mm). It does **not** fit a 180 mm bed (Bambu A1 mini) and is tight on 220 mm beds.
- **Thickness:** 2.0 mm (0.6 mm two-color pattern layer + solid cap)
Intended size — read this before printing
These dimensions are the **design intent**, but the *actual* printed size can drift slightly depending on your printer, filament shrinkage, and flow calibration. For calibration to be valid, the squares must be the real-world size your software expects:
➡️ **Print at 100% scale, then measure a few squares with calipers.** If they aren't 18.0 mm, either re-tune your printer or update the square size in your calibration config to match what you actually printed. The pattern is only as accurate as the measurement you feed your software.
Print settings
- **Two colors:** dark pattern (black) + light background (white). Highest contrast = best detection.
- **No brim needed** — the model has **built-in mouse ears** (single-layer discs at each corner) that pin the corners down and stop this big flat plate from curling. They peel off after printing; they sit in the white margin and never touch the pattern.
- **No supports needed.**
- **0.2 mm layer height** (the 0.6 mm pattern face = 3 × 0.2 mm; the ears are a single first layer).
- Pattern side down against the **textured plate** for the matte, glare-free finish.
Removing it from the bed
**Let the bed cool completely to room temperature before removing the print.** A flat plate this wide will bow or curl if you pop it off a warm plate, and any bow ruins the flatness the calibration depends on. Patience here directly protects your accuracy.
Tips
- Keep the whole board flat and fully in frame when calibrating.
- Place it coplanar with whatever you're measuring (flat on the same surface).
- Even, diffuse lighting beats harsh direct light — the matte face helps.
Comment & Rating (0)