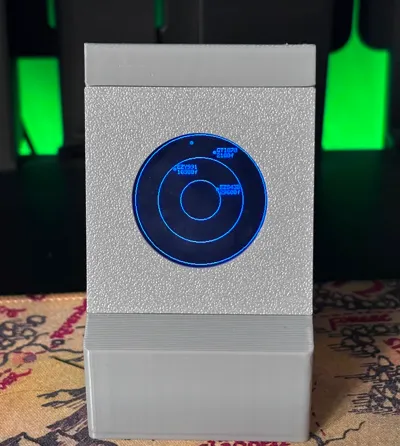
Another Desk Radar (RandumbRadarOS)


Print Profile(1)
Description

There's a few of these online now and I wanted to add my own flair to my own so I set about designing my own code (with the help of ChatGPT) and my own 3D printed case. Whilst this is not a fork or remix it is heavily inspired by @Hommerrrrrr so massive props to him. The idea was to see whether I could create my own Desktop Radar software with a 3D printed case that only uses friction fit for all the components and if possible to make it plug and play with no requirement for soldering if you weren't confident.
Design wise the screen mount is designed around the one I ordered which I have listed below but I have some more coming from AliExpress (to reduce cost) to see if these also fit.
I have put together a parts list below and install instructions are all on my github - Let me know what you think! First real coding project so would love some feedback :)
Parts List
- 3D Printed Case - You're looking at it :)
- ESP32 with header pins - Amazon UK
- TFT with header pins - Amazon UK
- Dupont Connectors - Amazon UK *Optional if you would like to go solderless
Connecting & Building:
- Print the case whilst waiting for the parts to arrive - Some cleanup maybe required on the top of cabinet where the screen mount fits due to overhangs and trying to create a snug fit
- Once you have the case and parts connect the ESP to the TFT using the pin layout below (I used different colours to differenitate but you don't have to do this)
- Place the Screen into the mount.
- Push Bars into the slots to hold screen in place (These have been designed as rectangles not squares so will fit better one way than the other
- Feed board and wires through the main cabinet opening
- Place the bottom of the screen mount in first at an angle and then push up to click the screen mount into place.
- Push ESP32 Board into mount on the base
- Slide cabinet ontop of base.
Pin Layout
| TFT (Screen Pins) | ESP32 (Board Pins) |
|---|---|
| RST | D4 |
| CS | D5 |
| DC | D2 |
| SDA | D23 |
| SCL | D18 |
| GND | GND |
| VCC | 3V3 |
Webflasher
Caution
By Flashing your ESP32 it will wipe any other app you currently have running - I would advice unplugging any other ESP's you may have plugged in just incase you select the wrong COM Port.
Connect the ESP32 to your PC with a USB-C cable and head to LINK this will open up a webflasher - Flash your ESP32 and wait for it to complete.
Initial Setup
Once the ESP32 boots up for the first time, it will create a Wifi Access Point called RandumbRadar, connect to this on your phone/laptop. Head to 192.168.77.1 on your browser and enter your home WIFI details. You'll get a confirmation page and the device will reboot.

First Setup
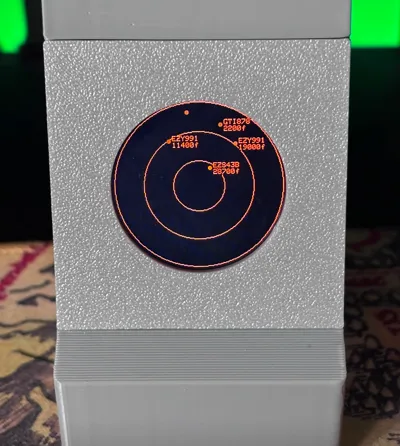
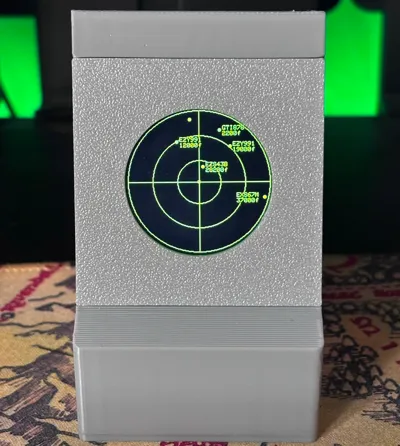
The Screen should now be displaying a local IP address, so back on your home WIFI you should be able to go to that address and start the first set up. The First thing you need to do is go to opensky and create an account, once done, on your account page you'll see an option to create an API key. Click this and it will download a file to your PC, there you'll find the ID and Secret. Now head to that IP address you seen on your Radar Screen and click settings. Paste your Client ID and Client Secret into the corresponding boxes (without the speech marks or any other formatting) and click Save. The system will take a few minutes and then start the next scan. The long/lat defaults are Heathrow Airport at a 200km range so expect to see alot of dots first time round!


Customisation
Now is the fun stuff. Head back to the Dashboard, Click Customisations and go crazy! Update your Lon/Lat and range to suit and I've included a couple of customisations options within the app. I hope to add more in the future.


GITHUB - With all these details again :)
TheRandumbHero/RandumbRadar: My own go at a Desktop Radar Screen

License
You shall not share, sub-license, sell, rent, host, transfer, or distribute in any way the digital or 3D printed versions of this object, nor any other derivative work of this object in its digital or physical format (including - but not limited to - remixes of this object, and hosting on other digital platforms). The objects may not be used without permission in any way whatsoever in which you charge money, or collect fees.
Comment & Rating (4)