HG-P407 + RC4WD Yota II RC Car Axle Conversion Kit


Print Profile(1)

Description
Boost Me (for free)
Boosting is free, and supports me just as much as a membership! Your points go straight to my filament and printer part costs, fueling more dope models like these!
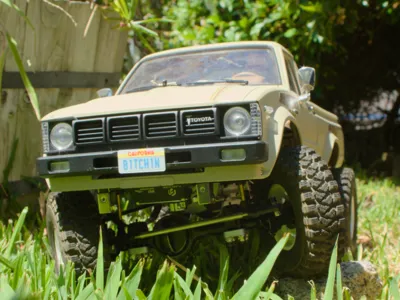
-1/10 Scale HG-P407 Yota II Axle Conversion Kit-
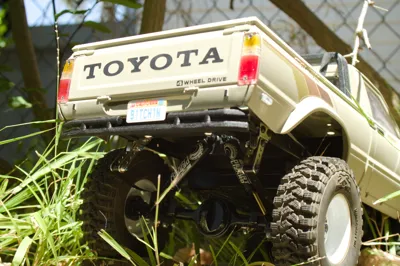
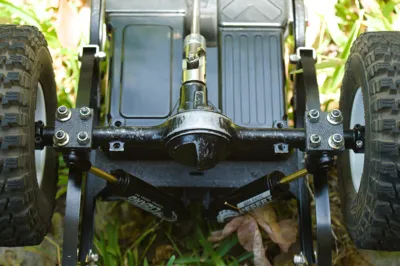
When choosing how I'd build my fully-custom Toyota Hilux crawler last year, I went with an HG-P407 kit (Tamiya Bruiser knockoff) instead of the more popular RC4WD Trailfinder 2, mainly because the cheaper kit comes with a more realistic frame along with more features like a 3-speed transmission. However, because the default kit was only meant to be more of a monster truck than a scale crawler, the wider stance of the rear axle and unique wheel mounting system means they're difficult to use for anything else.
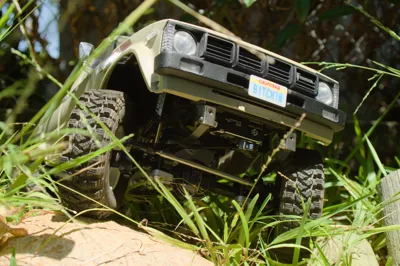
Instead of wasting my time with wheel adapters to try to get the original axles to work, I found a good deal on a set of used Yota II axles and adapted them to fit! This is a fully non-destructive way to both lower the body height while also allowing the use of the much more common and dependable Yota II platform, giving the whole build a much more authentic appearance on top of being more usable. Swapping only a few components from the stock kit you can go from the stock axles to the Yotas in a matter of hours!
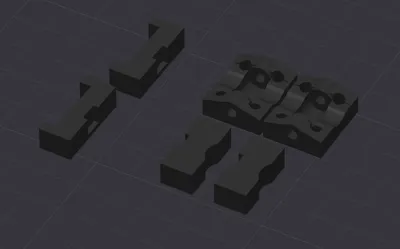
While I'm not good with detailed step-by-step instructions, the photos included should give enough of an understanding on how to mount everything, (front leaf spring blocks on my car are prototypes I had to partially cut but they're basically the same.) There aren't many parts needed, and they're all pretty self explanatory. But in addition, here's a parts list explaining more precisely what each component is for:
PARTS:
Leaf Spring Blocks (4)
Two for the front, (notched to hold onto stock front leaf spring mounts,) and two for the rear, (Hump on one side to sit directly atop the rear axle.) Both types also have small cutouts on the leaf spring contacting side to allow room for the small screw heads that holds the leaf springs together. They double as a way to key the axles in and prevent the mounts from sliding along the leaf springs.
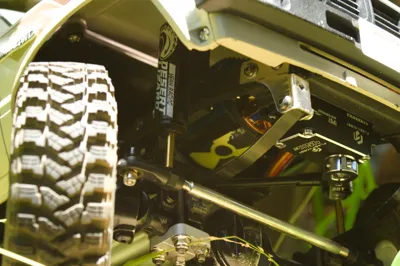
Rear Axle U-Bolt Retainers (2)
Because the HG-P407/Bruiser has leaf springs further spaced out in the rear, an extra part is needed to connect the axle away from the stock mounting points. One for each side, they slide perfectly onto the underside of the axle, aligning with the stock shock mount points. These replace the stock aluminum retainers in the kit for the rear and are otherwise used the same as the kit manual shows.
Rear Shock Mount Frame (1)
In combination with the Rear U-Bolt Retainers, this allows you to mount two 90MM shocks to the back axles for full dampening. They're configured to mount to the two points jutting off in the canter, and give the whole rear of the car a great scale look- mounting much the same way as the real car.
(OPTIONAL) Rear Lowered Body Mount (1)
Similar to the last part, though it goes in the very back of the car and allows for the whole body to drop by about 20MM. Used in combination with the front shock/body mount by bullit-68 on Thingiverse here, This can get you the scale lowered look you see in all my photos.
NOTES:
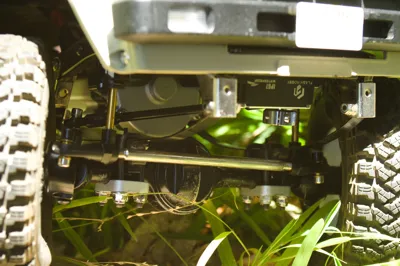
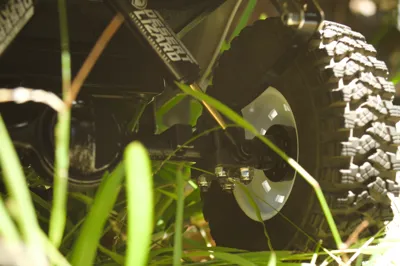
This kit isn't compatible with the stock HG-P407/Bruiser shocks. I designed it to work with my Yeah Racing 90MM Desert Lizards, and likewise you should be able to use any similarly sized 90MM shocks instead of the terrible ones included in the stock kit.
The stock kit drive shafts work perfectly with Yota IIs. Everything mounts the same and works perfectly.
Shock mounting: Front shocks mount to the axles in the stock locations, and to the frame using a custom part by another user on Thingiverse found here. Rear shocks mount to the axles through both the U-Bolt Retainers and stock points, and to the frame using the Rear Shock Mount Frame Part.
The Rear Shock Mount Frame and other frame-related components may interfere with the stock radio box. I cut mine down and shaved some parts off to fit it with a lowered body, so you may need to do the same in some areas or use another radio box.
- I ‘m running only one leaf spring on each corner, and no springs inside the shocks, (30Wt oil only.) It's a combo thats been working great for me so far with plenty of flex, though this kit should work fine with additional leaf springs/shock springs left in. It's all up to preference!
If you have any questions on the build I failed to mention here let me know in the comments, I'm happy to help! Thanks for checking this out and feel free to share you're build if successful, I hope this helps more people do this than what I'd already seen online. It's totally worth it and really brings together the best of both kits.
Membership
your contributions as a commercial member both give me the financial incentive to continue creating valuable designs, while also providing you with the opportunity to resell parts and models to hobbyists without printers!
License
You shall not share, sub-license, sell, rent, host, transfer, or distribute in any way the digital or 3D printed versions of this object, nor any other derivative work of this object in its digital or physical format (including - but not limited to - remixes of this object, and hosting on other digital platforms). The objects may not be used without permission in any way whatsoever in which you charge money, or collect fees.
Comment & Rating (0)