Search models, users, collections, and posts
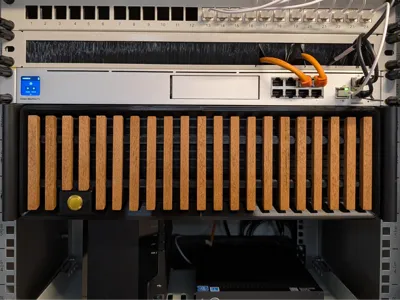
Scandinavian Slat Style 3U Server Chassis Front
IP Report


Print Profile(1)

Complete Shroud Assembly and jig (PETG)
Designer
14.9 h
4 plates
Open in Bambu Studio
Boost
3
4
0
0
2
0
Released
Description
Scandinavian Slat Style 3U Server Chassis Front
This front was designed for the Intertech IPC 3U-K340L i had laying around but because of the semi modular design with detachable holders you can likely design your own custom holder brackets for other 3U servers.
Additional parts needed
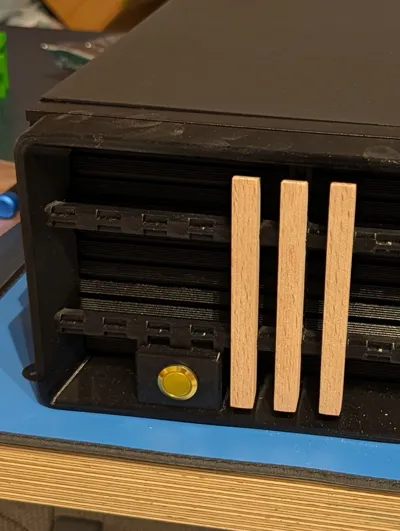
- 1x 16mm Push Button (power button for the server)
- 4x 3mm countersunk wood screws (approx. 15-20mm length)
- Epoxy resin or superglue
- Wood for the slats
Part 1: Plastic Assembly
- Print & Prep: Print shrouds and holders in PETG, ensuring all supports are removed. Remove rack ears, original power button, and USB module from the chassis.
- Component Install: Mount the 16mm button in the left shroud and route the wiring. Secure the holders into their respective shrouds using 3mm screws from the back. Make sure the holders are correctly aligned.
- Final Mounting: Snap the middle holder onto the right shroud. Slide both shroud assemblies onto the chassis, ensuring they lock together in the middle and fit seamlessly.
Part 2: Wooden Slats
The project includes two PDFs with the exact dimensions of the slats. I cut them from a piece of wood, but they could probably be CNC milled, laser cut, or 3D printed as well. Manufacturing these slats was surprisingly difficult but this workflow worked the best for me. You will need a Miter or Table saw.
- Start with a board (wide enough for a few slats, e.g. 40mm). Cut a section slightly longer than the length of the slats.
- Center-cut two 3mm wide mounting grooves into the back, spaced exactly 49mm apart.
- Snap the cutting jig into the grooves to set the correct angle for side cuts.
- Cut the chamfered ends using a miter saw aligned with the jig to get the correct angle.
- Cut the board into 10mm wide slats. Be really careful not to cut yourself.
- Sand smooth and apply your preferred finish, I chose a nuttree stain.
- Press slats onto the rails. Use epoxy resin in the grooves for a permanent lock.
Documentation (2)
Other Files (2)
Slat Short Drawing.pdf
Slat Long Dimensions.pdf
License
This user content is licensed under a
Creative Commons Attribution-Noncommercial-Share Alike
Comment & Rating (0)