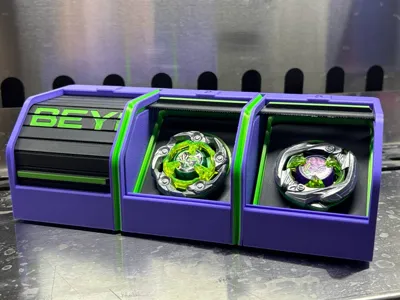
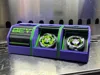
Rolling Shutter Deck Box (Beyblade)

Print Profile(1)
Bill of Materials


- Fine PVC Mesh x 1: cut to size, leave enough spare one all side to be held down with magenets
Description
VALIDATION ONLY
NO RE-UPLOAD
This is possibly the most complicated and coolest deck box out there. Fortunately, it wasn't hard to print with a bit of assembly. This will fit your deck of 3 perfectly where your opponent would not be able to see them easily even when opened.
Printing note:
with all of the Shutters, you need to insert a piece of PVC mesh cut about the size of your printing area or 5cm larger than the model so you can hold it down to the build plate with magnets; Recommended pause at around 0.8mm or right before your infill; so it wouldn't over extrude too much, trim away excess mesh before assembly
IF you don't follow this step you will just get a bunch of loose sticks after printing the shutter, this is done so that the shutter would be very flexible and durable while being about 2mm thin


Features:
Smooth Rolling shutter - Easy to open, Easy to close.
Optimized for 3d printing - No support needed
Customizable - The shutter, backplate, both side of the box can be customized easily, print different parts in different colour to mix and match without AMS
A1 mini compatible - separated in parts to be assembled; Print great on a A1 mini
Requirement:
Screwdriver/Allen key
6x M3 heatset
6x M3 screw (14mm or above recommanded)
1 each of Box L/R/C
2x Divider
3x Shutter(trimmed and printed with mesh in place)
3x Support Frame
1x Decoration plate(Optional)
Steps:
1. Insert all 6 heatset insert into Box C, 3 on each side
2. slide the shutter with handle facing outside in L/R/C in closed position, slide in Support Frame with the longer side facing up
3. slide one screw through Box L and put a divider on it
4. Line it up with Box C and gently tighten the screw
5. (optional) insert decoration plate in the back
6. repeat step 3-4 with Box R and confirm alignment
7. make sure everything fits, than tighten down the screws
Done
Please comment bellow if you have faced any problem during printing, or share your successful prints, enjoy
For commercial use, please contact me either through in site message or on github at https://github.com/BaybladeXplorer
A license must be obtained for any commercial use
Update 1:
Screw length had been rectified to 14mm+, due to my fault when drafting the BOM, credits to dk_yip on threads, BOM updated to 20mm just to be safe for future updates
Comment & Rating (11)