QuickStick Veneer Tape Dispenser


Print Profile(1)
Bill of Materials

Description
The QuickStick Veneer Tape Dispenser is a dedicated workshop tool designed specifically for fine woodworkers and marquetry enthusiasts working with veneer.
The inspiration for this project came after attending an advanced veneering class with master craftsman Scott Grove of Imagine Woodworking. During the course, Scott mentioned that the vintage, cast-iron Express Moistener manufactured by Better Packages was hands-down the best veneer tape dispenser ever made. Unfortunately, it was discontinued decades ago, forcing makers to hunt for rare, expensive units on eBay.
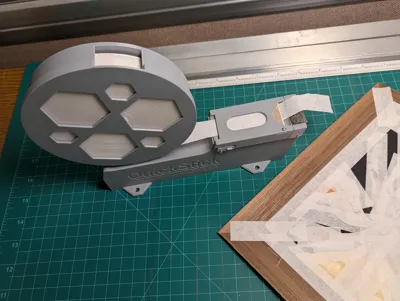
The QuickStick is modeled with those classic, proven geometry features. Most importantly, the cutting blade is precisely positioned before the wetting sponge. By keeping the cutter upstream of the water source, the tape is sliced dry—ensuring that absolutely no moisture or wet tape is pulled back onto the roll, preventing the roll from binding up.
As shown in the project photograph, this design modernizes that classic concept using fully 3D-printed components and a minimal amount of hardware.
Key Features
- Classic "Dry-Cut" Geometry: Modeled after the legendary, discontinued Express Moistener by Better Packages. The cutting blade sits before the sponge so you never pull wet tape back onto your dry roll.
- Veneer Tape Containment: Veneer tape is notoriously springy and prone to easily unspooling. The tape spool completely contains the roll, keeping it tightly managed and preventing frustrating unspooling in your workshop.
- Modular & Portable: The entire spool holder assembly slides smoothly into the base and can be easily pulled off whenever you need to pack up the tool for travel or compact storage.
- Stability & Bench Mounting: The base features an internal ballast compartment that can be filled with BBs, sand, or other heavy material to give it enough weight for effortless, one-handed pulling. Additionally, integrated counter-sunk screw holes on the base tabs allow you to screw the dispenser securely down to a workbench or dedicated mounting block if you choose.
- Support-Free Print Design: All components in this model have been designed and pre-oriented to print completely support-free, saving you material and post-processing cleanup.
Required Hardware & Components
To fully assemble the QuickStick, you will need the following 3D-printed parts and hardware components:
3D-Printed Parts (In Installation Order)
- Base (The main body of the dispenser)
- Cover (For containing the base ballast)
- Sponge Retainer (Featuring integrated spikes for capturing the sponge)
- Plate (Contains the track and cutting knife for the tape feed path)
- Axle (For connecting the lock tab)
- Lock Tab (Secures the plate to the base during use)
- Tape Holder (The spool holder)
- Tape Cover (The outer spool shield with the hexagonal cutout pattern)
Hardware & Consumables
- Veneer Tape: Designed for standard 3/4 inch (20mm) veneer tape with a standard 1/2 inch center hole.
- Wetting Sponge: One standard ~0.6 inch kitchen sponge to serve as the activation pad (Tested with Target DealWorthy Multi-Surface sponges).
- Cutting Blade: One 9mm serrated-edge snap blade for crisp tape tearing (Tested with Husky brand from Home Depot; standard 9mm straight-edge snap blades can probably also be used and are widely available).
- Base Ballast: One standard-size container of 6000 BBs, dry play sand, or lead shot to fill the base cavity for crucial stability (Tested with Crosman copper-coated BBs from Walmart for optimal water and corrosion resistance).
- Fasteners: Small self-tapping pan head screws (Sourced from this Amazon Screw Assortment Pack):
- 6x M2x4mm
- 1x M2x8mm


Recommended Print Settings
Important Material & Slicer Note: All functional prototypes have been extensively tested and printed using PETG-HF. Because this tool utilizes a wet reservoir, PETG or another water-resistant filament must be used to ensure longevity and prevent leaking.
The provided .3mf files include optimized slicer settings that are highly recommended to ensure proper tolerances and a watertight reservoir:
- Material: PETG-HF / PETG (Mandatory for proper water resistance and structural durability).
- Wall Generator: Arachne (Crucial for handling the fine tolerances of the feed track and texturing).
- Wall Order: Outer wall / Inner wall (Prioritizes dimensional accuracy for sliding assemblies).
- Travel Optimization: Avoid crossing walls enabled (Drastically reduces stringing inside the fluid reservoir and feed slots).
- Infill: 15% - 20% Gyroid (Provides solid structural support for the spool arm and base).
- Wall Loops: 3 to 4 (Ensures the water-retention area and ballast cavity are completely watertight).
- Layer Height: 0.2mm (A great balance between print speed and smooth feeding-slot tolerances).
- Supports: None Required. All parts are pre-orientated to print flat without any support material.
Assembly Instructions
Please assemble the hardware components in the following order:
- Ballast Assembly (Base & Cover): Fill the bottom ballast chamber of the Base with BBs, dry sand, or your preferred heavy ballast material to provide low-center-of-gravity stability. Once filled, align the Cover over the compartment and secure it tightly using four M2x4mm screws.
- Sponge Retainer Installation: Slide the empty Sponge Retainer into its channels within the Base and lock it securely against the front of the water well using one M2x4mm screw.
- Blade Installation (Plate): Snap your 9mm utility blade down to a length of exactly 7 segments. Position the blade into the designated side slot on the Plate and anchor it firmly with one M2x4mm screw. (Note: Do not install the Plate onto the Base yet).
Hinge Assembly (Axle & Lock Tab): Assemble the pivot mechanism hardware on the empty Base. Slide the Axle through the hinge mount on the chassis with the flat facing down. Align the Lock Tab oriented down with the axle on the left side of the base, then secure the Lock Tab directly to the Axle using the single M2x8mm screw to lock the hinge components together.

- Prep the Sponge: Cut your ~0.6 inch kitchen sponge to a rough dimension of 30mm x 45mm. Tip: Cutting an angle at the top of the sponge may improve overall wetting performance during operation. Set the cut sponge aside for tool usage setup.
Usage Instructions
- Loading the Spool (Tape Holder & Tape Cover): Slide your roll of 3/4 inch veneer tape onto the inner cylindrical core of the Tape Holder. Fit the stylized Tape Cover (featuring the custom hexagonal cutouts) over the tape package to cleanly contain the spool and prevent it from unspooling.
- Mounting the Spool: Slide the completed spool assembly down into the mounting tracks of the Base. It can easily slide back out whenever you need to travel or pack up the tool for storage.
- Installing the Sponge & Filling: Fill the water reservoir to about one-third full. (Too much water may cause spillage or over-wetting of the tape.) Pre-wet your sponge and then press it against the spikes of the Sponge Retainer.
- Installing the Plate: Drop the assembled Plate (containing the track and cutting knife) down into the Base and slide forward against the sponge. Engage the pivoting hinge lock to secure the plate.
- Mounting: If you prefer a permanent workstation setup, use the mounting tabs on the Base to screw the unit directly to your workbench or a mounting block.
- Operation: Use the finger cutout built into the Plate to advance the tape forward. Pull the tape across the damp sponge to activate the adhesive, and pull upward against the serrated blade to clean-tear your strip.

Planned Future Modifications
If there is community interest, I am considering rolling out a few additional options and variant files:
- Custom Sponge Sizing: The current Sponge Retainer and Lock Tab are precisely optimized for standard 0.6-inch sponges. If you use alternative sponge thicknesses, drop a comment and I can upload adjusted models to fit your local stock.
- Brush Holder Variant: I am considering developing a dedicated brush-holding attachment to replace the sponge. This mod would let you use the bristled top of a standard 1-inch paint brush, perfectly matching the original vintage wetting mechanics of the historical Express Moistener. Not sure if that would be better or not.
- Deluxe Edition: A dual-spool deluxe version featuring a second holder and cutter designed to manage blue painter's tape alongside your veneer tape.
License
You shall not share, sub-license, sell, rent, host, transfer, or distribute in any way the digital or 3D printed versions of this object, nor any other derivative work of this object in its digital or physical format (including - but not limited to - remixes of this object, and hosting on other digital platforms). The objects may not be used without permission in any way whatsoever in which you charge money, or collect fees.
Comment & Rating (0)