HOZO NeoSander Workstation — BenchRail


Print Profile(2)

Description
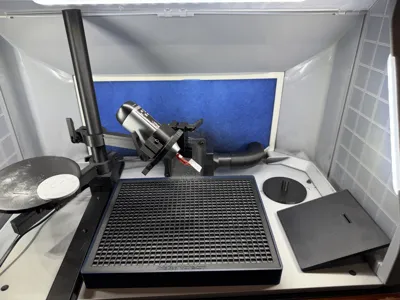
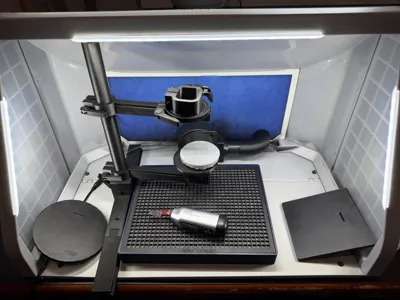
Turn your HOZO NeoSander into a benchtop sanding and cutting workstation. BenchRail mounts to any desk edge and holds the NeoSander in any orientation — vertical, horizontal, or tilted — leaving both hands free to guide the workpiece against the tool. A modular dovetail rail and interchangeable tables let you set up for detail sanding, perpendicular edge work, jigsaw-style cutting, or freeform handheld assists.
Why BenchRail
The NeoSander excels at fine-detail work, but small parts are hard to hold steady against a vibrating tool. BenchRail flips the workflow: lock the tool, move the work. A cam-clamp cradle grips the NeoSander securely while a 360° rotation joint lets you angle it for any job. Pair with the Sanding Dust Collection Station for a complete enclosed workstation.
What's included in this listing
- Desk Clamp Front — clamps to any desk or bench edge up to 50mm thick
- Screw-Down Front — alternative permanent-mount base
- Rail Segments — 200mm front + end cap included; coupled via dovetails. Optional 300mm full-length rail on a separate plate for wider work areas.
- Carriage — slides along the rail with cam quick-release, holds the upright
- Upright Post — 210mm tall (above threads) on the carriage plate; 260mm alternative on a separate plate. Threaded into the carriage's upright socket.
- Cradle Arm + Side-Bore Carriage — horizontal-axis carriage for the NeoSander cradle's rotation interface
- Table Arm + Vertical-Bore Carriage — vertical-axis carriage for table shafts
- Tables — 80mm round (small), 120mm round (large), 120×120mm square; all with slots for blade clearance during jigsaw work
- NeoSander Cradle (two-part) — sander clamp + rotation connector for 360° tool rotation
- Cam Levers + Nut Holders — quick-release hardware
Use cases this enables
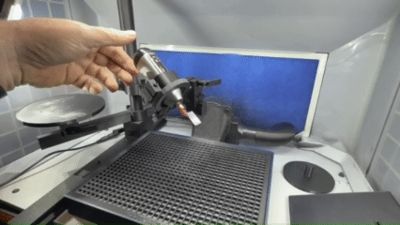
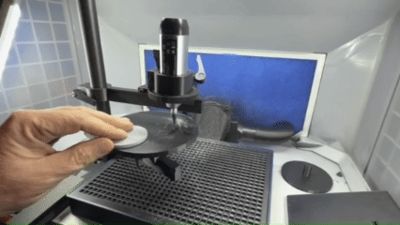
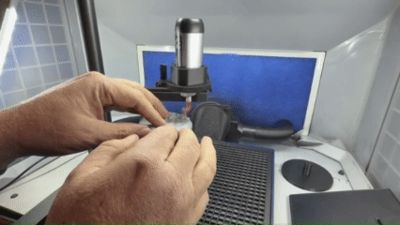
Vertical detail sander — NeoSander mounted nose-down over a flat or perforated table. Drop sanding heads into a workpiece pressed against the head. Ideal for resin model cleanup, miniature work, jewelry.
Perpendicular edge sander — Square table with the sander mounted horizontally against one edge. Run material along the square table edge for straight, true edges on small parts.
Vertical jigsaw — Swap to a NeoSander jigsaw blade. Tables have a blade-clearance slot 30mm from one edge so you can guide stock through cuts. Cut small parts with precision the original handheld grip can't match.
Diagonal/freeform hold — Lock the tool at any angle, hold the workpiece by hand. Best for complex contours and one-off shapes.
Print settings
| Setting | Value |
|---|---|
| Material | PETG-CF (recommended) with PLA support interfaces |
| Layer height | 0.2mm |
| Walls | 4 |
| Infill | 25–50% gyroid |
| Supports | Tree Slim on build plate only, where indicated |
| Nozzle | 0.4mm |
Exception — C-clamp screw: an object modifier in the 3MF bumps this part to 8 walls and 100% infill. The screw experiences sustained clamping load every time you mount the system; the extra material prevents thread creep. Don't strip this modifier when slicing.
PETG-CF gives the cam clamps and dovetail joints the stiffness and creep resistance they need under sustained load. PLA support interfaces release cleanly from PETG-CF without scarring the part. All print profiles in the 3MF are pre-configured for this combination. PLA will work for casual prototyping but is not recommended for daily use — the cam clamps will eventually deform under load.
Hardware (not included)
| Qty | Part | Use |
|---|---|---|
| 1 | M3×50 | Desk rail carriage cam clamp |
| 2 | M3×35 | Arm sleeve cam clamps (cradle arm + table arm) |
| 2 | M3×30 | Arm rail carriage cam clamps (rail grip) |
| 2 | M3×35 | Arm rail carriage cam clamps (12mm post grip) |
| 1 | M3×35 | Cradle connector cam clamp |
| 1 | M3×35 | NeoSander clamp cam clamp |
| 9 | M3 nut | One per cam screw |
| 4 | M4×30 wood screws | Only if using the Screw-Down Front |
Total: 9× M3 socket head cap screws (1× M3×50, 6× M3×35, 2× M3×30) + 9× M3 nuts + optional M4 wood screws.
Build plates (in the 3MF)
Seven plates are included. Print in this order — each plate produces a self-contained subassembly you can put together before moving to the next.
| # | Plate | Contents |
|---|---|---|
| 1 | Clamp BenchRail | Desk rail (front + short middle + end cap), C-clamp screw |
| 2 | Carriage & Upright (210mm) | Desk rail carriage, 1× cam lever + nut cylinder, 210mm upright post (above threads) |
| 3 | Tool Arm & NeoSander Cradle | Tool arm, side-post carriage, 5× cam lever + nut cylinders, NeoSander clamp, NeoSander connector ring/post |
| 4 | Table Arm & Tables | Table arm, top-post carriage, 3× cam lever + nut cylinders, small round table, large round table, large square table |
| 5 | Alternative: Screw-Down BenchRail | Screw-down desk rail (front + short middle + end cap) — use instead of Plate 1 if you'd rather permanently mount to the desk |
| 6 | Optional: 300mm Desk Rail Section | Extra full-length rail segment for wider work areas |
| 7 | Alternative: 260mm Upright Post | Taller 260mm upright (above threads) — use instead of the 210mm on Plate 2 if you need more vertical reach |
Minimum to get started: Plates 1 + 2 + 3 (with the NeoSander cradle) OR Plates 1 + 2 + 4 (table-only setup). Add the other plates as your workflow needs grow.
Assembly
Assemble each cam clamp before installing parts on the BenchRail. Each clamp uses one cam lever, one nut cylinder, one M3 socket-head screw, and one M3 nut.
Cam clamp assembly (do this 9 times):
- Drop the M3 nut into the nut cylinder's nut pocket
- Thread the M3 screw through the part being clamped, then through the lever, then into the nut cylinder
- Seat the lever into its cradle slot and confirm a quarter-turn fully engages the cam
Tip: Use needle-nose pliers to pick up the M3 nut and place it into the nut cylinder pocket, then use the pliers to squeeze the nut fully home. Trying to seat it by hand is fiddly and usually leaves the nut slightly off-axis.
System assembly order:
- Mount the BenchRail front (clamp or screw-down) to your desk
- Couple the middle rail segment and end cap to the front via the dovetail joints
- Slide the desk rail carriage onto the rail from the free end
- Thread the upright into the carriage and snug the carriage cam
- Slide the tool arm and/or table arm onto the upright; lock with the sleeve cam
- Slide the small carriage onto each arm's integrated rail
- For the tool: insert the NeoSander into its clamp and tighten; slide the clamp's flange into the connector ring (loose); insert the connector's 12mm post into the side-post carriage bore; lock all cams
- For tables: drop the table's 12mm shaft into the top-post carriage bore; lock the carriage cam
Once everything is on the rail, rotation and position adjustments take a quarter-turn each — no tool changes needed mid-job.
Tips & Tricks
- Set the upright at your preferred working height before installing the carriage on the rail — it threads in once and stays.
- The cam levers tighten with a quarter turn — no tools needed for reconfiguration.
- For jigsaw work, align the table slot with the NeoSander's blade BEFORE locking the table arm cam.
- The NeoSander cradle's two-part design lets you rotate the tool 360° without unclamping it from the cradle — just loosen the connector cam.
- For long sanding sessions, point the NeoSander's exhaust toward your dust collection inlet.
About BenchRail
BenchRail is a modular dovetail-rail platform that the NeoSander workstation is built on. The same rail and carriage system can host custom cradles and tables — see the upcoming BenchRail platform listing if you'd like to design your own accessories.
Axis Gear Works on MakerWorld License: CC-BY-SA 4.0 — modify, remix, share with attribution; derivatives must use the same license.
Comment & Rating (2)