LouverGuard DIY – Adjustable Louver Fence System


Print Profile(5)

Description
LouverGuard DIY – Modular, Adjustable Louver Fence System
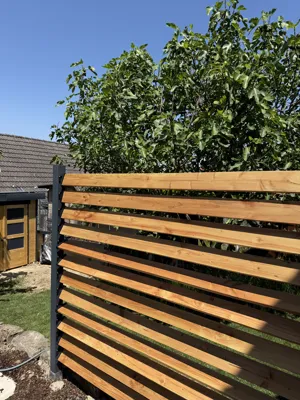
Transform your garden with ease! The LouverGuard DIY system is a professional-grade, infinitely extendable kit designed to build beautiful, adjustable louver (slat) fences and privacy screens. Engineered for strength and ease of installation, this system utilizes readily available wood planks to create a high-end look at a fraction of the cost.
🌟 Key Features
Modular & Extendable: Need a wider fence? Just add more sections. Need a taller fence? Add more louvers.
Adjustable Slats: Fine-tune the angle of the louvers for perfect privacy control or airflow (e.g., as a screen for trash cans).
Precision Installation Tool: Includes a unique installation spacer jig to ensure consistent, perfect spacing between every single louver automatically.
Heavy-Duty Design: Tested with substantial 98x22mm planks (e.g., Douglas Fir) over 2-meter spans.
🛠️ Required Hardware & Specifications
This is a DIY Hardware-Intensive Project. Please read carefully.
Bill of Materials (BOM) per 2m Section (approx. 10 louvers)
- 3D Printed Parts (see Files):
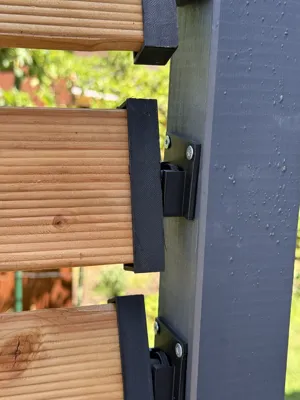
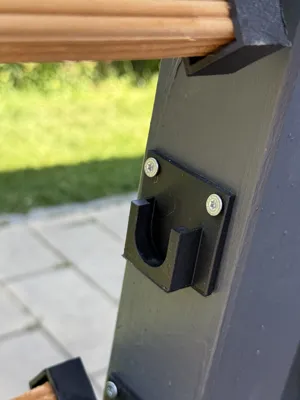
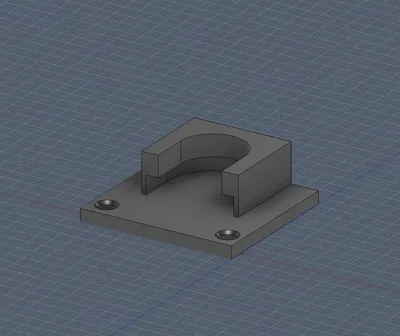
QTY 10x Post Anchor Brackets (female connector)
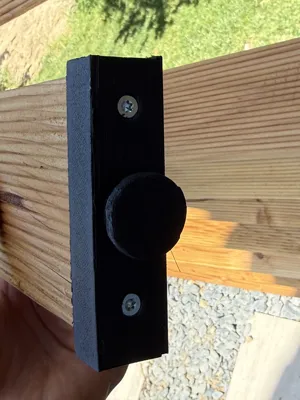
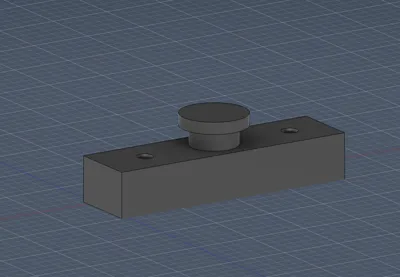
QTY 10x Louver End-Caps with Pivot Pin (male connector)
QTY 1x Installation Spacer Jig - Louver Planks (e.g., Douglas Fir):
QTY 10x approx. 98mm x 22mm x 2000mm planks - Screws:
Screws to attach End-Caps to Planks (e.g., 4.0mm x 25mm wood screws, 2 per plank).
Screws to attach Anchor Brackets to Post (e.g., 5.0mm x 40mm wood/concrete screws, depending on your post material).
🎨 Material & Post-Processing (CRITICAL)
To ensure your fence lasts for years in an outdoor environment, PLA is not recommended. Use one of these methods:
- Recommended:
Print all parts in ASA (UV and heat resistant) for a matte, industrial look. - Alternative:
Print in PETG or ABS, and immediately paint with a durable 2K automotive clear coat or 2K outdoor spray paint for UV protection.
🏗️ Step-by-Step Installation
- Post Preparation:
Mount your main vertical posts (wood, metal, or concrete) at the desired width (e.g., 2000mm apart). Ensure they are perfectly plumb. - Bracket Mounting:
Starting from the bottom, use the provided Installation Spacer Jig to automatically position and screw each Post Anchor Bracket. Move the jig up for the next bracket. - Louver Preparation:
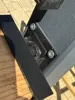
Place a 3D-printed Louver End-Cap over one end of your plank. Predrill (if necessary) and screw the cap onto the plank. (See image_4.png) - Final Assembly:
Insert the End-Cap's pivot pin into the corresponding Post Anchor Bracket slot. Repeat for the other side. (See image_3.png and image_5.png) - Adjust:
Simply rotate the louvers to your desired angle.
If you like this design and it helps your garden, please consider leaving a ⭐️⭐️⭐️⭐️⭐️ rating and a photo of your build! Points keep the filament flowing. ☕️
Boost Me (for free)
License
You may create derivative works based on this object, provided that all such derivative works are published exclusively on the MakerWorld platform and include proper attribution to the original creator. You may not share, upload, host, distribute, or publish this object—or any derivative work of this object—on any other digital platform, marketplace, or distribution channel. Commercial use of this object and any derivative works is strictly prohibited. This includes, but is not limited to, selling, renting, sublicensing, or using the object in any context in which you receive monetary compensation or other financial benefits.
Comment & Rating (33)