Capsule Toy Vending Machine - Upgraded Version


Print Profile(2)
Bill of Materials


- 8mm Furniture Feet x 1: https://amzn.to/4uKBIvW
- Heat Thread Inserts x 1: https://amzn.to/4nQtnUZ
Description
Pastel Capsule Toy Vending Machine
This print is made with permission from the original model creator, burakeser07. This version is a full redesign based on the original concept. *** Important note! You will need a large format bed to print the main top part and grill.
Boost Me (for free)
If this redesign saved you time, frustration, or filament, dropping a Boost really helps me out. Every Boost directly supports the hours spent: redesigning parts from scratch, test‑printing failures, refining tolerances, improving assembly, and engineering better function. Your Boost tells me these deep‑dive improvements matter — and trust me, I’ve got more designs coming.
🔧 Full Redesign Breakdown
After printing and testing the original, I rebuilt nearly every component to improve usability, assembly, and long‑term durability. So, I went through and redesigned nearly every part from the ground up, keeping only the two capsule‑dropper holder pieces close to the original.
This version is engineered for better fit, easier assembly, smoother operation, and more reliable access during use.
Major Structural Improvements
- Larger rear access opening — The original back opening was too small for comfortable access and made the plug difficult to remove. I redesigned the entire capsule holder with a wider opening and a more ergonomic plug.
- Improved rear plug with added grip nubs — The original plug was smooth, barely fit, and hard to pull out. I added raised nubs so you can grip it easily without stressing the part and redesigned the plug connections, so it fits easily in the insert.
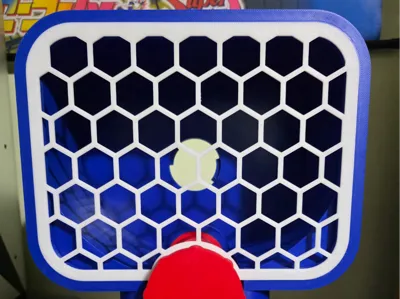
- Front grill alignment system — The original grill pieces didn’t align well. I added precision pegs so the parts snap together accurately. Note: They snap firmly. If you try to separate them after assembly, the pegs may break. Glue is still recommended before snapping together.
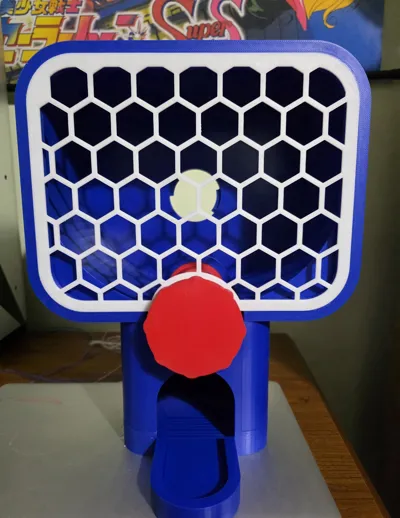
- Turn‑handle grip nubs — The ball‑drop turn handle now has added nubs for better traction and smoother operation.
- Added scoop geometry to the ball‑dropper — I redesigned the ball‑dropper with a small scoop‑shaped catch so it grabs capsules more reliably as it rotates. This dramatically improves consistency. This is also something I will expand on in a future redesign.
- Unified ball‑drop base — The original base was two pieces. I merged them into one stronger part and added holes sized for 8mm × 10mm heat‑set threaded inserts so you can use 8mm furniture feet to adjust the angle for smoother capsule rolling on any surface or angle.
🧩 Part Recommendations & Material Notes
To get the best performance and longest life out of this model, here are my recommended print settings and materials:
- Use PETG for all parts — I tested a full PLA version and it warped in heat, especially around the roller area. Once it warped, the roller couldn’t turn at all. PETG handles heat much better and keeps everything moving smoothly.
- Front grill should definitely be PETG — The grill pieces are thinner and more prone to heat deformation. PLA grills warped quickly in warm environments, while PETG stayed straight and functional.
- 15% gyroid infill — Strong enough for durability, light enough to keep print times reasonable, and gyroid gives great multidirectional strength.
- Avoid glitter or sparkle filaments if you plan to use heat‑set inserts — I tested glitter PLA with inserts and it was a nightmare. The additives make the plastic inconsistent and much harder to melt cleanly around the insert. PETG or standard PLA/PETG blends work far better.
- Heat‑set inserts recommended for the adjustable feet option — They give you a clean, durable threaded connection if you want to tilt the machine for smoother capsule rolling.
🧩 Additional Assembly Recommendations
- To make long‑term use and refilling easier, here are a few important assembly notes:
- Glue only the front grill pieces together — The alignment pegs lock in firmly, but glue ensures the grill stays rigid and doesn’t flex during use.
- Glue the assembled grill to the front of the machine — This keeps the structure solid.
- Do NOT glue the other major parts together if you plan on moving this around constantly— Keep the main body, capsule dropper roller and parts, and top section separable. This makes it far easier to refill, clean, and transport.
- Use a separate box or container for the capsules — Instead of loading capsules through the machine every time, keep a small box of capsules ready. When it’s time to refill, just lift the top section off and pour them in. Much faster, much cleaner.
- Transporting the machine is easier when it’s not fully loaded — Keeping the capsules stored separately prevents jams, rattling, and accidental drops during transport.
Product Links (Optional Add‑Ons)
- Heat‑set threaded inserts: https://amzn.to/4nQtnUZ
- 8mm adjustable furniture feet: https://amzn.to/4uKBIvW
Affiliate Note: Some of the links above may be affiliate links. This means I may earn a small commission if you purchase through them, at no extra cost to you. It helps support future designs and upgrades.
License
You shall not share, sub-license, sell, rent, host, transfer, or distribute in any way the digital or 3D printed versions of this object, nor any other derivative work of this object in its digital or physical format (including - but not limited to - remixes of this object, and hosting on other digital platforms). The objects may not be used without permission in any way whatsoever in which you charge money, or collect fees.
Comment & Rating (11)