The Aegis Cyber-Deck Stash Box


Print Profile(1)
Description
The Aegis Cyber-Deck Stash Box (No Supports)
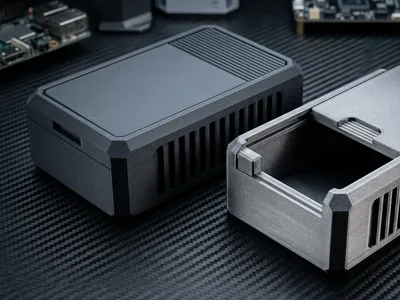
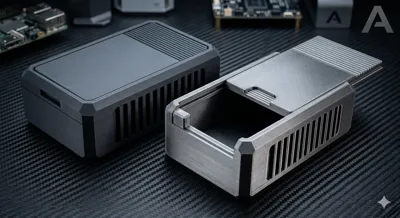
Upgrade your desktop or EDC (everyday carry) setup with The Aegis Cyber-Deck Stash Box—a highly detailed, sci-fi-inspired utility case featuring aggressive stealth chamfers, industrial cooling ribs, and a perfectly flush-fitting sliding lid.
This premium container is completely optimized for standard FDM 3D printing. It requires zero assembly and zero supports, allowing you to slide the lid right into the integrated tracks straight off the print bed.
🌟 Premium Features
- Stealth Industrial Design: Features 45-degree geometric chamfers on the top and bottom corners for a sleek, tactical aesthetic.
- Surface Greebling: Deep side-ribbing cuts into the walls, adding incredible visual detail that catches light perfectly (especially with Silk or Metallic filaments).
- Smooth Sliding Track: The lid features a built-in thumb grip and slides smoothly into an inner channel, seating flush against a front stopping block.
- 100% Support-Free: Every overhang is modeled at printable angles. No wasted filament or post-print cleanup required.
- Beefed-Up Geometry: Formatted with a robust 2.4mm wall thickness to create a heavy, rugged, and satisfying feel in the hand.
🛠️ Recommended Slicer Settings
For the smoothest lid glide and clean surface details, use these settings:
| Slicer Parameter | Recommended Value |
|---|---|
| Layer Height | 0.16mm to 0.2mm |
| Wall Loops / Perimeters | 4 to 6 (Thicker walls = stronger ribs) |
| Top/Bottom Layers | 4 Layers |
| Infill | 15% - 20% (Gyroid or Honeycomb) |
| Supports | None / Disabled |
| Filament Suggestion | Matte Black, Silk Silver, Gunmetal Grey, or Burnt Titanium |
⚠️ Pro-Tip on Fitment: The lid is modeled with a built-in 0.3mm clearance tolerance. If your printer tends to over-extrude, the lid might feel tight at first. Make sure your filament flow rate/extrusion multiplier is well-calibrated before printing!
📖 Post-Processing & Assembly
- Let the print bed cool down completely before removing the parts to avoid warping the bottom of the box or lid.
- Slide the lid into the track from the rear open end of the box.
- If the fit is slightly snug due to minor layer lines, slide the lid back and forth a few times to naturally wear down the high points for a buttery-smooth friction fit.
Enjoy the print!
Comment & Rating (9)