Search models, users, collections, and posts

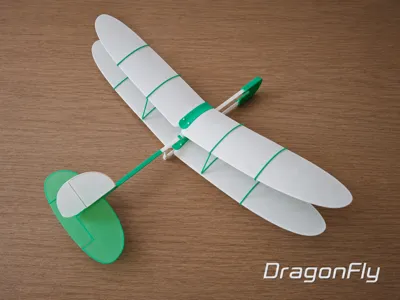
Free-flight glider "DragonFly"

GIF
GIF
GIF
GIF

Print Profile(4)

All
P1S
P2S
H2D
A1
X1 Carbon
H2S
X1
H2C
X1E
H2D Pro
X2D
P1P
A2L
A1 mini

DragonFly, V0.2, Bicolor
Designer
4.1 h
3 plates
5.0(10)

DragonFly, V0.2, Singlecolour
Designer
4.1 h
2 plates
5.0(3)

DragonFly, V0.2, A1 Mini
Designer
4.9 h
5 plates
5.0(1)

OPTIONAL - Safe TPU Nose
Designer
1.2 h
1 plate

Open in Bambu Studio
Boost
472
1359
36
19
529
290
Released 

Bill of Materials

Bambu Filaments
Select all
Jade White (10100) / Refill / 1kg
Bambu Green (10501) / Refill / 1kg

Description

SIMPLE. FLYING. FUN

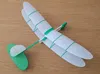
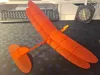
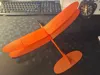
DragonFly is a fun compact biplane glider with excellent flight characteristics.

For a long time, I wanted to create a simple and durable biplane model that still keeps good aerodynamic efficiency and smooth flight behavior. DragonFly combines a lightweight structure, elegant lines and stable free-flight performance.

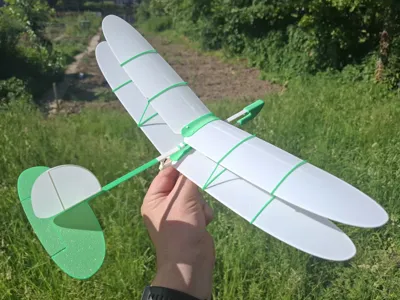
Designed for outdoor flights in calm weather, the model features an adjustable wing position for easy CG and pitch tuning.

DragonFly also inherits some of the best ideas and features from my previous designs: WingStar, COMET, Wespe and SkyStar.

1 - Model Data

Wingspan: 405 mm, 
Length: 320 mm
Wing chord: 60 mm
Model mass: 40g


Actual revision: V0.2 (ncreased Nose weight; increased fixing Clamp thickness).

V0.1 (improved Fin fitting slot tolerance; improved Nose mount tolerance).

Optional TPU Nose Weight

For additional safety, an optional TPU nose weight is available (see the corresponding optional print profile).

The soft TPU nose helps reduce the risk of damage during accidental impacts and contains a removable ballast insert.


2 - Materials, Settings, Printing

Model design created and tested using Bambu PLA Basic. Use this material for best results.

Do NOT use PLA Matte, especially for the wing parts. Printed parts may deform after removal from the Plate due to internal material strains after cooling.

Use recommended print settings.

Note: The print profile for A1 mini use slightly higher material flow coefficient (1.03 instead of 1.00).

For reliable printing: 

  • Clean the printing Plate before printing.
  • After printing, remove the Plate and let it cool for 3-4 minutes
  • Do not remove parts while the Plate is hot

3 - Model Assembly

The model consists of 13 parts, as shown in the figure.

1 – Nose, 2 – A-Beam, 3 – B-Beam, 4 – V-Beam, 5 –Tail, 6 – Fin, 7 – Left Wing (2 pcs), 8 – Right Wing (2 pcs), 9 – Rib Frame (2 pcs), 10 – Rib (4 pcs), 11 – Central Bracket, 12 – Dual-pin (2pcs), 13 – Clamp (2 pcs).

Assemble the tail unit and fuselage as shown.

Assemble the bottom wing as shown in the figure. Use Dual-pin (12) to fix wings.

Assemble the upper wing as shown. Fix upper wings with Dual-pin (12).

After installing and fixing the wing surfaces, uninstall Rib Frames (9) on both sides.

Finally, install the Ribs on both sides (10).

Wing assembly completed.

To install the wing on the fuselage, pull the fuselage beam through predefined guide points on the wing Central Bracket, as shown in the picture. A slight pushing force may be gently applied if needed. While sliding the wing into position, install one Clamp (13) onto the upper fuselage beam, directly after the first upper guide point of the Central Bracket, as shown in the figure.

After installing the wing onto the fuselage, set a gap of approximately 5-8 millimeters between the rear V-Beam (4) and the rear lower edge of the Central Bracket.

Fix the wing position on the fuselage with Clamps.

Install the Nose (1) part. Model assembly completed.

4 - Model Flight

Model is pre-balanced during assembly. Launch the model outdoors in calm weather conditions. Recommended wind speed: up to 5 km/h (≈1.4 m/s, ≈2.7 knots). Always launch the model directly into the wind.


DragonFly can be flown using two different launch techniques.

1. Gentle Glide Launch

This is the recommended launch method for initial trimming and normal flights.

Hold the model level and launch it with a gentle push and a slight nose-down attitude. The model should smoothly transition into a stable glide with minimal altitude loss.

If the model dives strongly, first try increasing the launch speed. If increasing the launch speed does not help, then:

  • Move the wing slightly forward 
  • OR bend the elevator slightly upward

If the model pitches up or stalls, first try reducing the launch speed. If reducing the launch speed does not help, then:

  • Move the wing slightly backward 
  • OR bend the elevator slightly downward

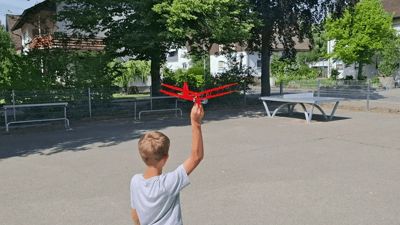
2. Dynamic Climb Launch

Use this launch technique only after the model has been properly trimmed for stable gliding.

Launch the model with a strong throw, approximately 25–35° upward, while applying a bank angle of about 30–50°.

The model will convert its launch energy into altitude, perform a gentle climbing turn, and then transition into a normal glide. When properly adjusted, this technique can significantly increase the total flight time and distance.

:) Experiment with launch angle, bank angle, and launch strength to find the best performance for your flying conditions. :)))


Happy Flights and Smooth Landings!

Boost Me (for free)

If you like my models, hit that Boost button like it's a launch switch! 🚀

Comment & Rating (36)

(0/1000)

Boosted
Print Profile
DragonFly, V0.2, A1 Mini
Just finished printing it. Another great glider. Tolerances where just a little bit too tight for the tail and nose pieces, which made it slightly difficult to assemble the model. I've printed all of the black pieces in PETG for little bit extra durability. Also I've made those 2 V clips 0.4mm thicker, because they where the first thing to break on the old models.
The profile uploader has replied
profile
3
Reply
Thank you for the boost, great feedback and valuable comments! Picture of model looks magnificent ✨️ You may be right regarding tolerances of nose part and fin, I will check ✅️ Thank you for the hint to increase clamps thickness a bit, will test this too.
(Edited)
2
Reply
Boosted
How does it fly, video?
0
Reply
Print Profile
DragonFly, V0.2, Bicolor
printed out perfect, and no problems with the assembly. nice glider flies good.
The profile uploader has replied
profile
1
Reply
Absolutely amazing pictures, thank you very much for them and for the great feedback!😃
0
Reply
Boosted
Print Profile
DragonFly, V0.2, Bicolor
Be careful removing supports for this piece
0
Reply
about time you produced a new model. still waiting on a !:! scale… thanks
The designer has replied
designer
2
Reply
Thanks! 😀 A 1:1 scale version would probably need a hangar instead of a printer.
0
Reply
Replying to @Arty_SC :
I think they just mean a larger scale like 2x or 3x for bigger flights. I know it's what I would want. :)
designer
1
Reply
Replying to @user_1407496086 :
Thanks, got it. It takes time 😀
0
Reply
This is impressive. Your gliders are the best-designed that I see on MakerWorld. WingStar has the best central bracket design because it’s integrated into the fuselage (and is much more crash-resistant when the kids fly it), but the dual-pin connector on WingRay and the other designs is great for clamping the wings in place. Would you be able to integrate both features into previous/future central brackets? Also, WingStar’s angle of attack is about 10 degrees too high and causes stalls, but I edited the bracket in Fusion and printed another one and it was perfect. Great work overall. Kids love these. I’ll boost when I get more
The designer has replied
designer
2
Reply
Thank you for the great feedback :) and valuable constructive comments and observations. I agree that angle of attack on early models is a bit high. BTW, on DragonFly I reduced it to 4 degrees. Yes, I constantly review design around models to implement best proven solutions, sometimes it may take time. Yes, it is planned to do " optimization". I'm happy to hear that kids have fun :))
1
Reply
Thank you! Boosted WingRay and will boost more when I get a chance to print out others!
1
Reply
Boosted
I haven't printed this yet, but I have a challenge for you! https://www.youtube.com/watch?v=-4X6KYlQ7YQ Design a glider that can be 3D printed onto tissue paper using tape to secure the paper to the build plate!
The designer has replied
designer
1
Reply
Great video, saw it. Tom's idea is brilliant. Yeap, there are some thoughts to electrify planes and to try combined technologies 😀. As soon as prototypes will fly stable and be reliable, will publish 😀
0
Reply
Boosted
Replying to @Arty_SC :
That's great! Tissue paper is easy to buy and I think could be a better material to make the glider planes lighter. This idea would make your designs unique because nobody else on Maker World is doing this. I like your designs but they're a bit heavy and tend to break. I've printed about 10-15 of them because they break but I enjoy them, so I keep reprinting them. I use PETG for the structural elements. This designer has more durable and easily replaceable parts design: https://makerworld.com/en/@Sami_84 However, his gliders do not fly as well as your designs. I'm excited to see what you come up with. Keep up the amazing work and thanks for your contributions to the 3D printing community!
(Edited)
designer
1
Reply
Replying to @Neodinium :
Thank you for the kind words, @Neodinium :) Yes, in my designs I tend to prioritize flyability over strength, trying to use as simplest material and technology, as possible. Still testing PETG and ABS solutions. Yes, I also saw Sami designs, also AD-Concept has great model. There are pro- and cons everywhere :). Thank you for motivation booster, definitely usage of tissue paper open hew interesting solutions. Lets see what will come :)
0
Reply
A biplane glider that actually flies well — simple, elegant, functional! Adjustable wing for CG tuning!
The designer has replied
designer
1
Reply
Thank you for the great feedback! Im happy to hear that 😊
0
Reply
Based on the video this looks like one of your best gliders yet! I like gliders with a slower optimal glide speed because it gives you more time to watch the flight. Amazing model! (Would boost but I don't have tokens sorry😅)
1
Reply
Super ;)
1
Reply
Print Profile
DragonFly, V0.2, Bicolor
Very good if one takes care to increase the extrusion temperature a little
Show original
0
Reply

License

This user content is licensed under a Standard Digital File License.

You shall not share, sub-license, sell, rent, host, transfer, or distribute in any way the digital or 3D printed versions of this object, nor any other derivative work of this object in its digital or physical format (including - but not limited to - remixes of this object, and hosting on other digital platforms). The objects may not be used without permission in any way whatsoever in which you charge money, or collect fees.