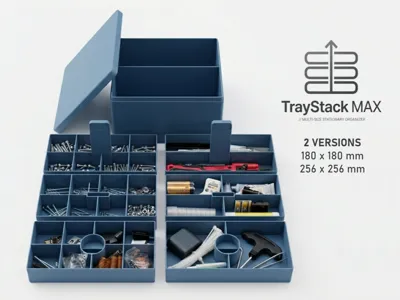
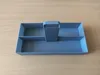
TrayStack MAX - Your XXL storage box


Print Profile(8)

Description
TrayStack MAX is a large-format organizer system for makers, hobbyists, and electronics enthusiasts. Designed as a spacious storage box, this system gets the absolute MAXimum out of your printer's build plate (optimized for 180 x 180 mm & 256 x 256 mm build plates) to organize small parts and tools in a structured manner. (The MAX box is too massive for a desk. For a compact desktop solution, there is the smaller TrayStack Desktop Organizer.)

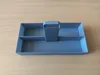
Comparison between the TrayStack Desktop Organizer (left) and the TrayStack MAX System (right)
Click here for the TrayStack Desktop Organizer
The geometry has been optimized so that the box precisely utilizes the available space on the build plate without exceeding hardware limits. With a height of under 10 cm, the system remains compact and flat, yet offers maximum storage space due to its wide base. The system and tolerances were developed based on Bambu Lab PLA Basic. The inserts slide smoothly into the box.
Why TrayStack MAX? // The Innovative Approach
Classic 3D printed storage systems either waste space due to thick casing walls and rail constructions or force you to stack boxes vertically. TrayStack MAX takes a different approach:
- Optimized Build Volume: The design utilizes the physical limits of your print bed to the last millimeter. Even the haptic grip structures were included in the final millimeter calculation of the build plate. No more storage space can be extracted from a single print.
- Low-Profile instead of Plastic Tower: By dividing it into two side-by-side segments, the system remains extremely flat. No wobbling, no searching in deep boxes. Everything lies flat, clearly arranged, and immediately accessible to you.
- Gap-Free Precision: The system deliberately avoids rattling rails. The trays use the casing itself as a guide. The result is a fit that closes so precisely that a noticeable air cushion is created upon insertion.
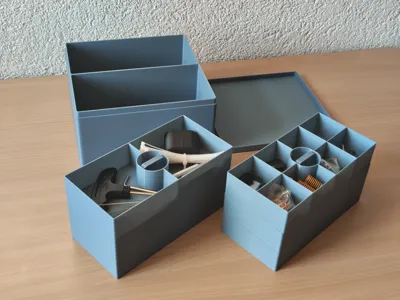
Selection & Assembly of the System
The system is modular. First, choose the appropriate size for your printer (180 mm for the A1 mini or 256 mm for large print beds like A1, P1S, P2S, X1C, X2D etc.). To complete your set, simply download the casing profile and then select your desired compartment layout from the three tray profiles via the print plates.
1. Print the Main Casing
180 mm Box and Lid or 256 mm Box and Lid are available depending on the desired size.
These profiles contain the outer casing and the lid on two print plates. This is the mandatory basis for the entire project.
2. Choose the Inserts
To fully equip both segments of the casing, simply select the desired compartment variation from the following profiles and print two trays per layer in your preferred layout:
- Bottom Trays (Layer 1): Profile 180 mm Bottom Trays or 256 mm Bottom Trays
- Middle Trays (Layer 2): Profile 180 mm Middle Trays or 256 mm Middle Trays
- Top Trays (Layer 3): Profile 180 mm Top Trays or 256 mm Top Trays
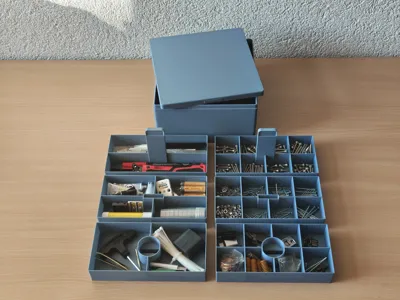
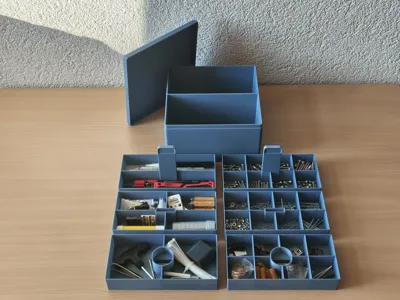
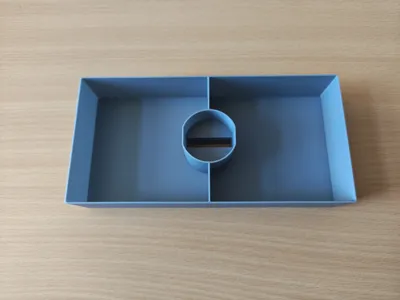
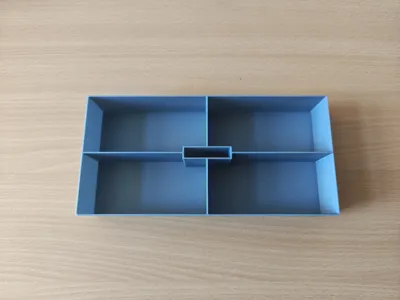
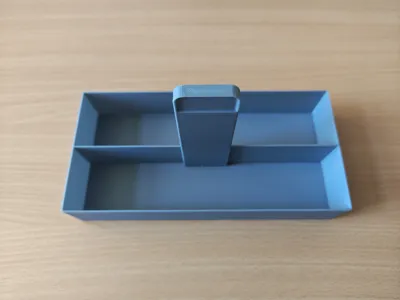
The System Concept: Dual Insert & Capacity
The design relies on two side-by-side segments to optimally utilize the available footprint in height. The system is based on two Base Trays (Layer 1) with a central handle, which form the foundation in the casing. Since these carrier segments themselves already function as full-fledged trays and each accommodate two further layers, a structure of 6 trays in total (3 per insert) results.
If, for example, the storage box is fully equipped with 8-compartment trays, a total of 48 separate compartments are available. This offers sufficient organized storage space for sorted assortments like screws, SMD components, craft or model-making accessories.
The 4 Compartment Variants & Exact Internal Dimensions
The inserts can be freely combined with each other on the respective layers. So that you know exactly before printing whether your tools, screws, or SMD components will fit, here are the exact internal compartment dimensions. The usable internal height of all trays in both versions is strictly and consistently a maximum of 30 mm.
180 mm Version (A1 mini)
8-Compartment Tray: Maximum number of compartments for fine components and small odds and ends.
Compartment dimension: 42.3 x 40.85 mm
4-Compartment Tray: Universal layout for medium-sized components.
Compartment dimension: 85.1 x 40.85 mm
2-Compartment Tray (Longitudinally divided): Optimal for flat, elongated utensils like brushes, tweezers, drills, or scalpels.
Compartment dimension: 171.2 x 40.85 mm
2-Compartment Tray (Transversely divided): Ideal for wider, more compact utensils.
Compartment dimension: 85.1 x 82.7 mm
256 mm Version (A1, P1S, P2S, X1C, X2D etc.)
8-Compartment Tray: Maximum number of compartments for extensive, sorted small parts assortments.
Compartment dimension: 61.05 x 59.85 mm
4-Compartment Tray: Generous layout for standard components and cables.
Compartment dimension: 123.1 x 59.85 mm
2-Compartment Tray (Longitudinally divided): Perfect for longer, flat tools like files, spatulas, utility knives, or precision screwdrivers.
Compartment dimension: 247.2 x 59.85 mm
2-Compartment Tray (Transversely divided): Ideal for bulky or wider utensils.
Compartment dimension: 123.1 x 120.7 mm
Design Philosophy & Handling
The design relies on a clear, aesthetic low-profile concept. Instead of building upwards, the system expands flatly outwards. By dividing it into two side-by-side segments, the box remains under 10 cm tall. This ensures a tidy, minimalistic look on the workbench, on the shelf, or in your crafting corner and guarantees that all tools and small parts are perfectly stored.
Important for practical use: Pay attention to direction! Although the casing appears absolutely square visually, the construction on the outer sides differs by exactly one millimeter (179 x 180 mm for the small version and 255 x 256 mm for the large version). Therefore, the lid fits in only one direction. The raised grip lines protrude exactly 0.5 mm on each of the outer sides. Since the available build volume of the printer is utilized to the last micrometer, the actual casing measures one millimeter less on this axis.
The grip on the top side serves as a visual and haptic indicator. When placing it on, this must run lengthwise (i.e., parallel to the inner inserts) so that the box closes perfectly.
The "Air-Cushion" Effect (Pneumatic Damping)
Due to the extremely precise and almost gap-free fit, air escapes very slowly through the minimal gap when a tray is inserted. The tray does not clumsily slam into the box, but glides gently and dampened downwards as if by itself due to air resistance (known from opening high-quality smartphone packaging). The same vacuum effect is created in the casing when pulling it out. Therefore, simply pull out the trays relaxed and slowly, or briefly hold the casing fixed with your other hand.

Important Note for Printing Success
Since the box maximally utilizes your printer's build volume and the geometry is designed for exact, clean tolerances, the success of the project depends entirely on your printer's preparation. Please absolutely observe the following for a perfect result:
- Absolutely Grease-Free Build Plate: Thoroughly clean your build plate before starting with hot water and dish soap (or isopropanol). With such a large base area, even the smallest fingerprint leads to insufficient adhesion, first-layer problems, and warping at the corners.
- Perfect Bed Alignment: Make sure your magnetic build plate sits absolutely clean, flat, and straight in the rear guides or on the heated bed. Any minimal misalignment or a trapped filament crumb under the plate will immediately become apparent with these component dimensions.
- Allow to Cool Completely: Absolutely allow the build plate to cool completely to room temperature after printing before you remove the casing or the trays from the plate! If you unevenly bend the large-surface components from the flexible plate while warm, the material will permanently deform. This ruins the fit accuracy and the exact tolerances of the system.
👍 Free support: A like and a place in your collection show us that the CAD hours were worth it. ☺️
License
You shall not share, sub-license, sell, rent, host, transfer, or distribute in any way the digital or 3D printed versions of this object, nor any other derivative work of this object in its digital or physical format (including - but not limited to - remixes of this object, and hosting on other digital platforms). The objects may not be used without permission in any way whatsoever in which you charge money, or collect fees.
Comment & Rating (2)