Electric Scooter Rearview Mirror (35mm Mount)


Print Profile(1)

Bill of Materials


- 49mm mirror x 1: attached link for one in description.
- M3 heat insert x 1: for clamp
Description
Boost Me (for free)
If this model helped you out, gave you a smile, or saved you some time—consider giving it a boost! Every click helps me keep designing useful, clean, and printable models for the maker community. Your support fuels the next idea!
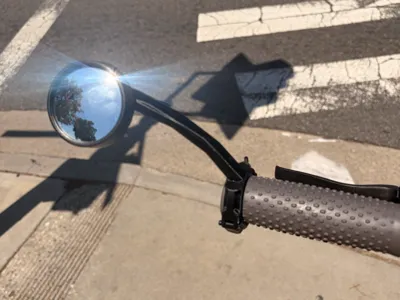
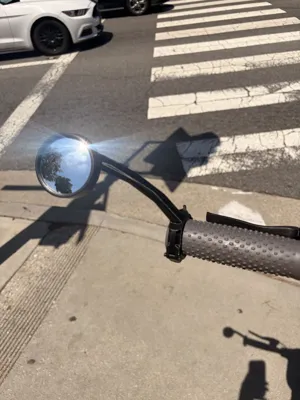
Low-Profile Electric Scooter Rearview Mirror (35mm Mount)
Upgrade your commute with a clean, low-profile rearview mirror engineered specifically for electric scooters. This design provides a clear, stable view of traffic behind you without adding unnecessary bulk to your handlebars or cluttering your cockpit.
By utilizing a rigid, short-arm geometry, this model minimizes the annoying road vibrations common with generic, long-stalk aftermarket mirrors.
🛠️ Required Assembly Hardware
To fully assemble this mirror, you will need the following non-printed components:
- Mirror Glass: 1x 49mm round convex or flat mirror glass/lens.
- Hardware: * 1x M3 bolt (for the printed bolt handle/mirror pivot).
- 2x Small bolts & nuts (for clamping the 35mm handlebar mount securely).
- Adhesive: Strong double-sided tape, superglue, or epoxy to secure the mirror glass into the printed backing plate.
🖨️ Recommended Print Settings
This model is split into two clean print plates (optimized for plates like the Bambu Lab A1 mini).
- Filament: PETG or ASA is highly recommended. (Avoid standard PLA, as it will warp or soften when left outside in direct sunlight).
- Perimeters/Walls: 4 to 5 walls to ensure the clamp and hinge loops have adequate structural strength.
- Infill: 25% – 35% (Gyroid or Cubic recommended).
- Supports: Plate 2 (35mm mount & arm) prints best standing upright as oriented, using tree/organic supports for the top hinge overhang.
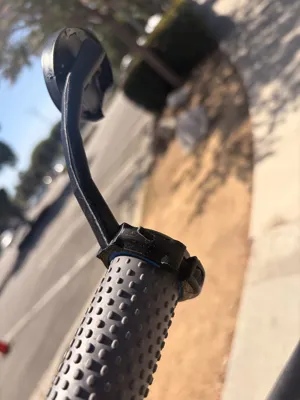
💡 Assembly & Installation Notes
- Glue the Mirror: Affix your 49mm glass lens into the printed mirror tray and let it cure.
- Mount the Base: Clamp the 35mm mount onto your scooter's handlebar grip area. Note: Snug the bolts firmly, but do not over-tighten to prevent cracking the printed plastic.
- Connect & Adjust: Use the M3 bolt and your printed bolt handle to attach the mirror to the arm. Sit on your scooter, adjust to your perfect viewing angle, and tighten the handle to lock it in place.
Materials needed:
M3 x 20 - 1
M3 x 15 - 1-2
m3 x 10 - 1*
Heat insert for M3 goes into the clamp for handlebar (alternatively you can drill through and just screw a longer screw through if you don't have heat inserts)
Mirror used: https://a.co/d/03t1KTTp (I just glued the mirror onto the mirror plate)
***The printed bolt handles are for the bolts to make it easier to take on/off and or tighten without needing tools. (screws can be used as well if you do not have bolts, I tested screws and what i found to work while still keeping the bolt handles was to insert your M3 screw into the bolt handle and I used UV resin to secure it inside. I think super glue would also work but I have not tested it)
License
You shall not share, sub-license, sell, rent, host, transfer, or distribute in any way the digital or 3D printed versions of this object, nor any other derivative work of this object in its digital or physical format (including - but not limited to - remixes of this object, and hosting on other digital platforms). The objects may not be used without permission in any way whatsoever in which you charge money, or collect fees.
Comment & Rating (0)