TP-Link OC200 10" Rack Mount

Print Profile(2)
Description
🛠️ Support the Process!
💡 What you see is what you get: Unlike many profiles that only upload digital renders of unprintable models, every single design here is fully test-printed, refined in Blender/Meshmixer, and optimized for FDM before release.
I spend hours tweaking geometries, custom supports, and wasting my own filament so that you can enjoy a flawless, hassle-free print on your first try.
If my test-printing hours saved your time and filament, feel free to keep my printers running and fuel the next project! Any support is greatly appreciated: paypal.me/mjrko84
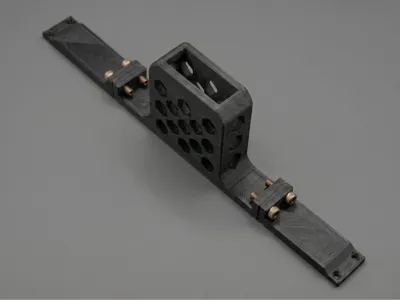
🌐 TP-Link OC200 10" Rack Mount
"Clean up your homelab and rackmount your Omada hardware controller."
Upgrade your network cabinet with this custom-designed 10-inch rack mount adapter specifically tailored for the TP-Link OC200 Omada Hardware Controller. Designed for small-form-factor home labs and IT setups, this modular bracket ensures a clean, professional, and secure installation for your network controller.
📦 Included Files & 3MF Profiles
To guarantee the best printing experience and structural integrity, this project includes multiple file options:
- Raw STL File: For those who prefer to slice their own files from scratch.
- Polycarbonate (PC) 3MF: Pre-configured profile for maximum thermal resistance. Set with 3 Wall Loops, 4 Top/Bottom Layers, and 5% Gyroid Infill to optimize print time and reduce internal plastic tension while keeping high rigidity.
- Bambu PETG HF 3MF: Profile optimized for Bambu Lab's High-Flow PETG. Set with 3 Wall Loops, 4 Top/Bottom Layers, and 15% Gyroid Infill for an excellent balance between production speed and mechanical durability.
🔩 Modular Design & Easy Assembly
To make printing easier and avoid the need for large print beds, the adapter is split into a smart 3-piece assembly.
- Hardware Required: You only need 4x M5 screws and 4x M5 nuts to bolt the bracket segments securely together.
- The fit is engineered to grip the controller safely without scratching the casing.
⚠️ Material Selection Warning
Network equipment generates continuous ambient heat, and rack cabinets can get surprisingly warm.
- 🚫 DO NOT USE PLA: It will inevitably warp, deform, and sag under the hardware's continuous thermal load.
- 🟢 PETG HF or PC: Use the provided 3MF files for materials that can withstand continuous thermal loads without deformation.
📏 Tested Print Settings
- Layer Height: 0.20mm (Provides the perfect balance between dimensional accuracy for the M5 screw holes and structural speed).
- Nozzle: 0.4mm.
- Wall Loops: 3 walls.
- Top & Bottom Shells: 4 Top Layers / 4 Bottom Layers.
License
You may create derivative works based on this object, provided that all such derivative works are published exclusively on the MakerWorld platform and include proper attribution to the original creator. You may not share, upload, host, distribute, or publish this object—or any derivative work of this object—on any other digital platform, marketplace, or distribution channel. Commercial use of this object and any derivative works is strictly prohibited. This includes, but is not limited to, selling, renting, sublicensing, or using the object in any context in which you receive monetary compensation or other financial benefits.
Comment & Rating (0)