mx5 subwoofer


Print Profile(2)
Bill of Materials


- ETON Wiring Set x 1: https://eton-audio.com/zubehoer/pcc-20.html
- Silicone/Sickaflex/Sealant for Assembly x 1:
- ETON AM 500 Amplifier x 1: https://eton-audio.com/verstaerker/basic/am-serie/am-500.html
- ETON MW8 Flat Subwoofer x 1: https://eton-audio.com/subwoofer/mw-8-flat.html
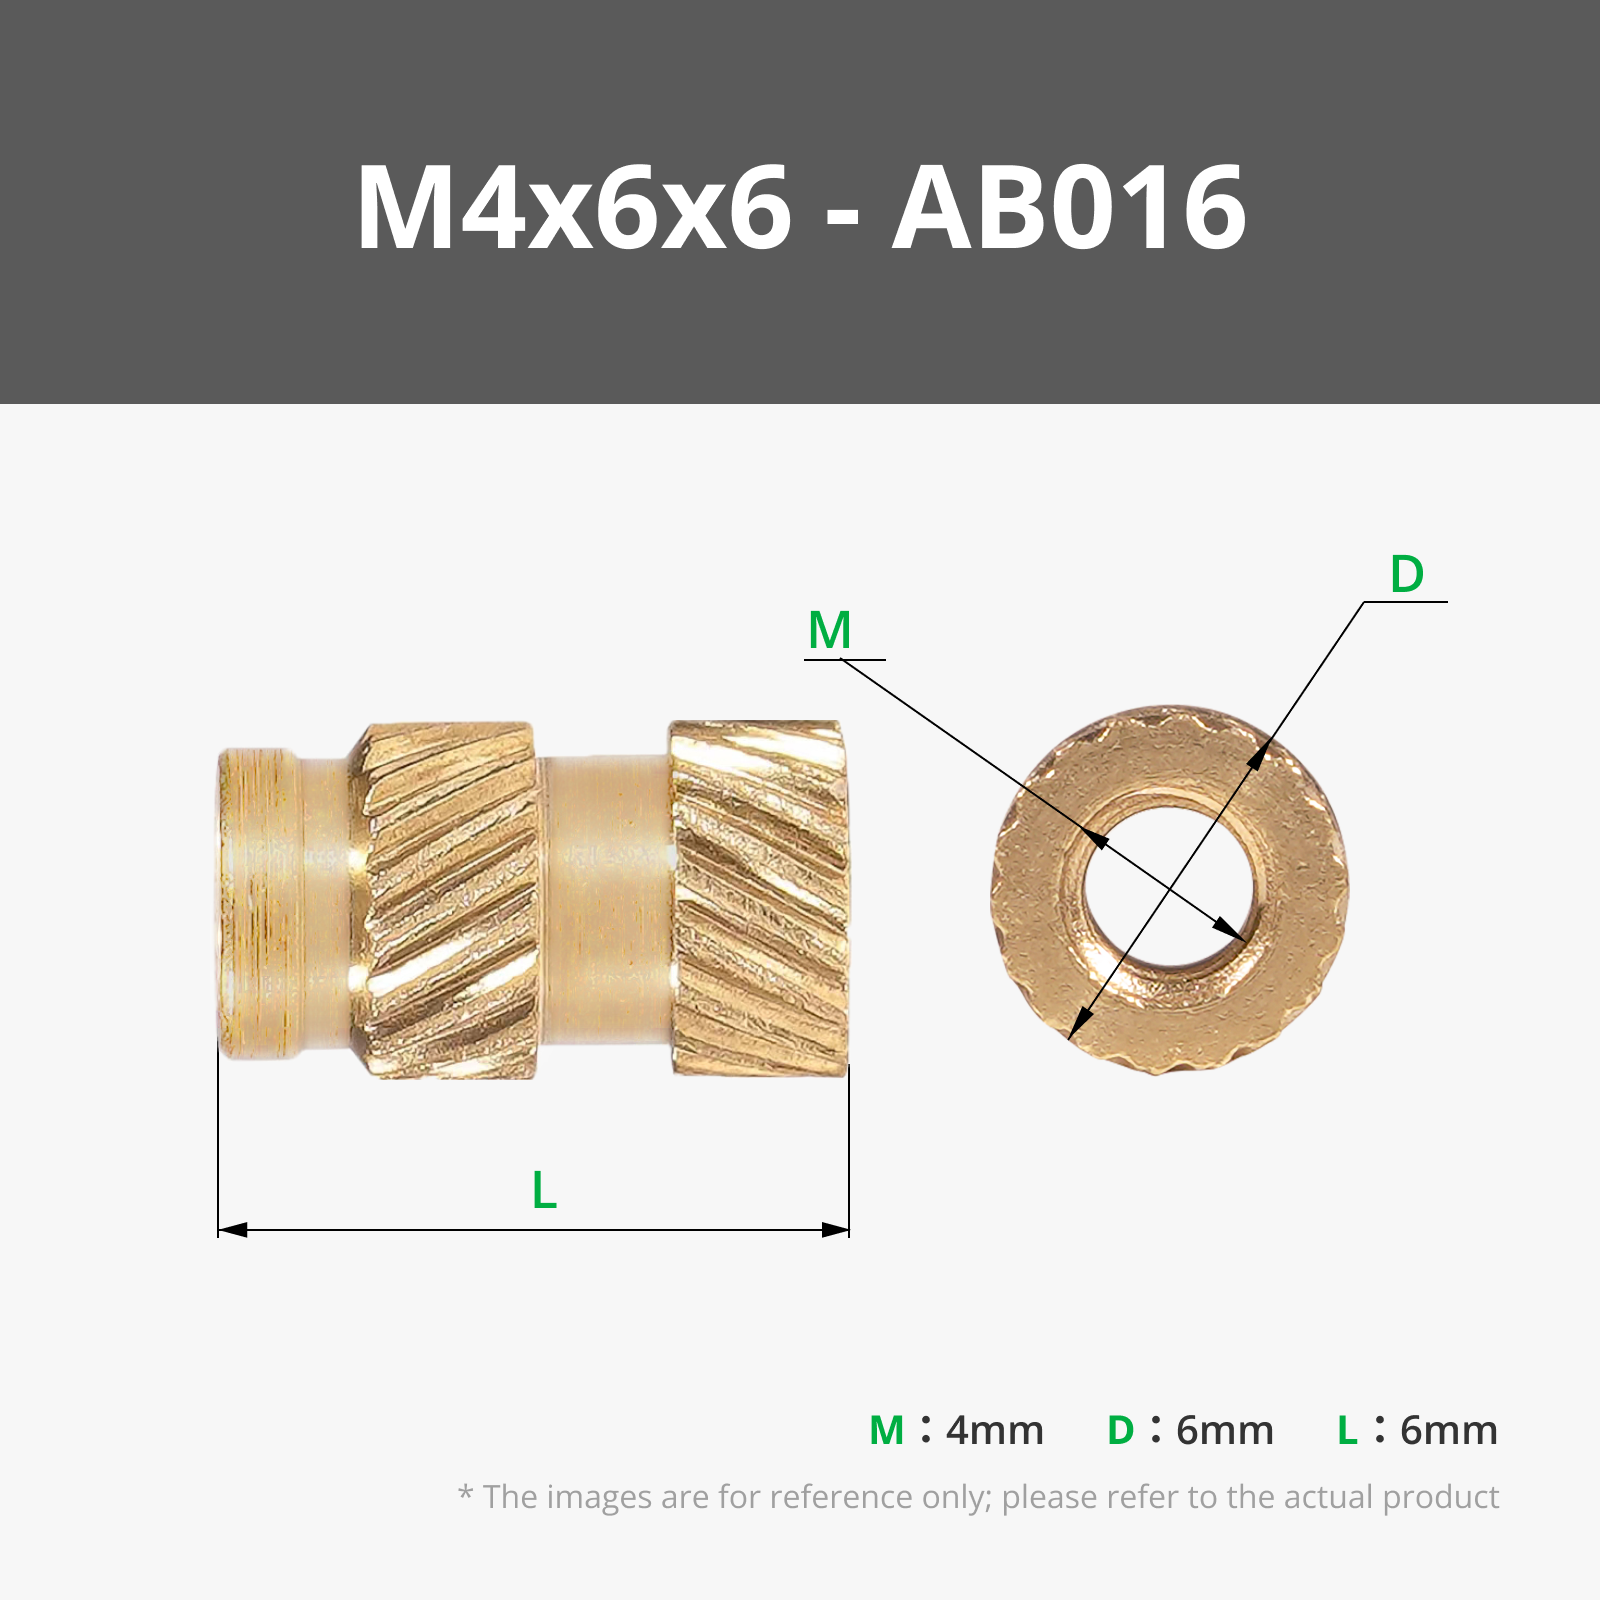
- M5x9,5 Round Threaded Brass Heat-Insert Nut x 8:
- M5x25mm Socket Head Screw x 8:
Description
MX-5 NBFL 8 Inch Flat Subwoofer
16 L Bass Reflex Enclosure for ETON MW 8 Flat and ETON AM 500
DESCRIPTION
This is a custom bass reflex subwoofer enclosure designed specifically for the Mazda MX-5 NBFL.
The enclosure was made for one very specific hardware combination:
ETON MW 8 Flat
https://eton-audio.com/subwoofer/mw-8-flat.html
ETON AM 500
https://eton-audio.com/verstaerker/basic/am-serie/am-500.html
This is not a universal 8 inch subwoofer box. The enclosure was designed around the ETON MW 8 Flat subwoofer and the ETON AM 500 amplifier module.
The finished enclosure has about 16 L net internal volume with the used components installed. ETON recommends 8 to 20 L net volume for a bass reflex enclosure with the MW 8 Flat, so this design sits inside the recommended range. The port diameter and port length are also within ETON’s recommended bass reflex specs for this woofer.
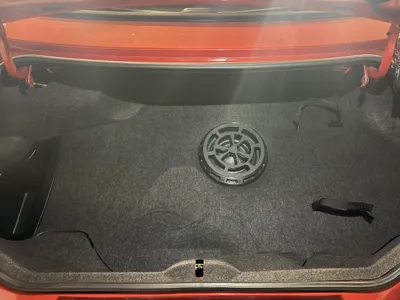
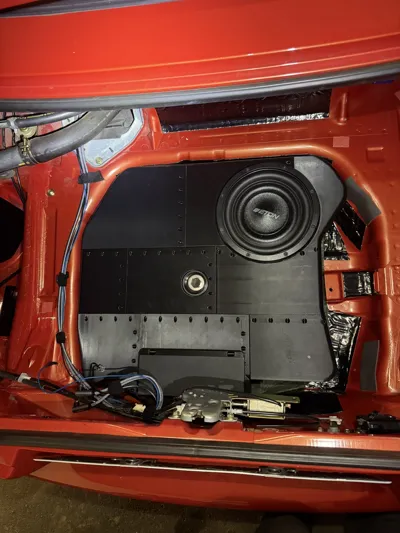
The shape of the enclosure was fitted to the MX-5 NBFL spare wheel well using 3D scanning. This allows the box to use the available space very efficiently and sit neatly in the trunk.
IMPORTANT
The original spare wheel has to be removed. The jack can stay in its original position.
Personally, I do not miss the small emergency spare wheel. If the tire pressure is not checked regularly, a spare wheel is often not much help anyway. Many modern cars no longer come with a spare wheel and use a tire repair kit with sealing fluid and a small compressor instead. That is also what I use now: a flat tire kit in the trunk for emergencies.
Of course, this is your own decision. If you absolutely want to keep the spare wheel, this project is not for you.
MAIN COMPONENTS
Subwoofer:
ETON MW 8 Flat
Main specs:
- 200 mm / 8 inch flat subwoofer
- 2 x 2 Ohm dual voice coil
- 2 x 200 W RMS power handling
- 2 x 250 W max power
- 81.5 dB sound pressure level
- 51 mm voice coil
- 217 mm outer diameter
- 186 mm cutout diameter
- 74.5 mm installation depth
- Ferrite magnet
- Engineered in Germany
Amplifier:
ETON AM 500
Main specs:
- 1-channel Class-D active amplifier module
- Up to 540 W RMS at 4 Ohm
- Up to 485 W RMS at 2 Ohm depending on limiter setting
- 3-stage power limiter
- Integrated 25 Hz subsonic filter
- Adjustable low-pass filter from 40 to 125 Hz
- Bass boost up to +12 dB
- Low-level RCA input
- High-level input
- Auto turn-on via SIG / DC detection
- Phase switch 0 / 180 degrees
- Wired remote level control
- External dimensions: 206 x 85 x 98 mm
- Cutout dimensions: 188 x 64 mm
- Engineered in Germany
Important:
The MW 8 Flat has two 2 Ohm voice coils. Make sure the wiring and amplifier limiter setting match your setup. If you are not sure how to wire dual voice coils safely, ask someone who knows car audio or look it up in the Eton Manual.
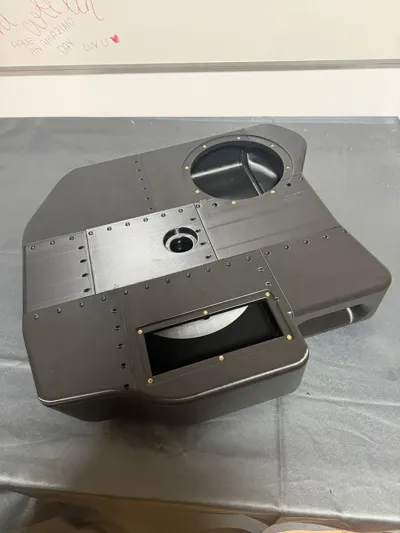
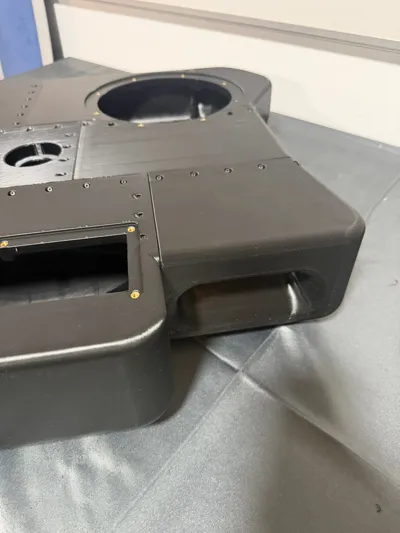
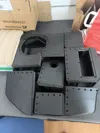
PRINTED PARTS
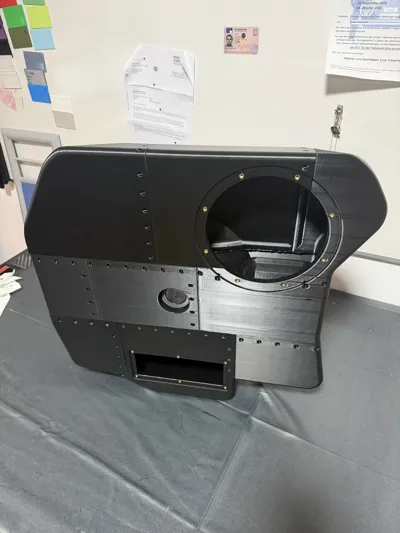
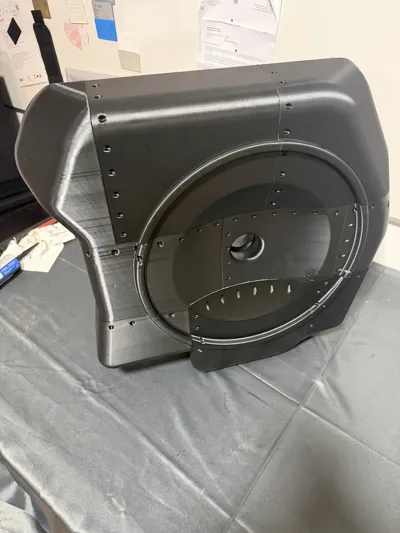
The enclosure is built from 9 large main casing parts.
Additional printed parts are included for practical use, cooling options and protection:
- Amplifier flap / closed lid
- Optional perforated amplifier lid for better cooling
- Optional blind cover for the amplifier opening when using an external amplifier
- Cable strain reliefs for signal cables
- Cable strain reliefs for power supply cables
- Speaker grille / protection cover
- Round printed washer / center mounting part for fixing the enclosure in the spare wheel well
There are three options for the amplifier opening:
- Closed amplifier lid:
For the standard ETON AM 500 setup after the amplifier has been adjusted.
- Perforated amplifier lid:
Optional lid with ventilation openings for better cooling around the amplifier area.
- Blind amplifier cover:
Closes the amplifier opening completely when using an external amplifier instead of the integrated ETON AM 500 module.
The enclosure is still mainly designed around the ETON MW 8 Flat and ETON AM 500 combination, but the blind cover gives you the option to close the amplifier cutout if you build the enclosure with an external amplifier setup.
The amplifier lid can be closed after setup. It helps protect the amplifier area, prevents accidental adjustments of the amplifier settings and reduces the risk of short circuits from loose objects in the trunk.
The speaker grille protects the woofer from luggage, tools, bags or anything else you might put in the trunk. This is important because the speaker sits in a real luggage area, not in a show car trunk that stays empty forever.
The housing parts are quite large, so print quality and warp control are very important.
I made the mistake of printing one of the smaller parts on an A1 mini. Even though it technically worked, I got significant warping on the edges, which made assembly harder. Because of that, enclosed printing is strongly recommended, even for the smaller parts.
PRINT RECOMMENDATIONS
Recommended material:
- PETG minimum
- ABS-GF, ASA, PC blend or Nylon would be even better
- PLA is not recommended because car interiors can get very hot
Recommended setup:
- Enclosed printer strongly recommended
- 0.6 mm nozzle recommended for the main parts
- Strong wall settings
- Good bed adhesion
- Brim where needed
- Dry filament
- Avoid drafts during printing
Approximate total print data:
- Print time: 4 days 14 hours
- Material use: about 5.4 kg
Your result may vary depending on printer, slicer settings, material, nozzle size and support settings.
HARDWARE LIST
For the printed casing:
- 112 pcs Bambu Button Head Cap Self-Tapping Screws BT3x12 mm
- 21 pcs Bambu Button Head Cap Self-Tapping Screws BT3x10 mm
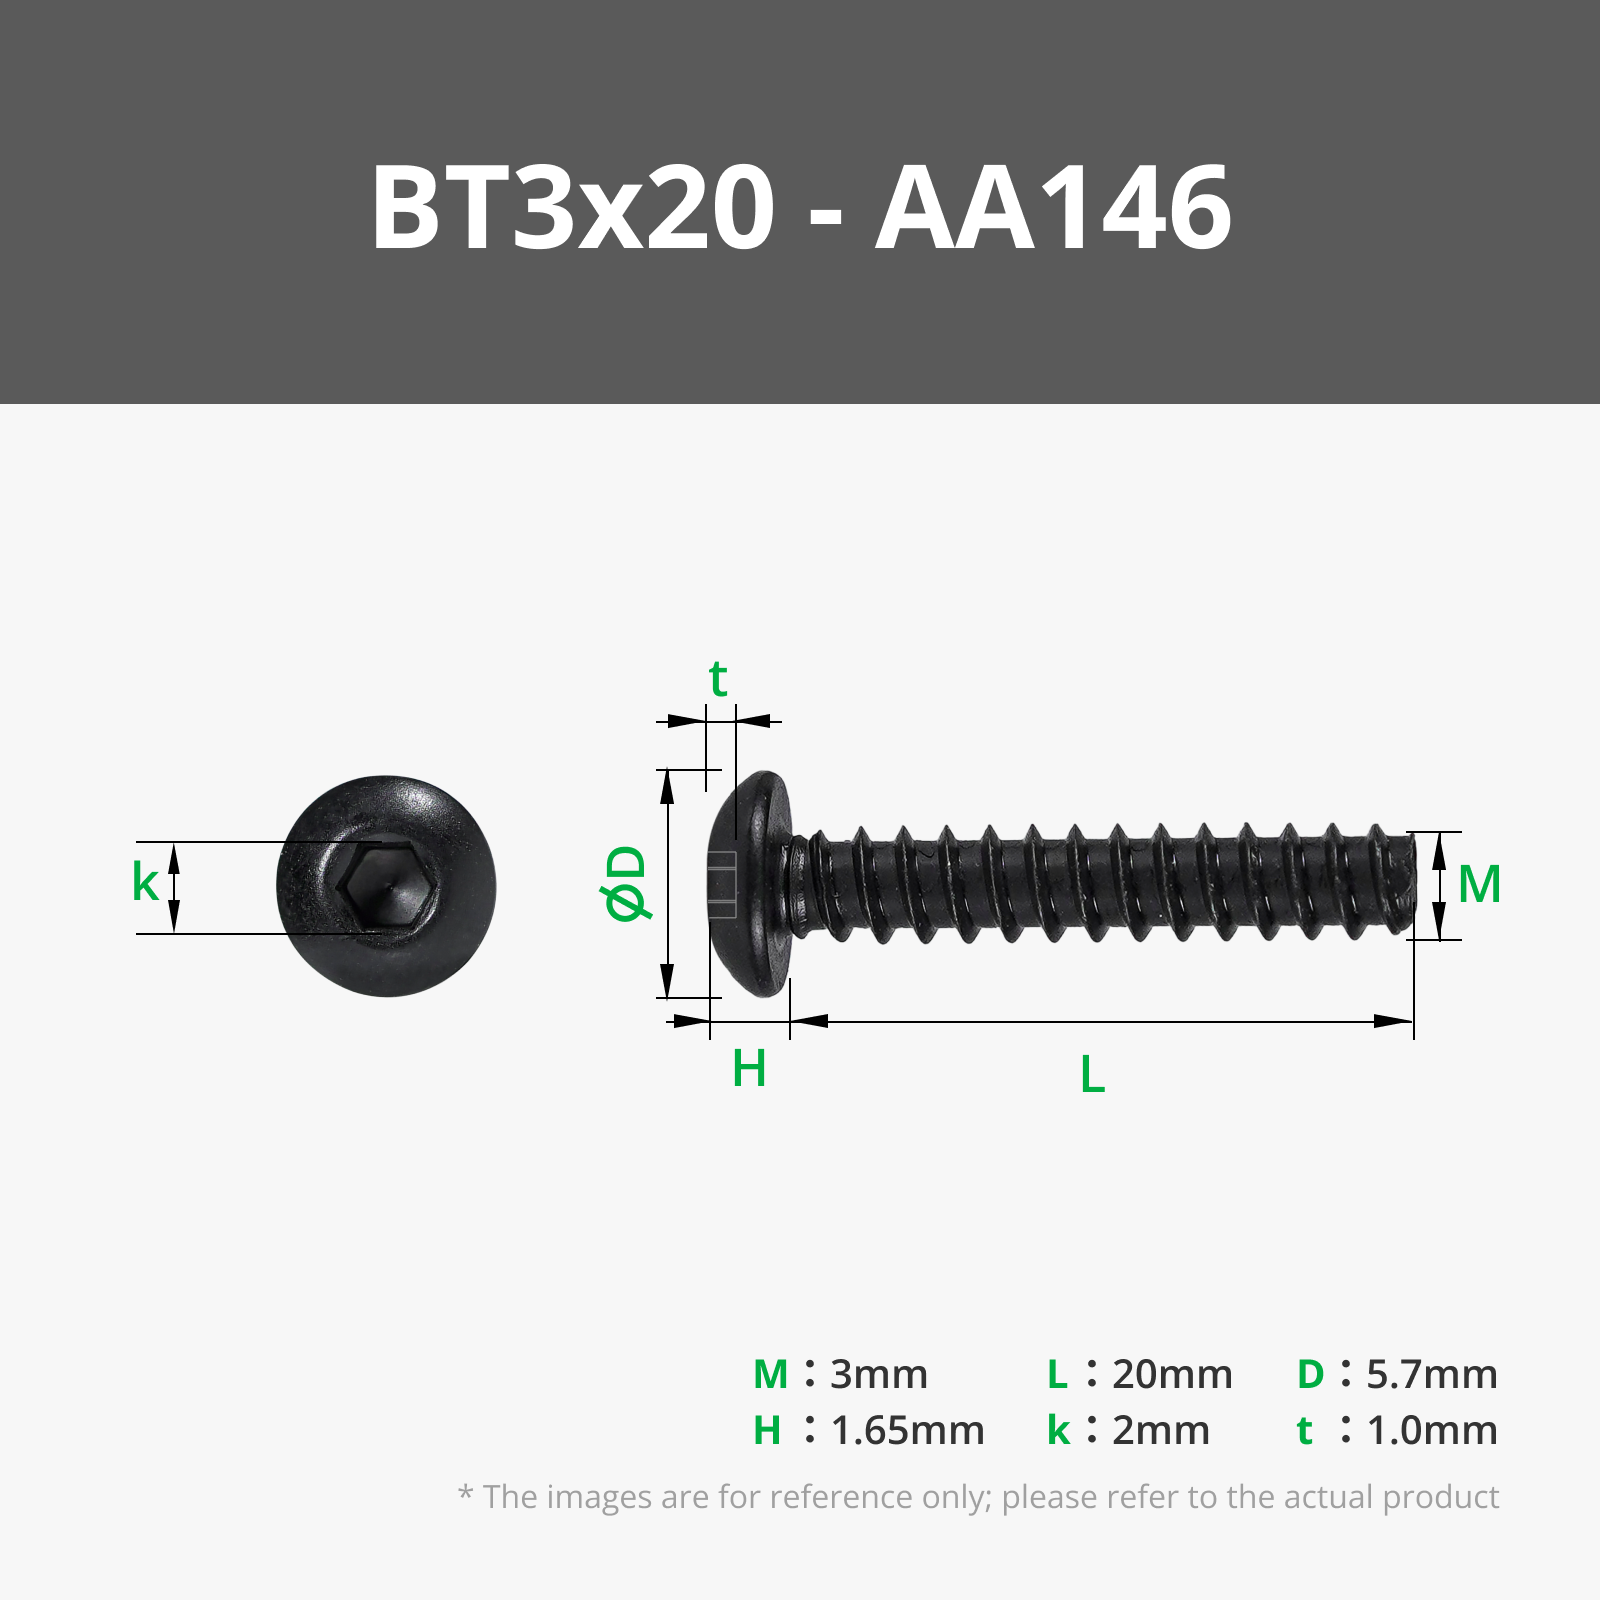
- 2 pcs Bambu Button Head Cap Self-Tapping Screw BT3x20 (Lid Hinges)
The shorter BT3x10 mm screws are marked on the outside of the housing at the correct positions. Do not ignore these markings. Using the longer screws in the wrong places can damage the part or poke into areas where they should not go.
For the speaker:
- 8 pcs speaker mounting screws: M5x25 mm Socket Head
- 8 pcs brass heat-set inserts for speaker mounting: M5x9.5 mm
For the amplifier:
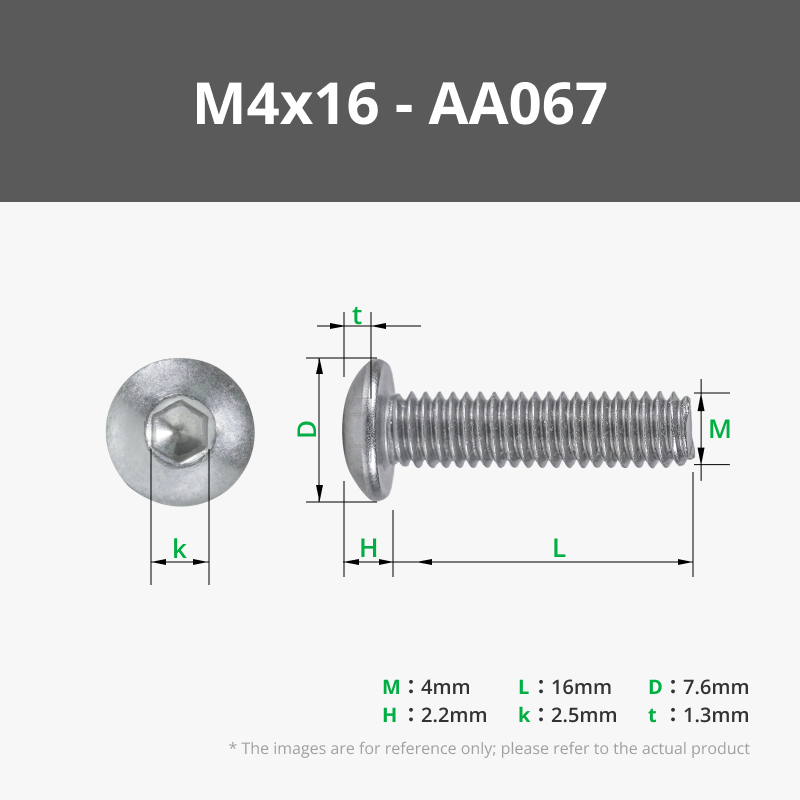
- 6 pcs amplifier mounting screws: M4x16 mm Socket Head
- 6 pcs brass heat-set inserts for amplifier mounting: M4x6 mm
Optional for the Grille:
- 8 pcs Magnets D6x2mm
Also needed:
- ETON MW 8 Flat subwoofer
- ETON AM 500 amplifier
- ETON PCC20 / AWG4 wiring set
- Sikaflex 522 or similar flexible automotive sealant
- Soft sealing tape or gasket material for the speaker
- Soft sealing tape or gasket material for the amplifier
- Soft foam, felt tape or similar material for cables inside the enclosure
- 2 mm alubutyl damping mats for trunk sound deadening
- Optional replacement for spare wheel: tire repair kit with sealant and small compressor
BEFORE ASSEMBLY
After printing:
- Remove all supports
- Remove brims
- Deburr all edges
- Clean the mating surfaces
- Dry fit the parts before using sealant
- Install the brass heat-set inserts carefully
- Check that the speaker and amplifier sit flat on their sealing surfaces
- Check that the cable strain reliefs fit correctly
Do not rush this step. If the mating edges are full of support scars, elephant foot or brim leftovers, the box will not seal properly.
SPEAKER AND AMPLIFIER INSTALLATION
Use a soft sealing material for both the speaker and the amplifier before screwing them in.
Recommended options:
- EPDM sealing tape
- Soft foam gasket tape
- Suitable speaker gasket material
Do not mount the speaker or amplifier directly onto hard plastic without a gasket. You want a clean seal and no rattling.
Use the included cable strain reliefs for the signal cables and power supply cables. This keeps the wiring more secure and reduces the risk of cable movement, rubbing or accidental pulling.
For the cables inside the enclosure, use soft foam, felt tape or similar material so the wires cannot vibrate against the housing. Loose cables inside a subwoofer enclosure can cause annoying rattles later.
After setting up the amplifier, close the printed amplifier lid. It helps protect the amplifier controls from accidental adjustment and prevents loose objects from touching the amplifier area.
Install the speaker grille to protect the woofer from anything stored in the trunk.
Do not fill the enclosure with damping wool unless you intentionally want to change the tuning.
TRUNK SOUND DEADENING
Sound deadening the trunk is highly recommended.
This speaker is strong enough to make panels, trims, cables and loose parts vibrate. Those vibrations can create unwanted rattling noises that ruin the result, even if the subwoofer itself works perfectly.
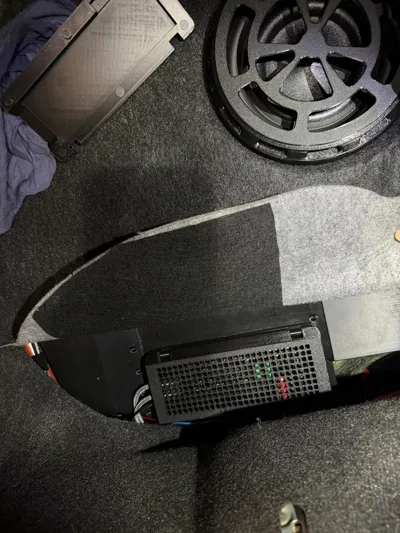
I recommend using 2 mm alubutyl damping mats to soundproof the trunk bodyshell. This helps reduce vibrations and unwanted resonance and makes the overall bass response feel much cleaner and more solid.
See the picture for how I applied the damping material in my own car.
Recommended areas to treat:
- Spare wheel well area
- Trunk floor
- Rear body panels
- Side sections of the trunk
- License plate area
- Loose trim parts
- Any panel or area that starts buzzing during bass-heavy music
Also check cable routing and secure anything that could vibrate or knock against the body.
The enclosure can produce good bass, but if the whole trunk starts rattling, the result will sound cheap. Proper sound deadening makes a big difference and is strongly recommended if you want the build to feel finished.

CAR INSTALLATION WARNING
This is a DIY car audio project. You are responsible for safe installation.
Basic rules:
- Disconnect the battery before wiring
- Use a properly rated fuse close to the battery
- Use proper cable thickness
- Secure the enclosure properly in the car
- Do not leave the box loose in the cabin or trunk
- Do not route cables near sharp edges or moving parts
- Do not drill into unknown body areas without checking behind them
- Protect all cables from rubbing and pulling
- If you are not sure, let a professional install the electrical side
A subwoofer enclosure must be mounted safely. In an accident, a loose heavy object inside a car can become dangerous.
SPARE WHEEL NOTE
This enclosure uses the spare wheel well, so the original small emergency spare wheel has to be removed.
The jack can remain in its original position.
As a replacement, I keep a flat tire repair kit with sealant and a small compressor in the trunk. This is similar to what many modern cars use from the factory. For me, this is a reasonable tradeoff because the spare wheel well becomes useful for a proper custom subwoofer enclosure instead of carrying a small emergency wheel that I personally do not miss.
Still, this is a personal decision. Check your local rules, your own driving habits and your own comfort level before removing the spare wheel.
FINAL NOTES
This project is big, heavy and hardware-specific.
It needs:
- A lot of filament
- Long print time
- Good temperature control
- Proper deburring
- Careful sealing
- Correct wiring
- Good cable management
- Trunk sound deadening
- Patience
This is not a quick decorative print and not a universal car audio part. It is a large functional enclosure for a specific car and a specific audio setup.
If printed, sealed, wired and installed properly, it makes very good use of the MX-5 NBFL spare wheel well without taking away much practical trunk space.
Build carefully, install safely and do not rush the sealing or wiring.
SEALING AND ASSEMBLY
I used Sikaflex 522 to seal the enclosure.
There does not have to be one perfect full assembly order for all parts, but one point is important:
Leave “part 10” for last.
There are hidden screws that are only accessible from inside the housing. Leaving "part 10" open until the end allows these internal screws to be installed without a problem.


Assembly tips:
- Apply sealant to the inner-side mating edges
- The sealant should squeeze toward the inside of the housing, not all over the outside
- Place the sealant bead before the screw holes on the side facing the inside of the enclosure
- This way the screw holes do not need separate sealing because the sealed surface is already inside of them
- Screw the parts together while the sealant is still workable
- Wipe only what you need to wipe
- Do not smear sealant into the bass reflex port
- Let the sealant cure properly before final installation
ASSEMBLY GUIDE
1. Install the brass heat-set inserts
Press in all brass heat-set inserts before assembling the enclosure.
Use a soldering iron with a proper heat-set insert adapter. Press the inserts in straight and slowly. Do not force them in at an angle.
Make sure the inserts sit flush and cleanly in the plastic. Let them cool down fully before installing screws.

Required inserts:
Speaker mounting:
- 8 pcs M5x9.5 mm brass heat-set inserts
Amplifier mounting:
- 6 pcs M4x6 mm brass heat-set inserts
2. Assemble the 9 main enclosure parts
Dry fit all 9 main parts before using sealant.
The casing parts are screwed together with sealant between the mating surfaces, as already described in the sealing section.
Important:
Do not forget the 3 screws marked in the assembly picture.
The part marked with * should be installed last. This is important because 3 screws are installed from the inside of the enclosure. If you close the housing too early, these screws will no longer be reachable.

Apply sealant to the inside-side mating edges, then screw the parts together while the sealant is still workable.
Do not overtighten the screws. These are self-tapping screws in printed plastic.
When tightening the screws, do not simply go around the enclosure in order. Tighten them gradually in a criss-cross pattern so the pressure is distributed more evenly across the sealing surfaces.


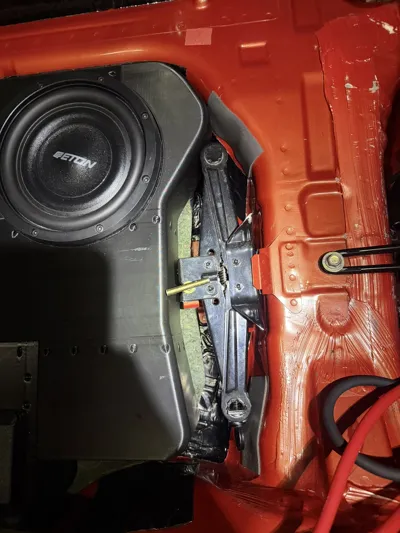
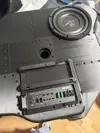
3. Install the amplifier or amplifier cover
Install the ETON AM 500 amplifier with the 6 M4x16mm screws.
Mount the Lid onto the hinge with 2 BT3x20mm.
Use soft sealing tape or gasket material between the amplifier and the printed housing. Do not mount the amplifier directly onto hard plastic without a gasket. The AMP should come with a soft sealing already attached.
Refer to the assembly picture for the correct amplifier lid construction.
Choose one of the following options:
- Closed lid:
Standard option after the amplifier has been adjusted.
- Perforated lid:
Optional version for better cooling.
- Blind cover:
Use this when closing the amplifier opening for an external amplifier setup.
If you choose to use an external amplifier, the blind amplifier cover can also be used as a custom cable entry or connection panel area. You can route the speaker wires through the blind cover by carefully drilling holes, cutting an opening, or installing your own terminal / connection panel. Another option is to modify the blind cover digitally before printing and integrate the exact connector panel you want to use. Make sure any cable pass-through, terminal cup or connector panel is sealed properly so the enclosure stays airtight. Also make sure the wires are secured with strain relief and cannot rattle against the housing.
Make sure the amplifier area is clean, the screws are tight and no wires can touch sharp edges or vibrate against the housing.

4. Connect the internal speaker cables
Connect the cables from the amplifier to the speaker.
Make sure the dual voice coils of the ETON MW 8 Flat are wired correctly for your amplifier setup and limiter setting. Do not guess here. Wrong wiring can damage equipment.
After soldering or connecting the cables, cover them with soft foam, felt tape or similar material so they cannot vibrate against the enclosure.
If you use connectors inside the enclosure, make sure they are fixed or padded so they cannot rattle. A loose connector inside a subwoofer box will sound terrible later and will be annoying to find after everything is installed.

5. Install the speaker
Apply soft sealing tape or gasket material to the speaker mounting surface.
Place the ETON MW 8 Flat into the enclosure and mount it with the 8 speaker screws. (M5x25mm)
Do not overtighten the screws. Tighten them evenly and gradually so the speaker gasket is compressed evenly.
Check that the speaker sits flat and that the gasket seals all the way around.
6. Mount the enclosure in the trunk
Before final installation, think about trunk sound deadening. This is the best moment to apply 2 mm alubutyl damping mats to the spare wheel well and surrounding trunk bodyshell, because the area is still fully accessible.
Remove the original spare wheel.
The jack can stay in its original position.
Place the subwoofer enclosure into the spare wheel well.
Use the original spare wheel mounting screw together with the printed round washer / center mounting part to fix the enclosure securely in place.
Do not overthinghten the screw otherwise cracks could form in the case.

7. Connect the amplifier and finish the trunk
Connect power, ground, remote / signal and speaker wiring according to your audio setup.
Use BT3x10mm screws and the 2 strain relief brackets to secure the cables to the amp cover assembly.

Basic wiring reminders:
- Disconnect the battery before wiring
- Use a fuse close to the battery
- Use proper cable thickness
- Protect cables from sharp edges
- Secure all wiring properly
- Do not leave cables loose where they can rub, pull or rattle
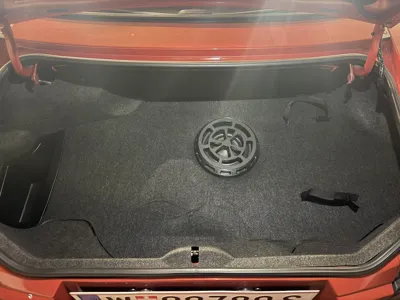
After wiring, finish the trunk as desired.
You can cut the original boot mat / trunk mat around the enclosure or make your own finish panel depending on the look you want.
Install the speaker grille to protect the woofer from luggage or loose objects.
Optional:
Small magnets can be placed inside the grille so it can hold onto the screw heads, depending on the screw material used. Test the magnet strength before final assembly. (Bambu 8pcs D6x2mm)
Boost Me (for free)
Enjoyed this model? Give it a little BOOST boost! Your support helps more makers find my designs—and keeps the ideas flowing (and the filament melting)! Thanks for helping this project shine.
Membership
If you plan to sell prints made from this model, please make sure you have an active Commercial Membership.
License
You shall not share, sub-license, sell, rent, host, transfer, or distribute in any way the digital or 3D printed versions of this object, nor any other derivative work of this object in its digital or physical format (including - but not limited to - remixes of this object, and hosting on other digital platforms). The objects may not be used without permission in any way whatsoever in which you charge money, or collect fees.
Comment & Rating (1)