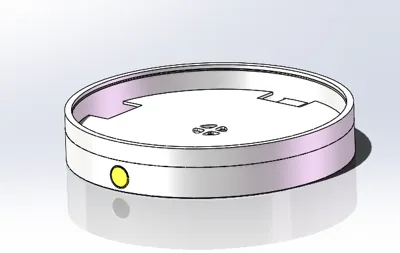
0.2mm nozzle - Bambu Lab cmyw transparent lithophane model example
Designer
29.6 h
3 plates
Open in Bambu Studio
Boost
0
0
0
0
0
0
Released
Description
Content has been automatically translated.
Show original
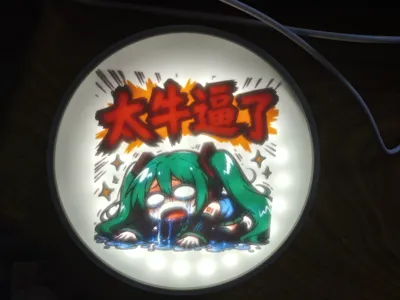
这是一个直径126mm,显示区域直径120mm的彩色透光浮雕圆盘。使用3.7v软包锂电池供电、5v LED驱动板、铜头触摸开关、Type-C接口充电和5v LED灯板。你可以用于装饰或者在上面置物,例如水杯(注意防水)、钥匙、手表之类的物品。如果你没有这个需求,透光浮雕不一定需要用滴胶或者透明filament把表面弄平。
filament使用的是必趣PLA Go 红-白-蓝-黄。Bambu Lab彩色透光模型和Lumina Studio制作的彩色透光模型都是这个filament打印的。
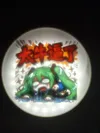
图片来自聊天群,这里仅做演示使用。
彩色透光浮雕使用的Bambu Lab彩色透光浮雕生成器和使用Lumina Studio 1.6的四色模式。模型需要可以被放置于直径118mm的圆内。Bambu Lab彩色透光浮雕可以用MakerWorld-透光浮雕生成器制作 (https://makerworld.com.cn/makerlab/makeMyLithophane)。如何使用Lumina Studio 1.6制作彩色透光浮雕,简单的来说就是将Lumina Studio的四色校准板拍照时的状态与彩色浮雕灯板工作时的状态一致。不过需要注意的是,Lumina的本职工作是叠色版画,虽然经过我的尝试可以用于制作彩色透光浮雕,但是颜色准确度不是很理想(其中一部分原因是我手机拍摄的照片颜色不准),因为浮雕厚度不同而Lumina Studio不能根据厚度动态补偿颜色,所以一定会有色差(部分区域颜色偏暗或偏亮)。如果你感兴趣,我会在末尾写上制作方法,或者参考我发的print profile。
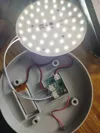
制作圆盘所需的非打印件如下:
或者你也可以购买这个组合套装
非必要 透明层可以用滴胶或者透明filament(透明filament我没打印过,但是你们可以试试)
必须注意的是,Type-C接口必须是上面的带壳子的,不带壳子的还在研究。此外LED控制板可能和我买的不一样,我购买了灯板套装和灯带套装,因为灯板比较方便所以我把灯带套装的灯板用灯板套装的替换了,这两个套装的LED控制板尺寸是完全不一样的,所以print profile里带元件槽的并不一定适用于所有LED控制板。锂电池我用的是602040的,厚度小于6mm都可以用,就是可能用不了带元件槽的。
可以看到我的控制板比商家预览图里的控制板要大。
左灯板套装,右灯带套装
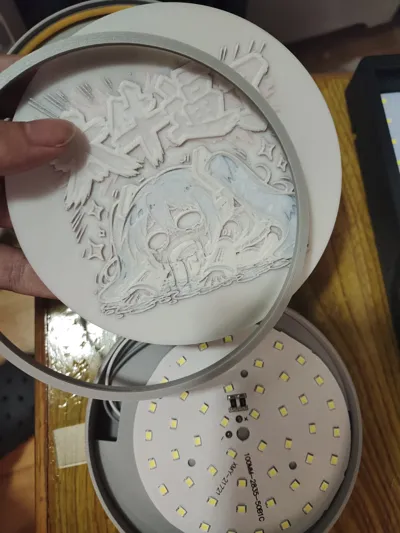
组装接线如图,Type-C口可能有点难塞。固定元件则使用热熔胶或者胶水。如果你有想更换彩色透光浮雕的需求可以不用胶水粘住上盖,
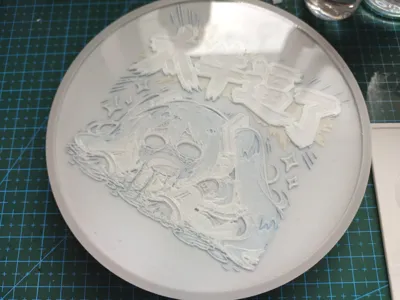
彩色透光浮雕的格式如下:
Lumina Studio彩色透光浮雕:底层0.2mm白色+0.4mm4色五层叠色层(Lumina叠色格式 层高0.08)+1.6mm浮雕层
Bambu Lab彩色透光浮雕:底层0.2mm白色+0.7mm4色七层叠色层+1.6mm浮雕层
模型尺寸需要可以被放置于直径118mm的圆内。
1.6mm的浮雕层我是从Bambu Lab彩色透光浮雕生成器生成的模型上切下来的(高度0.9的位置切)
制作好彩色透光浮雕后,根据你的喜好和print profile里的部件进行组合就可以得到上盖部分了。
因为Bambu Lab的彩色透光浮雕比Lumina Studio的厚0.2mm且叠色层高是0.1,所有两者制作时略有区别需要注意。具体看我的示例print profile的描述。
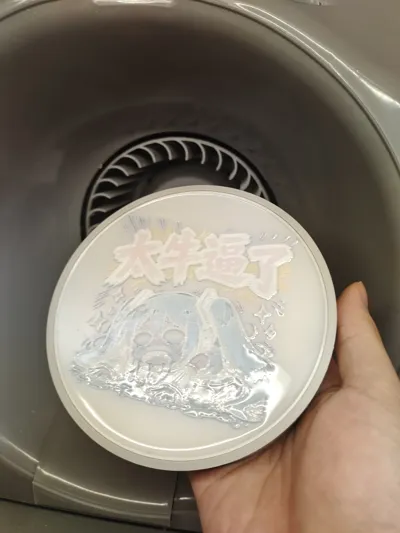
正面朝上透明层用滴胶的模型打印完需要和彩色透光浮雕固定板一起被滴胶固定(注意滴胶别倒太多了溢出来)
验证过的模型:
Lumina model, top-facing transparent layer with epoxy resinLumina model with epoxy resin baffleBambu Lab colored lithophane model, top-facing transparent layer with epoxy resin, but epoxy resin not added
============================Below is how to generate colored lithophane models using Lumina Studio
1. Generate, print, and photograph the calibration plate. In Lumina Studio, generate a four-color calibration plate with a color block size of 4mm and a gap of 0.82mm. Then, use parts and negative parts to transform the calibration plate into a 0.2mm white base layer with a side length of 156mm. Maintain the middle stacking layer as the calibration plate's 0.4mm four-color five-layer, with a white top layer of 0mm/0.4mm/0.8mm (according to your preference; I use 0.8mm, but I recommend 0mm or 0.4mm, as most lithophane areas are thinner than 0.8mm, so this thickness produces significant color deviation in light areas of the calibration plate). You can also print a 0mm white fixed layer and then place a 0.4mm/0.8mm white plate in front of the color calibration plate. Why a 156mm side length? Because this size perfectly fits into the light box of Bambu Lab's three light panels (1:1) for colored lithophanes. When shooting, remember to turn off white balance; it is recommended to shoot in a dark environment. Keep the print parameters at the software's default settings. You can use a layer height modifier to set a higher layer height for non-stacking areas to reduce printing time.
2. Generate calibration data. Open Lumina Studio's color extraction, and generate calibration data following the normal process. Manually correct colors with excessive deviation. After downloading the calibration file, calibration is complete.
3. Use the calibration parameters to generate the model. The dimensions need to fit within a 118mm diameter circle, the base plate thickness is 0.2, and the rest can be set according to your needs.
4. Use Bambu Lab's colored lithophane generator to generate the lithophane model and cut out the lithophane part (using Lithophanemaker's colored lithophane generator should also work). After exporting as STL, combine it as a component with the stacked color parts to form the colored lithophane model.


 或者你也可以购买这个组合套装
 非必要 透明层可以用滴胶或者透明filament(透明filament我没打印过,但是你们可以试试)
 必须注意的是,Type-C接口必须是上面的带壳子的,不带壳子的还在研究。此外LED控制板可能和我买的不一样,我购买了灯板套装和灯带套装,因为灯板比较方便所以我把灯带套装的灯板用灯板套装的替换了,这两个套装的LED控制板尺寸是完全不一样的,所以print profile里带元件槽的并不一定适用于所有LED控制板。锂电池我用的是602040的,厚度小于6mm都可以用,就是可能用不了带元件槽的。
 可以看到我的控制板比商家预览图里的控制板要大。
左灯板套装,右灯带套装
可以看到我的控制板比商家预览图里的控制板要大。
左灯板套装,右灯带套装

 组装接线如图,Type-C口可能有点难塞。固定元件则使用热熔胶或者胶水。如果你有想更换彩色透光浮雕的需求可以不用胶水粘住上盖,

 彩色透光浮雕的格式如下:
Lumina Studio彩色透光浮雕:底层0.2mm白色+0.4mm4色五层叠色层(Lumina叠色格式 层高0.08)+1.6mm浮雕层
Bambu Lab彩色透光浮雕:底层0.2mm白色+0.7mm4色七层叠色层+1.6mm浮雕层
模型尺寸需要可以被放置于直径118mm的圆内。
1.6mm的浮雕层我是从Bambu Lab彩色透光浮雕生成器生成的模型上切下来的(高度0.9的位置切)
制作好彩色透光浮雕后,根据你的喜好和print profile里的部件进行组合就可以得到上盖部分了。
因为Bambu Lab的彩色透光浮雕比Lumina Studio的厚0.2mm且叠色层高是0.1,所有两者制作时略有区别需要注意。具体看我的示例print profile的描述。
正面朝上透明层用滴胶的模型打印完需要和彩色透光浮雕固定板一起被滴胶固定(注意滴胶别倒太多了溢出来)
验证过的模型:
彩色透光浮雕的格式如下:
Lumina Studio彩色透光浮雕:底层0.2mm白色+0.4mm4色五层叠色层(Lumina叠色格式 层高0.08)+1.6mm浮雕层
Bambu Lab彩色透光浮雕:底层0.2mm白色+0.7mm4色七层叠色层+1.6mm浮雕层
模型尺寸需要可以被放置于直径118mm的圆内。
1.6mm的浮雕层我是从Bambu Lab彩色透光浮雕生成器生成的模型上切下来的(高度0.9的位置切)
制作好彩色透光浮雕后,根据你的喜好和print profile里的部件进行组合就可以得到上盖部分了。
因为Bambu Lab的彩色透光浮雕比Lumina Studio的厚0.2mm且叠色层高是0.1,所有两者制作时略有区别需要注意。具体看我的示例print profile的描述。
正面朝上透明层用滴胶的模型打印完需要和彩色透光浮雕固定板一起被滴胶固定(注意滴胶别倒太多了溢出来)
验证过的模型:


Comment & Rating (0)