3D Scanning Target


Print Profile(1)
Description
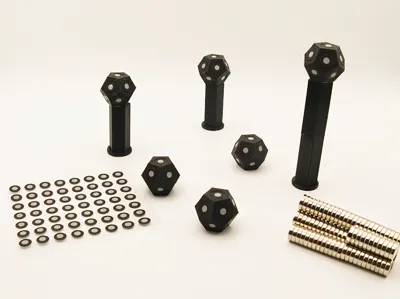
Modular Magnetic 3D Scanning Target System
Upgrade your 3D scanning workflow with this fully modular, magnetic marker system! Designed for precision and ease of use, these parts allow you to elevate your scanning game—literally.
Why you’ll love this system:
- Snap-and-Go: Every component (Base, Extension, and Marker) features integrated pockets for 8×2 mm neodymium magnets. No more fumbling with threaded parts; just snap them together and start scanning!
- Fully Modular: Use the Base standalone for low-profile tracking, or add the Extension to raise your markers. This is perfect for capturing complex geometries where line-of-sight is an issue.
- Precision Fit: Specifically designed for standard 6 mm adhesive scanning dots.
- Stable & Secure: The magnetic connection is strong enough to hold during a scan but allows for effortless teardown or reconfiguration.
Technical Specs & Assembly:
- Magnet Size: 8 mm (Diameter)×2 mm (Thickness). https://www.amazon.de/dp/B0FK5F4KVD?ref=ppx_yo2ov_dt_b_fed_asin_title&th=1
- Target Size: Optimized for 6 mm retro-reflective stickers. https://www.amazon.de/dp/B0DT49QM4G?ref=ppx_yo2ov_dt_b_fed_asin_title
- Assembly: A drop of superglue is recommended to secure the magnets permanently. Pro Tip: Make sure to align the polarities so all your bases and extensions are cross-compatible!
Print Settings:
I’ve optimized these for quick printing and durability. No supports needed!
- Material: PLA or PETG.
- Layer Height: 0.16 mm - 0.2 mm.
- Infill: 15-20% (Grid or Gyroid).
⚠️ Critical: Magnet Polarity & Assembly Tool
To make this system fully modular and "hot-swappable," you must align the magnets correctly during assembly. To make this foolproof, I have designed a dedicated Magnet Alignment Tool which you can find here: https://makerworld.com/de/models/578136-magnet-insertion-tool#profileId-498839
This tool allows you to pick up and press the magnets with the correct orientation every time. Use the Tool to insert the magnets as follows:
Polarity Guide:
For everything to snap together perfectly, follow this setup:
- The Marker: Insert the magnet using the South (S) side of the tool.
- The Base:
- Bottom (Foot): Insert the magnet using the South (S) side of the tool.
- Top (Head): Insert the magnet using the North (N) side of the tool.
- The Extension:
- Insert one end using the North (N) side and the other end using the South (S) side of the tool.
Pro Tip: Use my Alignment Tool to double-check before the glue sets! If you follow this standard, all your markers, bases, and extensions will be 100% interchangeable.
Summary of the Build
- Magnets: 8×2 mm Neodymium.
- Markers: 6 mm adhesive dots.
- Logic: Snap-fit magnetic modularity.
Happy Printing and Precision Scanning! Don't forget to download the alignment tool first to save yourself a headache!
Download now and make your 3D scanning process faster and more professional! If you like the design, please leave a ⭐⭐⭐⭐⭐ rating and share your makes—I’d love to see these in your scanning setups!
Boost Me (for free)
Like my designs? Give them a boost! Your support helps me create even more amazing 3D printable models. Thank you very much!
License
You shall not share, sub-license, sell, rent, host, transfer, or distribute in any way the digital or 3D printed versions of this object, nor any other derivative work of this object in its digital or physical format (including - but not limited to - remixes of this object, and hosting on other digital platforms). The objects may not be used without permission in any way whatsoever in which you charge money, or collect fees.
Comment & Rating (0)