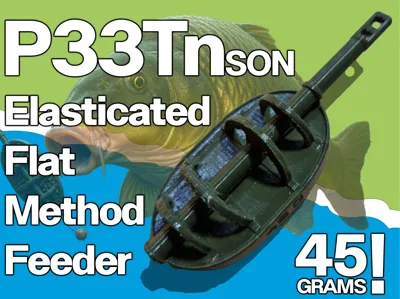
PeeTnson Elasticated Flat Method Feeder


Print Profile(1)
Description
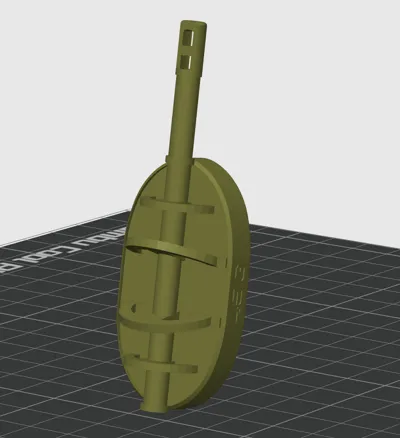
I proudly present: My version of the “Preston Elasticated Flat Method Feeder”.
Method feeder fishing, popular among both carp and coarse anglers, offers exceptional bait presentation by concealing the hookbait directly within a pile of feed (pellets or groundbait). Utilizing a short hooklink, this method is largely self-hooking, while specialized elasticated feeders act as a shock absorber to prevent fish from throwing the hook. The flat-bottomed design ensures the feeder always lands correctly on the lakebed, offering precise casting and maximum efficiency for anglers of all levels.
My buddies and I love method feeder fishing in the summer, and we always use the Elasticated Flat Method Feeder from Preston. However, since you lose them or suffer line breaks more often than you’d like—and they aren't exactly cheap—I decided to put my FreeCAD/Blender skills to the test. My goal was to create a version that matches the original Preston design as closely as possible!
The only changes I made were to ensure the feeder is stronger and optimized for 3D printing. The best part? It fits perfectly into the original 'Preston Large Method Mould', so you can use it exactly like the original ones!"


I’ve been looking for a good method feeder STL file for a while, but none of them were quite right. Often the weight distribution was off, or it was simply impossible to add any weight at all.
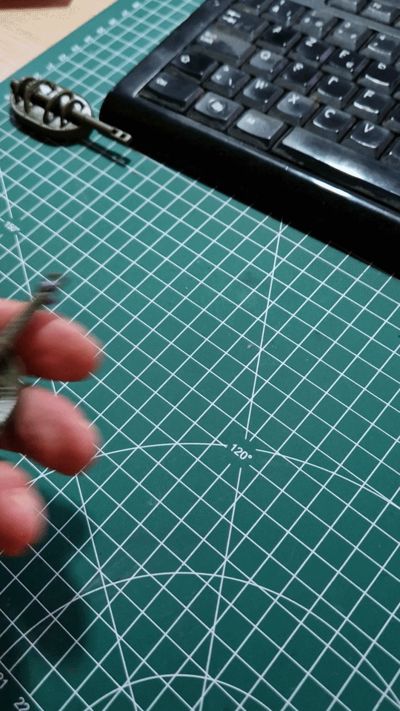
To solve this, I came up with the idea to incorporate strips of roof lead into the print. I still had a large roll lying around from a home renovation. The strips are 1.5mm thick and easily cut with a Stanley knife. You will need three strips to reach a weight of around 42-45 grams. (I’ve added a 'lead fit model' to make it easy to cut the strips to the correct size).
Printing details:
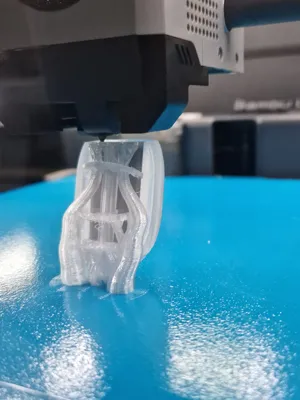
Bambu Studio might report that the model is "not manifold". This is intentional and due to the internal slots designed for the lead strips. Do not use the "fix model" or "make manifold" option, as this will close the slot and make it impossible to insert the weights. The feeder prints perfectly as is!
The feeder is printed vertically at a slight angle for the best quality and strength. I’ve programmed a pause at the layer 279 where you need to insert the lead strips (piggy bank-style! 👇). As you can see in the photos, I used transparent filament for demonstration purposes.
After inserting the lead, the print resumes and seals them inside.
(Note: Please ensure the lead strips are perfectly flush within the model before resuming. I am not responsible for any damage to your printer if they are sticking out!)


I have added manual supports where needed to ensure good adhesion, so the model won't move while you are inserting the lead strips. Don't worry—these are designed to be easily removed afterwards! Of course, it's always best to give your print bed a good clean beforehand to ensure maximum grip.
Finishing touches:
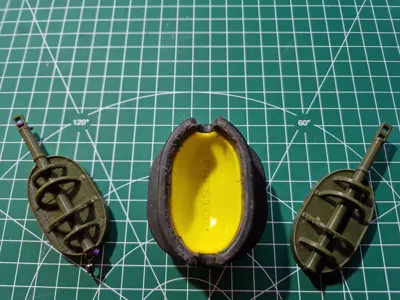
For the best results, I recommend using an Olive Green PETG to match the original look. Then, simply tie in a swivel and a strong fishing elastic just like the original, and you’re ready to catch some carp! 😉🎣

A lot of trial & Error & “back to the drawing board -moments” have gone into this fellow. So please show a little appreciation with a nice message, a picture of your print, a like, or maybe even a little Boost to keep me going! 😅
Happy Hunting!
License
You shall not share, sub-license, sell, rent, host, transfer, or distribute in any way the digital or 3D printed versions of this object, nor any other derivative work of this object in its digital or physical format (including - but not limited to - remixes of this object, and hosting on other digital platforms). The objects may not be used without permission in any way whatsoever in which you charge money, or collect fees.
Comment & Rating (1)