Stepped Wedge 1–13 mm (Adjustment Wedge / Leveling Wedge)


Print Profile(1)
Description
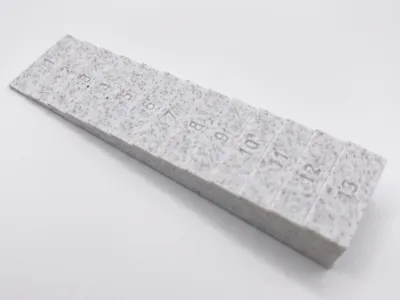
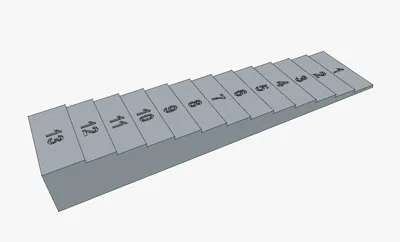
1–13 mm Stepped Wedge (Adjustment Wedge / Leveling Wedge) with Engraved Measurements
Short Description Practical and precise stepped wedge (also ideal as an adjustment block, leveling wedge, or shim) with 13 exact steps from 1 mm to 13 mm in height. Each step is centered with the corresponding millimeter number (Arial Bold, 4 mm font height). The engraving depth is 0.4 mm – with a clever exception for the 1 mm step: Here, the engraving is only 0.2 mm deep so that the bottom remains stable and isn't printed right through.
Perfect for the workshop and DIY projects:
- As a measuring aid and setup tool
- For parallel alignment and shimming of workpieces (e.g., when flattening with a router sled)
- For calibrating distances and gap sizes
- As a height gauge for saw blades or routers
📐 Dimensions & Proportions
- Length: 100 mm
- Width: 25 mm
- Height: 1–13 mm (in exact 1 mm increments)
- Step depth/width: 7.5 mm per step (the top step offers 10 mm of surface area)
⚙️ Recommended Print Settings The model is optimized for easy printing without supports (simply print lying flat on its bottom).
- Nozzle: 0.4 mm
- Layer height: 0.2 mm (Important: For the 1 mm step, you must choose 0.2 mm or finer, as an engraving depth of 0.2 mm leaves exactly one solid bottom layer!)
- Wall lines (Perimeters): 4
- Infill: 30 % (Cubic or another stable pattern is perfectly sufficient)
- Supports: Not needed!
- Material: PLA, PETG, ASA, or ABS – all work flawlessly.
💡 Tips for Engraving & Readability The font depth was specifically tailored to typical FDM tolerances (minimum line width ≥ 0.8 mm). With extremely fine nozzles (e.g., 0.2 mm), the text will turn out even sharper. Pro-Tip: If you choose a light-colored filament and later fill in the recessed engraving with a fine dark marker, you get an extremely strong contrast and perfectly readable numbers!
License
You shall not share, sub-license, sell, rent, host, transfer, or distribute in any way the digital or 3D printed versions of this object, nor any other derivative work of this object in its digital or physical format (including, but not limited to, publishing derivative works outside the Makerworld platform or hosting on other digital platforms). The objects may not be used without permission in any way whatsoever in which you charge money or collect fees. Subject to the above restrictions, derivative works may be published only within the Makerworld platform, and all such derivative works must be licensed under the same SDFL‑C license, without modification or additional terms. You may download the digital versions of this object, 3D print it, and display images, videos, or usage demonstrations of 3D printed versions of the object on personal social media platforms or Makerworld official channels, provided that no digital versions of the object are shared or distributed.
Comment & Rating (8)