UV-VIS-NIR Spectrometer v1.5 (Easy build)


Print Profile(1)
Bill of Materials

- Low-Wattage CFL bulb for calibration x 1: Sourced wherever you can still find CFL bulbs. Lowest wattage you can find should be more than enough.
- Safety Razor Blade Refills x 1: Sourced from Amazon or local store
- DVD-R (unused), no label/writing x 1: Sourced from Amazon
- M12 3.6mm 1/2.5" IR lens x 1: Sourced from Amazon
- Arducam 120fps Mono Global Shutter USB Camera Module, 800P x 1: Sourced from Amazon for under $40. MUST be monochrome.
Description
Backstory
I started working on this in 2020. I like studying light. I've used industrial/commercial spectrometers and was fascinated by them. Unfortunately, these spectrometers are insanely expensive and out of the reach for most hobbyists. So, I set out designing my own. I found a lot of DIY versions on the Internet. None of them suited my needs. They were just hacked together simple classroom demonstrations.
After six years, 4 major versions and literally hundreds of iterations, I'm finally able to release my final version 1.5 of this spectrometer. I included a picture of v 1.0 (gray plastic wrapped in aluminum tape) for comparison.
Capabilities & How Does This Work?
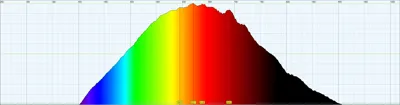
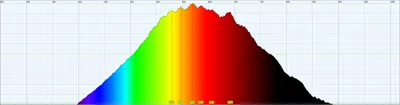
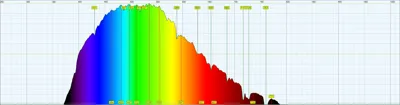
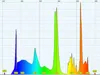
This spectrometer obviously has limitations, but for many hobbyists, it is quite capable. The performance of the spectrometer will depend on how well you build it, your 3D printer's accuracy, the USB webcam sensor you use, and the lens used on the webcam. It is good enough to measure bright light sources. It is capable of performing absorption spectroscopy. Unfortunately, it is not sensitive enough to work well with fluorescence spectroscopy.
- Spectrum Width: ~300nm - 1000nm (at the extremes, the sensor's lack of sensitivity in these regions has the largest effect)
- Spectral Resolution: 1nm - 2nm
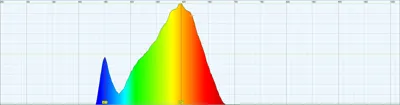
A spectrometer typically requires collimated light to hit a grating at a specific angle. This design uses a longer light path with apertures and light baffles to imitate a crude collimating light system. This results in a significant loss of light and therefore sensitivity/efficiency. This design uses a DVD-R inner surface as a 1,350 lined transmission grating. Since the material is polcycarbonate, yes, you will most likely notice a stray reading in the IR when measuring UV light sources. It is designed to be used with a Toslink fiber optic cable, but you can just point the aperture opening at light sources and it will still work.
This build uses the Theremino Spectrometer software: https://www-theremino-com.translate.goog/downloads/automation?_x_tr_sl=auto&_x_tr_tl=en&_x_tr_hl=en-US#spectrometer
Material
I didn't know this before starting this endeavor, but most 3D printing plastics are transparent to IR light. If you plan to use this outside or near a window where sunlight comes through, this is extremely important to know. This build uses black PETG-CF. The black pigment helps block IR light. The CF in the material also further blocks IR light. This build is essentially a light-tight and light-blocking enclosure.
Printing Parameters
You want this thing to be as solid as possible. Support is not required. The square hole for the Toslink keystone should fit though it might be tight. If you want support there, I recommend the normal support (not tree) and “snug” type. I also recommend you put support blockers on the small apertures in the light baffles as it is not needed and will most likely just waste time and lead to a possible failure.
- 4-5 perimeters/walls
- 20% Gyroid infill
- 6 top and bottom layers
Things You'll Need
There are some extras you'll have to purchase separately to make this work.
- Safety Razor Blades (these are extremely thin and sharp, used to make the slit)
- DVD-R, no label/lettering (used for the transmission grating)
- Monochrome USB webcam - at least 1,280 horizontal pixels
- Webcam must be monochrome - this gives you the best sensitivity on every pixel to UV and IR
- Most monochrome webcams also come without a UV/IR cut filter which is essential to this build
- M12 thread 3.6mm 1/2.5" IR lens
- This is what this build is designed around. Test whatever lens your webcam comes with to see if it works. Otherwise, try and find this replacement lens
- Must not have a UV/IR filter in it - most of these lenses have an “IR” label on them
- Mussou Black Matte Paint (optional, but recommended)
- Used to paint the interior surfaces to reduce internal reflections
- You can see in the pictures I uploaded how much darker the painted surfaces are compared to the already matte black PETG-CF material
- You get the best results when airbrushed in multiple thin coats
- Toslink Fiber Optic Cable
- Standard cheap ones are often times made out of PMMA plastic material. The plastic sometimes fluoresces and/or blocks some UV and it also heavily attenuates light around 710nm - 760nm.
- For better measurement of UV and NIR, you'll want to find a Toslink fiber cable made from GLASS strands.
- CFL Fluorescent light bulb for calibration - low wattage
Build Instructions
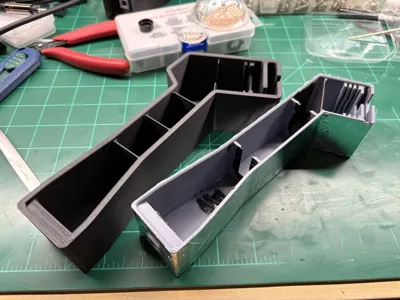
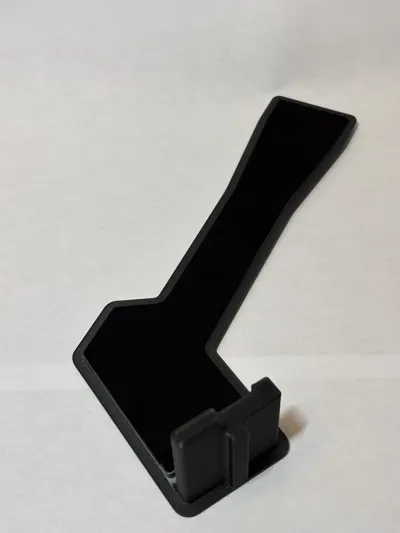
- Print the body and lid out of PETG-CF
- Print the Toslink keystone pieces are a lower layer height in a vertical orientation
- Glue in the Toslink keystone (note orientation)
- (Optional) Mask off non-interior surfaces and paint with Mussou black matte paint
- Prepare DVD-R transmission grating - try not to touch the area you'll be cutting out as best you can
- Use a sharp razor blade or knife and separate the two halves of a DVD-R. It is tricky, but take your time. Multiple scoring in the same spot will help you get it started separating.
- Try and peel the two halves apart in one go - don't stop.
- Cut out a 39mmx39mm square, trying to remember which side is the inner, grating surface
- Use some rubbing alcohol and pour/dribble onto the inner surface to remove the dye.
- Rinse well with water and use some sort of fan or forced-air blower to dry the plastic - DO NOT USE ANYTHING TO TOUCH THE SURFACE IN AN ATTEMPT TO DRY IT - you will damage the grating surface
- Glue in the grating with the grating facing away from the webcam - DO NOT USE SUPERGLUE/CA. It will fog the plastic.
- Prepare the razor blade slit
- Cut off the end tabs of the razor blade so they separate into two halves
- Glue them on the front interior, right after the Toslink keystone.
- Try to center the slit the best you can on the aperture from the Toslkink keystone. Having a bright light surface on the other side helps see the aperture more clearly.
- The slit should be no thicker than a single sheet of paper
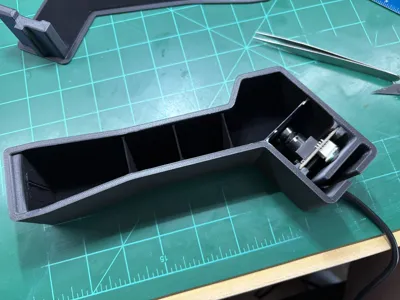
- Prepare the webcam
- You can prefocus the webcam by watching the feed and focusing the lens until objects 20-30ft away are in crisp focus. Collimated light is “at infinity”, so you need to focus “at infinity.”
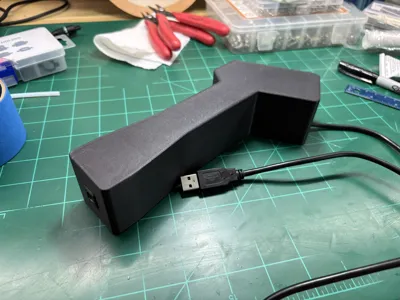
- Insert the webcam into the body with the USB plug at the top
- Route the USB wire and press to the bottom of the enclosure
Calibration
This is where the CFL bulb comes into play.
Follow the guidance from Theremino for calibrating your spectrometer with their software: https://www.theremino.com/wp-content/uploads/files/Theremino_Spectrometer_Help_ENG.pdf
Still to Come
- Design SMA 905 keystone for those that want to use actual fiber cables for spectrometers ($$$)
- Design a plano-convex light capture apparatus
- Design cuvette analyzer setup for fluorescences and absorption spectroscopy
- Design v 2.0 and v 3.0 spectrometers for increased sensitivity and resolution
License
You shall not share, sub-license, sell, rent, host, transfer, or distribute in any way the digital or 3D printed versions of this object, nor any other derivative work of this object in its digital or physical format (including - but not limited to - remixes of this object, and hosting on other digital platforms). The objects may not be used without permission in any way whatsoever in which you charge money, or collect fees.
Comment & Rating (0)