Raspberry PI4 Nas


Print Profile(2)

Description
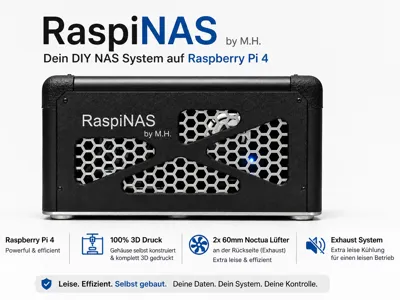
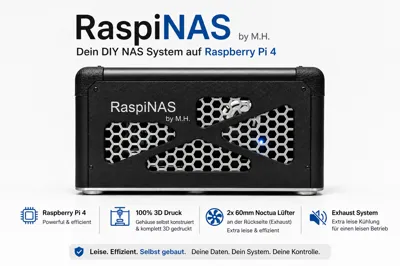
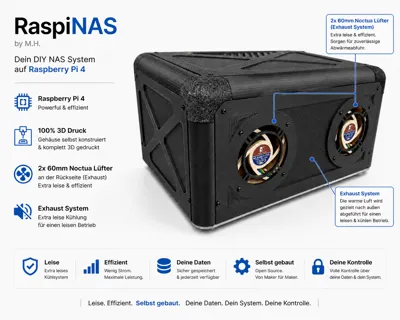
🚀 RaspiNAS by M.H. – The Modular High-End DIY NAS
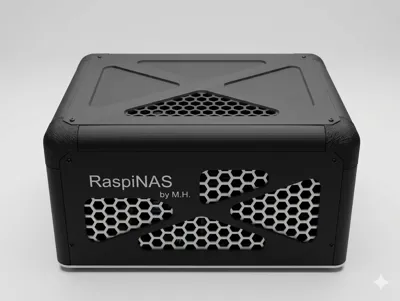
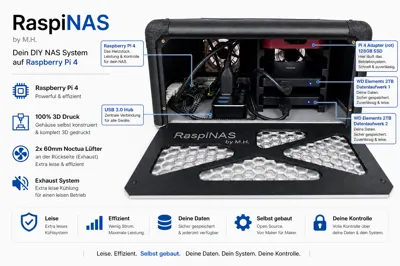
The RaspiNAS is a custom-made case for your Raspberry Pi home lab. It combines a modern hexagonal design with maximum ease of maintenance and is designed for reliable 24/7 continuous operation
✨ Highlights & Features
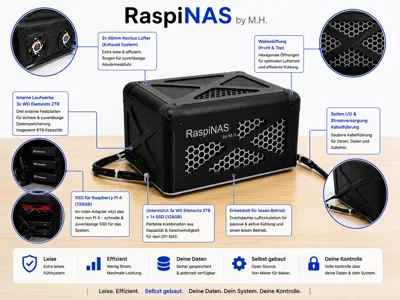
- Maintenance Highlight (Toolless Base): The base is plugged in and can be detached from the frame without tools. You can easily pull out the entire base unit including the Raspberry Pi
- Smart Fan Control: Includes Python script for dynamic PWM control of Noctua fans based on CPU- and HDD temperature
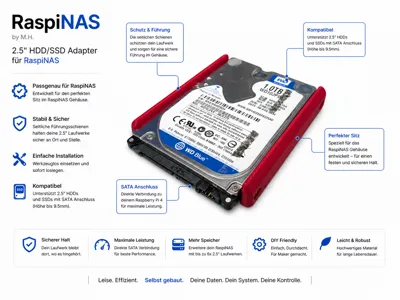
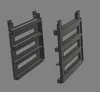
- Custom-Made HDD Rack: Precisely fitted for the WD Elements 2TB and an SSK 128GB SSD (for the operating system)
- Fully Modular Design: All side panels (3mm wall thickness) and the lid are individually removable
- Smart Assembly: Optimized for M2 heat-set inserts, which can be easily pressed in due to precise fit
🛠 Hardware BOM
- Screws: M2 x 6mm round head (uniform for the entire case)
- Nuts: M2 heat-set inserts (are pressed into the frame)
- Controller: Raspberry Pi 4 or 5
- Fans: 2x Noctua NF-A6x25 5V PWM (60mm)
- USB Hub: Active USB hub (e.g., RSHTECH RSH-516)
- Storage: SSD boot for the OS recommended (SSK 128GB) + mass storage (WD Elements)
- Also 2.5'' HDD or SSD easy to mount via adapter rail with M3x 4 hex screws
🖥️ Software Setup & Fan Script
For perfect operation, I use:
- OS: OpenMediaVault (OMV) for file management
- Remote Access: Tailscale for secure access without port forwarding
- Mobile App: Owlfiles for access via smartphone
The Fan Control:
- Logic: The fans react to both the CPU and the HDDs
- Levels: 30% continuous operation (Silent), 60% from 55°C, and 100% Full Power from 62°C
- Kickstart: Guarantees a safe startup of the fans from a standstill
💻 Smart Fan Control (DIY Setup)
- Since MakerWorld does not allow scripts to be downloaded, here you will find the code for automatic PWM control. The script ensures that the Noctua fans remain whisper-quiet and only spin up when the CPU or hard drives really need it
1. Installation
- Make sure that the required tools are installed on your Raspberry Pi:
- sudo apt update
sudo apt install pigpio smartmontools
sudo systemctl enable pigpiod
sudo systemctl start pigpiod 2. Create the script
Create a file named nano fan_control.py and copy this code into it:
- #!/usr/bin/env python3
import time
import pigpio
import subprocess - # --- Configuration ---
PIN = 18 # GPIO18 = Pin 12
PWM_HZ = 25000 # 25kHz
INTERVAL = 3 # Measurement interval - # Levels in percent
Dauerbetrieb = 30
SILENT_PCT = 60
FULL_PCT = 100 - # Temperature thresholds
T_SILENT_ON = 55.0
T_SILENT_OFF = 50.0
T_FULL_ON = 62.0
T_FULL_OFF = 59.0 - def temp_c():
with open("/sys/class/thermal/thermal_zone0/temp", "r") as f:
return int(f.read().strip()) / 1000.0 - def get_max_hdd_temp():
temps = []
for drive in ['sda', 'sdb', 'sdc']:
try:
cmd = f"sudo smartctl -A -n standby /dev/{drive} | grep -i Temperature_Celsius"
output = subprocess.check_output(cmd, shell=True, encoding="utf-8")
temps.append(float(output.split()[9]))
except:
continue
return max(temps) if temps else 0 - def main():
pi = pigpio.pi()
pi.set_mode(PIN, pigpio.OUTPUT)
pi.set_PWM_frequency(PIN, PWM_HZ)
state = Dauerbetrieb
try:
while True:
t = max(temp_c(), get_max_hdd_temp() + 10) # HDD gets 10°C bonus
if state == Dauerbetrieb and t >= T_SILENT_ON: state = SILENT_PCT
elif state == SILENT_PCT and t >= T_FULL_ON: state = FULL_PCT
elif state == FULL_PCT and t <= T_FULL_OFF: state = SILENT_PCT
elif t <= T_SILENT_OFF: state = Dauerbetrieb
pi.set_PWM_dutycycle(PIN, round(state * 255 / 100))
time.sleep(INTERVAL)
except KeyboardInterrupt:
pi.set_PWM_dutycycle(PIN, 0)
pi.stop() - if __name__ == "__main__":
main()
🖨 Printing Notes
- Material: PLA or PETG
- Infill: 20% (Gyroid recommended)
- Assembly: Firmly press the M2 nuts into the designated openings. If they fit loosely, a tiny dot of superglue helps
Enjoy building it! I'm thrilled about your makes and photos!
License
You shall not share, sub-license, sell, rent, host, transfer, or distribute in any way the digital or 3D printed versions of this object, nor any other derivative work of this object in its digital or physical format (including - but not limited to - remixes of this object, and hosting on other digital platforms). The objects may not be used without permission in any way whatsoever in which you charge money, or collect fees.
Comment & Rating (5)