11-Key Programmable MacroPad/Stream Deck


Print Profile(1)


Description
11-Key Programmable MacroPad / Stream Deck
Description
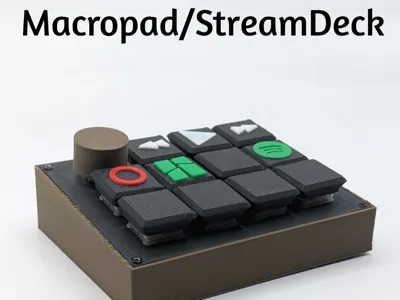
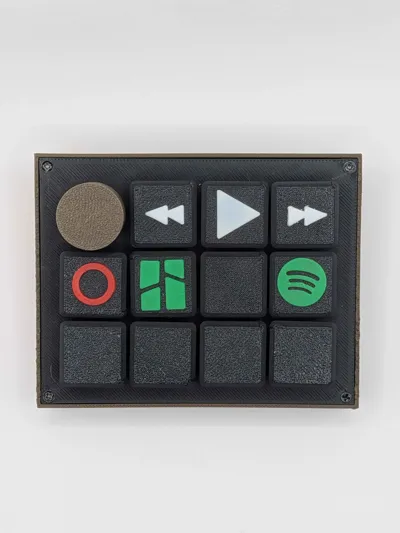
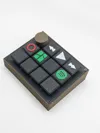
3D printable enclosure for a custom handwired macropad. The layout features 11 slots for standard Cherry MX mechanical switches and one slot for a linear potentiometer.
It is dimensioned to house an Arduino Pro Micro or similarly sized microcontroller. The top plate and bottom case are assembled using four M2.5 screws.
If you have any recommendations feel free to leave it in the comment.
Material
- 1x Arduino Pro Micro
- 11x keyboard switches (any standard Cherry MX style switch will work)
- 11x Keycaps (mine are 3D printed, found on the internet)
- 1x Linear Potentiometer (mine is a B10k)
- 4x M2.5 Screws
- Basic soldering equipment : soldering iron, tin, electrical wire (ex : AWG 24), wire stripper
Instructions
Prepare the plate: Insert the 11 switches and the potentiometer into the top 3D-printed plate from the top. Press firmly until you hear them click into place.
Soldering the switches and the potentiometer: Following the wiring diagram provided in the image below, solder the switches and the potentiometer together.

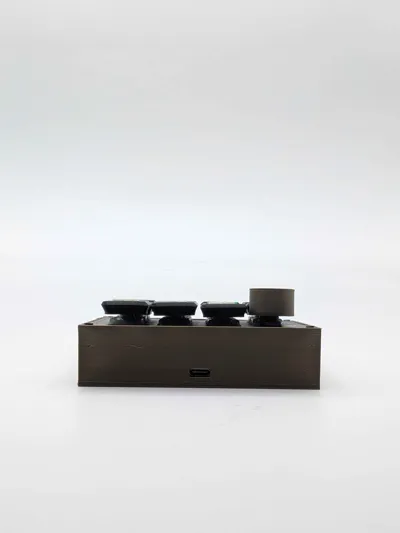
Install the microcontroller: Slide the Arduino Pro Micro into its dedicated slot in the bottom printed part. Make sure the USB port aligns perfectly with the cutout.
Wiring to the Arduino: Solder the wires coming from your switches and potentiometer to the corresponding pins on the Arduino Pro Micro, as shown in the wiring diagram.
Assembly: Place the top plate onto the bottom part and secure them together using the screws.
Add your keycaps to the switches and the knob to your potentiometer.
Code
You will need to download the Arduino IDE.
Then you have to download the HID-Project library by going : Sketch (top bar) > Include Library > Manage Libraries then search “HID-Project” by NicoHood
Here is a code example of what you can do, you are free to adapt it to your needs :
#include <HID-Project.h>
// ========================================================================= // KEYBOARD LAYOUT CONFIGURATION // ========================================================================= // By default, the Arduino types as a QWERTY keyboard. // If your computer is set to AZERTY, remove the "//" on the line below:
// #define USE_AZERTY
// ========================================================================= // 1. HELPER FUNCTIONS // =========================================================================
// --- KEYBOARD LAYOUT CONVERSION (AZERTY TO QWERTY) --- String azertyToQwerty(String text) { String qwerty = "=qwertyuiopasdfghjkl;zxcvbnQWERTYUIOPASDFGHJKL:ZXCVBNm,./M<>?1234567890!@#$%^&*()"; String azerty = "=azertyuiopqsdfghjklmwxcvbnAZERTYUIOPQSDFGHJKLMWXCVBN,;:!?./ & (- 1234567890"; String str = "";
for (uint16_t i = 0; i < text.length(); i++) { int idx = azerty.indexOf(text[i]); str += (idx >= 0) ? qwerty[idx] : text[i]; } return str; }
// --- UNIVERSAL TYPING FUNCTION --- // Automatically handles the layout based on the configuration above void typeString(String text) { #ifdef USE_AZERTY Keyboard.print(azertyToQwerty(text)); #else Keyboard.print(text); #endif }
// --- ACTION: LAUNCH APP VIA WINDOWS RUN (Win + R) --- void launchApp(String command) { Keyboard.press(KEY_LEFT_GUI); // Press Windows key Keyboard.press('r'); // Press 'R' delay(30); Keyboard.releaseAll();
delay(150); // Wait for the "Run" window to open
typeString(command); // Type the command/path Keyboard.write(KEY_RETURN); // Press Enter
delay(400); // Cooldown to prevent spamming }
// --- ACTION: TYPE A MACRO (TEXT) --- void typeTextMacro(String text) { typeString(text); delay(200); }
// --- ACTION: MEDIA CONTROL --- void sendMediaKey(uint16_t mediaKey) { Consumer.write(mediaKey); delay(200); }
// ========================================================================= // 2. PIN DEFINITIONS & STATE VARIABLES // =========================================================================
// Media pins const int PIN_PREV = 6; bool lastPrev = HIGH;
const int PIN_PLAY_PAUSE = 9; bool lastPlay = HIGH;
const int PIN_NEXT = 15; bool lastNext = HIGH;
// App launchers pins const int PIN_APP_SPOTIFY = 14; bool lastAppSpotify = HIGH;
const int PIN_APP_FUSION = 8; bool lastAppFusion = HIGH;
// Shortcuts & Macros pins const int PIN_SHORTCUT_COPY = 5; bool lastShortcutCopy = HIGH;
const int PIN_MACRO_TEXT = 3; bool lastMacroText = HIGH;
// Potentiometer (Volume) const int PIN_POTENTIOMETER = A0; int lastVolume = 0;
// ========================================================================= // 3. SETUP // =========================================================================
void setup() { // Initialize buttons with internal pull-up resistors pinMode(PIN_PREV, INPUT_PULLUP); pinMode(PIN_PLAY_PAUSE, INPUT_PULLUP); pinMode(PIN_NEXT, INPUT_PULLUP); pinMode(PIN_APP_SPOTIFY, INPUT_PULLUP); pinMode(PIN_APP_FUSION, INPUT_PULLUP); pinMode(PIN_SHORTCUT_COPY, INPUT_PULLUP); pinMode(PIN_MACRO_TEXT, INPUT_PULLUP);
delay(3000); // Safety delay for USB enumeration
// Initialize USB communication Consumer.begin(); Keyboard.begin();
// Read initial volume lastVolume = map(analogRead(PIN_POTENTIOMETER), 0, 1023, 50, 0); }
// ========================================================================= // 4. MAIN LOOP // =========================================================================
void loop() {
// --------------------------------------------------------- // EXAMPLE 1 : MEDIA CONTROLS // --------------------------------------------------------- if (digitalRead(PIN_PREV) == LOW && lastPrev == HIGH) { sendMediaKey(MEDIA_PREVIOUS); } lastPrev = digitalRead(PIN_PREV);
if (digitalRead(PIN_PLAY_PAUSE) == LOW && lastPlay == HIGH) { sendMediaKey(MEDIA_PLAY_PAUSE); } lastPlay = digitalRead(PIN_PLAY_PAUSE);
if (digitalRead(PIN_NEXT) == LOW && lastNext == HIGH) { sendMediaKey(MEDIA_NEXT); } lastNext = digitalRead(PIN_NEXT);
// --------------------------------------------------------- // EXAMPLE 2 : LAUNCH APPLICATIONS (Win + R) // --------------------------------------------------------- if (digitalRead(PIN_APP_SPOTIFY) == LOW && lastAppSpotify == HIGH) { launchApp("spotify"); } lastAppSpotify = digitalRead(PIN_APP_SPOTIFY);
if (digitalRead(PIN_APP_FUSION) == LOW && lastAppFusion == HIGH) { launchApp("path to a .lnk file"); } lastAppFusion = digitalRead(PIN_APP_FUSION);
// --------------------------------------------------------- // EXAMPLE 3 : KEYBOARD SHORTCUTS // --------------------------------------------------------- // Simple shortcut example: Copy (Ctrl + C) on PIN 5 if (digitalRead(PIN_SHORTCUT_COPY) == LOW && lastShortcutCopy == HIGH) {
Keyboard.press(KEY_LEFT_CTRL); // 1. Press and hold Ctrl delay(50); // 2. Give the OS time to register Keyboard.press('c'); // 3. Press 'c' delay(100); // 4. Hold both briefly Keyboard.releaseAll(); // 5. Release everything delay(200); // 6. Cooldown
} lastShortcutCopy = digitalRead(PIN_SHORTCUT_COPY);
// --------------------------------------------------------- // EXAMPLE 4 : TYPE A TEXT MACRO // --------------------------------------------------------- // Text Macro example: Automatically typing an email/password on PIN 3 if (digitalRead(PIN_MACRO_TEXT) == LOW && lastMacroText == HIGH) { typeTextMacro("MyText"); } lastMacroText = digitalRead(PIN_MACRO_TEXT);
// --------------------------------------------------------- // EXAMPLE 5 : ANALOG VOLUME CONTROL // --------------------------------------------------------- int potValue = analogRead(PIN_POTENTIOMETER); int currentVolume = map(potValue, 0, 1023, 50, 0);
if (currentVolume > lastVolume) { for (int i = 0; i < (currentVolume - lastVolume); i++) { Consumer.write(MEDIA_VOLUME_UP); } } else if (currentVolume < lastVolume) { for (int i = 0; i < (lastVolume - currentVolume); i++) { Consumer.write(MEDIA_VOLUME_DOWN); } }
lastVolume = currentVolume;
// Small debounce delay delay(5); } |
License
You shall not share, sub-license, sell, rent, host, transfer, or distribute in any way the digital or 3D printed versions of this object, nor any other derivative work of this object in its digital or physical format (including, but not limited to, publishing derivative works outside the Makerworld platform or hosting on other digital platforms). The objects may not be used without permission in any way whatsoever in which you charge money or collect fees. Subject to the above restrictions, derivative works may be published only within the Makerworld platform, and all such derivative works must be licensed under the same SDFL‑C license, without modification or additional terms. You may download the digital versions of this object, 3D print it, and display images, videos, or usage demonstrations of 3D printed versions of the object on personal social media platforms or Makerworld official channels, provided that no digital versions of the object are shared or distributed.
Comment & Rating (0)