Keychain - Custom Logo SVG - Advanced Tool


Print Profile(1)
Bill of Materials

Description
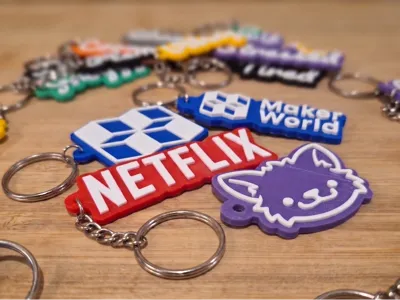
Turn any 2-layer logo into a clean bicolor keychain. Upload two SVGs, tweak the parameters, hit generate.
Perfect for: Business keychains, gifts with custom logos, fan merch, conference giveaways, or just slapping your favorite icon on your keys.
How it works
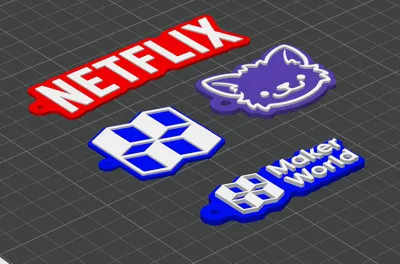
Your logo have to be split into two layers:
- A base layer with a halo border, hook ring, and connecting bridge — printed in color 1
- A top layer with the detail — printed in color 2
Example here with my logo: The color base is BASE LAYER and the details are TOP LAYER


The hook ring auto-places at the middle-left of your logo with a smooth connecting bar, so it looks like one continuous piece (no random floating circle).
What you need to upload
Two SVG files representing the two layers of your logo:
- svg_bottom — silhouette / background (the part that becomes the base color)
- svg_top — detail layer (text, accents, the part that sits on top)
⚠️ Both SVGs must share the same exact size so they line up when stacked.
Easiest method: open your logo in Illustrator, Inkscape, or Figma. Hide one layer → export → unhide it → hide the other → export. Don't change the artboard between exports.
There is also some free tool to vectorize existing images, but you'll still need to get 2 images. https://supersaas.dev/tools/vectorizer
You can try adding the same image twice and play with “Fill Radius” within the margin category
The actual mm size of your SVG doesn't matter, the model auto-scales to the width you set.
What you can customize
| Section | Parameters |
|---|---|
| Logo | Target width (mm), X/Y offset, optional auto-centering |
| Colors | Base color & top color (hex) |
| Thickness | Base layer Z, top layer Z |
| Border | Halo width, internal hole filling, include-top-in-base toggle |
| Hook ring | Outer/inner diameter, auto-position toggle, gap from logo, manual X/Y override, include-in-offset toggle |
| Bridge | Connecting bar width, penetration depth into logo |
Sensible defaults are set. Most users only need to tweak target_width and the two colors.
Print settings
- 2-color print
- 0.2 mm layer height works great; 0.16 mm if your top layer has fine details
- No supports — fully flat design
- 15% infill is plenty, but I recommend to print as 100% filled
- I use PLA, but PETG can wokr as well
Tips for clean results
- Use solid filled paths in your SVGs — no strokes (convert strokes to fills first)
- If your logo has internal counters (insides of O, D, A, B…), bump fill_radius to 1–2 mm so the base stays solid under the top layer
- For thin top-layer features, increase top_thickness to 1.5 mm so they print reliably
- If the connecting bridge looks awkward, tweak hook_gap (distance from logo to ring) and bridge_width
- The ring inherits the halo border by default — the visible outer diameter is hook_outer_d + 2 × offset_val. If the ring looks too chunky, lower hook_outer_d to 4–5 mm
Others
Free to use and share. If you have ideas of improvement, please tell me :)
Built in OpenSCAD. The source doce is currently hidden & I don't allow licensing for commercial use. If you're interested by licensing, please contact me :)
License
You shall not share, sub-license, sell, rent, host, transfer, or distribute in any way the digital or 3D printed versions of this object, nor any other derivative work of this object in its digital or physical format (including - but not limited to - remixes of this object, and hosting on other digital platforms). The objects may not be used without permission in any way whatsoever in which you charge money, or collect fees.
Comment & Rating (0)