Slicer for soaps and candles


Print Profile(1)

Description
Short Description
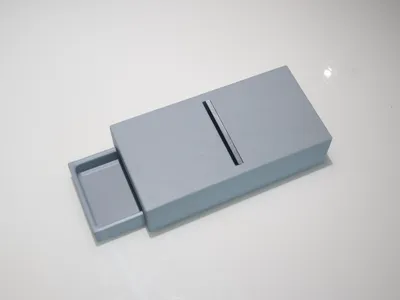
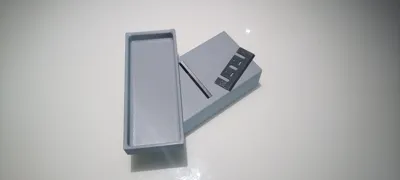
The perfect tool for soap and candle makers. A stationary planer for the 80×29×3 mm blade (from an electric hand planer). The blade is secured with 3 M4 screws into brass heat-set inserts. Level soap, candles, wax, wood, and soft plastics. Includes a removable container for shavings.
📏 Technical Specifications
Planer (Table) Dimensions:
- Tabletop: 200 mm (L) × 100 mm (W)
- Total height: 50 mm
Container Dimensions:
- Length: 198 mm
- Width: 81 mm
- Height: 25 mm
Hardware (not included, purchased separately):
| Part | Size | Quantity |
|---|---|---|
| Countersunk M4 screws | M4 × 10–12 mm | 3 pcs |
| Brass heat-set inserts | M4 × 8 mm (length) × 6 mm (diameter) | 3 pcs |
✅ Compatible blade: 80 × 29 × 3 mm (standard for electric planers F1900B / F20A)
Elektrische Hobelmesser:
🧼 What is this for?
| Material | Application |
|---|---|
| 🧼 Soap | Leveling blocks, chamfering edges |
| 🕯️ Candles / Wax | Leveling bottoms, planing slabs |
| 🌲 Softwood | Model making, small woodworking |
| 🔧 Plastic | Soft plastics (ABS, PP, HDPE) |
The blade is installed edge-up into the table. The workpiece is pushed manually.
🧩 3D Printing Features
1. Completely Support-Free
2. Blade Pocket
- Slot: 80.5 × 29.5 × 3.2 mm
- Blade sits flush with the table surface
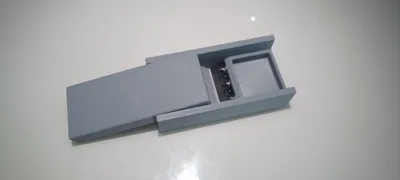
3. Blade Securing — 3× M4 Screws + Brass Inserts
The model includes 3 holes for M4×8×6 mm brass heat-set inserts.
Installation process:
- Heat your soldering iron to ~200–250°C
- Press each insert into the hole
- Let it cool — the insert is now permanently fixed
- Insert the blade and screw in M4 screws
4. Integrated Chip Chute
Shavings fall into the removable container (198×81×25 mm).
🔧 Slicer Recommendations
| Parameter | Value |
|---|---|
| Nozzle | 0.4 mm |
| Layer height | 0.2 mm |
| Infill | 10–25% |
| Walls | 3 perimeters |
| Supports | OFF |
| Material | PETG (recommended) / ABS / ASA |
PETG handles the heat from insert installation better than PLA.
⚙️ Assembly Instructions
| Step | Action |
|---|---|
| 1 | Print the table and container |
| 2 | Install 3 M4×8×6 mm brass inserts using a soldering iron |
| 3 | Insert the blade (80×29×3 mm) — cutting edge UP |
| 4 | Align the blade holes with the table holes |
| 5 | Screw in 3 M4 screws (length ~10–12 mm, countersunk) |
| 6 | Slide the container under the chip chute |
| 7 | Push the soap / candle over the blade |
Safety note:
The blade is sharp! Keep your fingers behind the workpiece.
🛒 Shopping List (not included)
| Part | Size | Where to buy |
|---|---|---|
| Electric planer blade | 80×29×3 mm | AliExpress, Amazon, hardware store |
| Brass heat-set inserts | M4×8×6 mm (3 pcs) | AliExpress, Amazon |
| Countersunk M4 screws | ~10–12 mm (3 pcs) | Any hardware store |
Elektrische Hobelmesser:
License
You shall not share, sub-license, sell, rent, host, transfer, or distribute in any way the digital or 3D printed versions of this object, nor any other derivative work of this object in its digital or physical format (including - but not limited to - remixes of this object, and hosting on other digital platforms). The objects may not be used without permission in any way whatsoever in which you charge money, or collect fees.
Comment & Rating (1)